Forgot your password? You can request a reset link in on the login page.
If you want to associate your account with a different email address, you can do so under User -> Preferences in the top menu bar.
To start over with a new account, delete your existing account(s) first before creating your new account. This can be done in User -> Preferences menu in the top bar.
Changing account email or password
Start at the Galaxy server where you are working. Remember that accounts at different Galaxy servers are distinct.
Log into your account.
Go to User -> Preferences in the masthead (find this on the right, near the top).
Click on Manage Information.
You may change your email address and public name on the form.
Your may also change your password by clicking on Change Password.
When done, click on the Save button at the bottom.
Go to your email account to find the message from us. Verify your account changes by clicking on the activation link. No email? Check your spam and trash folders.
Try logging into Galaxy with your new credentials!
tip Notes
Please do not open a new account if your email changes, instead, update the existing account’s email address.
We cannot merge accounts. Download your data then delete any excess accounts created by accident.
How can I reduce quota usage while still retaining prior work (data, tools, methods)?
Download Datasets as individual files or entire Histories as an archive. Then purge them from the public server.
Transfer/MoveDatasets or Histories to another Galaxy server, including your own Galaxy. Then purge.
Copy your most important Datasets into a new/other History (inputs, results), then purge the original full History.
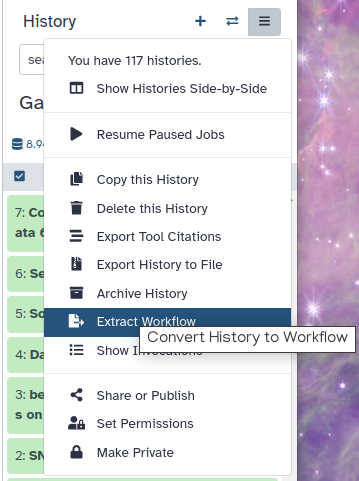
Extract a Workflow from the History, then purge it.
Back-up your work. It is a best practice to download an archive of your FULL original Histories periodically, even those still in use, as a backup.
Resources Much discussion about all of the above options can be found at the Galaxy Help forum.
How do I create an account on a public Galaxy instance?
To create an account at any public Galaxy instance, choose your server from the available list of Galaxy Platforms.
Click on “Login or Register” in the masthead on the server.
On the login page, find the Register here link and click on it.
Fill in the the registration form, then click on Create.
Your account should now get created, but will remain inactive until you verify the email address you provided in the registration form.
Check for a Confirmation Email in the email you used for account creation.
Missing? Check your Trash and Spam folders.
Click on the Email confirmation link to fully activate your account.
galaxy-info Delivery of the confimation email is blocked by your email provider or you mistyped the email address in the registration form?
Please do not register again, but follow the instructions to change the email address registered with your account! The confirmation email will be resent to your new address once you have changed it.
Trouble logging in later? Account email addresses and public names are caSe-sensiTive. Check your activation email for formats.
pref-info Manage Information (change your registered email addresses or public name)
pref-password Change Password (change your login credentials)
pref-permissions Set Dataset Permissions for New Histories (grant others default access to newly created histories)
pref-toolboxfilters Manage Toolbox Filters (customize your Toolbox by displaying or omitting sets of Tools)
pref-apikey Manage API Key (access your current API key or create a new one)
pref-notifications Manage Notifications (allow push and tab notifcations on job completion)
pref-cloud Manage Cloud Authorization (grants Galaxy to access your cloud-based resources)
pref-identities Manage Third-Party Identities (connect or disconnect access to your third-party identities)
pref-custombuilds Manage Custom Builds (custom databases based on fasta datasets)
pref-list Manage Activity Bar (a bonus navigation bar)
pref-palette Pick a Color Theme (interface color theme)
pref-dataprivate Make All Data Private (disable all data sharing)
pref-delete Delete Account (on this Galaxy server)
pref-signout Sign out of Galaxy (signs you out of all sessions)
Log in to Galaxy using Single Sign-on
In the Galaxy login screen, you may find the option to log in with an institutional or other external account. Which options are offered depend on which Galaxy you are using.
In the top menu bar, go to User -> Preferences -> Manage Custom Builds
Create a unique Name for your reference build
Create a unique Database (dbkey) for your reference build
Under Definition, select the option FASTA-file from history
Under FASTA-file, select your fasta file
Click the Save button
Beware of Cuts
Galaxy has several different cut tools
The section below uses Cut tool. There are two cut tools in Galaxy due to historical reasons. This example uses tool with the full name Cut columns from a table. However, the same logic applies to the other tool called Advanced Cut ( Galaxy version 9.5+galaxy0). It simply has a slightly different interface.
Extended Help for Differential Expression Analysis Tools
The error and usage help in this FAQ applies to most if not all Bioconductor tools.
DEseq2
Limma
edgeR
goseq
Diffbind
StringTie
Featurecounts
HTSeq-count
HTseq-clip
Kalisto
Salmon
Sailfish
DEXSeq
DEXSeq-count
IsoformSwitchAnalyzeR
galaxy-info Review your error messages and you’ll find some clues about what may be going wrong and what needs to be adjusted in your rerun. If you are getting a message from R, that usually means the underlying tool could not read in or understand your inputs. This can be a labeling problem (what was typed on the form) or a content problem (data within the files).
Expect odd errors or content problems if any of the usage requirements below are not met.
General
Are your reference genome, reference transcriptome, and reference annotation all based on the same genome assembly?
Check the identifiers in all inputs and adjust as needed.
These all may mean the same thing to a person but not to a computer or tool: chr1, Chr1, 1, chr1.1
The good news is that usage in Galaxy produces the same error messages as direct usage.
This means that a search at the Bioconductor Support website can provide useful clues! Come back to the Galaxy Help forum with any remaining questions.
tip Remember, for any value in your inputs that is not a number, using only alphanumeric characters and optionally underscores _ with no spaces is what the authors recommend. Check your factor names, sample names, gene identifiers, transcript identifiers, and header lines in files.
Reference genome (fasta)
Can be a server reference genome (hosted index in the pull down menu) or a custom reference genome (fasta from the history).
If a GTF dataset is not available for your genome, a two-column tabular dataset containing transcript <tab> gene can be used instead with most of these tools.
HTseq-count requires GTF attributes. Featurecounts is an alternative tool choice.
Sometimes the tool gffread is used to transform GFF3 data to GTF.
DO use UCSC’s reference annotation (GTF) and reference transcriptome (fasta) data from their Downloads area.
These are a match for the UCSC genomes indexed at public Galaxy servers.
Links can be directly copy/pasted into the Upload tool.
Allow Galaxy to autodetect the datatype to produce an uncompressed dataset in your history ready to use with tools.
Avoid GTF data from the UCSC Table Browser: this leads to scientific problems. GTFs will have the same content populated for both the transcript_id and gene_id values. See the note at UCSC for more about why.
Still have problems? Try removing all GTF header lines with the tool Remove beginning of a file.
Note: For questions about errors you’ve encountered in Galaxy, please see our troubleshooting page.
How to ask
The more detail you provide, the better we can help you. Please provide information about:
Your data and experiment e.g. “paired-end RNASeq, mouse, 16 triplicates, 2 timepoints”, etc
Your goal and research question e.g. “I want to detect diffentially expressed genes between these two groups and generate a volcano plot”
What you have already tried? Do you already know which tools you want to use? Did you already try some but they didn’t work? Why not? Did you find good papers describing something similiar to what you want to do? etc.
Which Galaxy are you using? And if you have already tried some steps, please share your Galaxy history via URL and provide this along with your question.
Examples
Bad Question:“Help!!! How to perform metagenomics analysis. I need it urgent!”
Good Question:“Hello everybody, I have 16S rRNA sequencing data from Illumina, it was paired-end with 150bp reads. I want to perform a taxonomy analysis similar to this paper (provide link). I have followed this GTN tutorial (provide link), but my data is different because (reason) . How can I adapt this step of the analysis for my data? I read about a tool called X, but I cannot find it in Galaxy. I am using Galaxy EU, and here is a link to my history. Any help would be greatly appreciated!”
Before you ask
Check the Galaxy Help forum to see if others have already asked a similar question before.
Search the GTN website for a tutorial that matches what you want to do, and work your way through that. Even if it doesn’t doe exactly what you need, you usually learn a lot along the way that will help you adapt it to your own data or research question.
Be patient
Please remember that most of the people answering questions on Matrix chat and the help forum are volunteers from the community. They take time out of their busy days to help you. They may also be in a different time zone, so it may take some time to get answers. Please always be patient and kind to each other, and adhere to our code of conduct.
Merge Reads for Co/Grouped Assembly
How to merge reads from multiple samples for co- or group-assembly
Co-assembly is the process of assembling reads from multiple metagenomic samples together into contigs or genomes (MAGs), instead of assembling each sample individually. If only subsets of samples are assembled together, this can also be referred to as grouped assembly.
In principle, co- or grouped assembly can be performed with any assembler by merging reads from the desired samples before running the assembly.
To simplify this process, we provide the Fastq GroupMerge ( Galaxy version 1.0.1+galaxy0) tool. This tool allows flexible grouping (including multiple groupings) using a simple tabular file, as shown below:
sample
group
reads_A
1
reads_B
1
reads_B
2
reads_C
3
Explanation of the example:
Reads from A and B will be merged into a new synthetic sample called 1.
Reads from B will also be kept individually as sample 2.
Reads from C will remain as sample 3.
The tool supports merging of both single-end and paired-end reads, making it flexible for various sequencing datasets.
My jobs aren't running!
Please make sure you are logged in. At the top menu bar, you should see a section labeled “User”. If you see “Login/Register” here you are not logged in.
Activate your account. If you have recently registered your account, you may first have to activate it. You will receive an e-mail with an activation link.
Make sure to check your spam folder!
Be patient. Galaxy is a free service, when a lot of people are using it, you may have to wait longer than usual (especially for ‘big’ jobs, e.g. alignments).
Contact Support. If you really think something is wrong with the server, you can ask for support
Pick the right Concatenate tool
Most Galaxy servers will have two Concatenate tools installed - know which one to pick!
On most Galaxy servers you will find two toolConcatenate tools installed:
Concatenate multiple datasets or collections (or Concatenate datasets tail-to-head on previous Galaxy versions)
Concatenate datasets tail-to-head (cat)
The two tools have nearly identical interfaces, but behave differently in certain situations, specifically:
The second tool, “Concatenate datasets tail-to-head (cat)”, simply concatenates everything you give to it into a single output dataset.
Whether you give it multiple datasets or a collection as the first parameter, or some datasets as the first and some others as the second parameter, it will always concatenate them all. In fact, the only reason for having multiple parameters for this tool is that by providing inputs through multiple parameters, you can make sure they are concatenated in the order you pass them in.
The first tool (Concatenate multiple datasets or collections), on the other hand, will only ever concatenate inputs provided through different parameters.
This tool allows you to specify an arbitrary number of param-file single datasets, but if you also want to use param-files multiple datasets or param-collection a collection for some of the Dataset parameters, then all of these need to be of the same type (multiple datasets or collections) and have the same number of inputs.
Now depending on the inputs, one of the following behaviors will occur:
If all the different inputs are param-file single datasets, the tool will concatenate them all and produce a single output dataset.
If all the different inputs are specified either as param-files multiple datasets or as param-collection, and all have the same number of datasets, then the tool will concatenate the first datasets of each input parameter, the second datasets of each input parameter, the third, etc., and produce an output collection with as many elements as there are inputs per Dataset parameter.
In extension of the above, if some additional inputs are provided as param-file single datasets, the content of these will be recycled and be reused in the concatenation of all the nth elements of the other parameters.
Reporting usage problems, security issues, and bugs
For reporting Usage Problems, related to tools and functions, head to the Galaxy Help site.
To resolve it you may be asked to send in a shared history link and possibly a shared workflow link. For sharing your history, refer to this these instructions.
Using Galaxy Help is the best way to get help in most cases.
If the problem is more complex, email a description of the problem and how to reproduce it.
Administrative problems:
If the problem is present in your own Galaxy, the administrative configuration may be a factor.
For the fastest help directly from the development community, admin issues can be alternatively reported to the mailing list or the GalaxyProject Gitter channel.
For Security Issues, do not report them via GitHub. Kindly disclose these as explained in this document.
For Bug Reporting, create a Github issue. Include the steps mentioned in these instructions.
Search the GTN Search to find prior Q & A, FAQs, tutorials, and other documentation across all Galaxy resources, to verify in case your issue was already faced by someone.
Results may vary
Your results may be slightly different from the ones presented in this tutorial due to differing versions of tools, reference data, external databases, or because of stochastic processes in the algorithms.
Troubleshooting errors
When you get a red dataset in your history, it means something went wrong. But how can you find out what it was? And how can you report errors?
When something goes wrong in Galaxy, there are a number of things you can do to find out what it was. Error messages can help you figure out whether it was a problem with one of the settings of the tool, or with the input data, or maybe there is a bug in the tool itself and the problem should be reported. Below are the steps you can follow to troubleshoot your Galaxy errors.
Expand the red history dataset by clicking on it.
Sometimes you can already see an error message here
View the error message by clicking on the bug icongalaxy-bug
Check the logs. Output (stdout) and error logs (stderr) of the tool are available:
Expand the history item
Click on the details icon
Scroll down to the Job Information section to view the 2 logs:
Galaxy is a fantastic system, but some users find themselves wondering:
Will my jobs keep running once I’ve closed the tab? Do I need to keep my browser open?
No, you don’t! You can safely:
Start jobs
Shut down your computer
and your jobs will keep running in the background! Whenever you next visit Galaxy, you can check if your jobs are still running or completed.
However, this is not true for uploading data from your computer. You must wait for uploading a dataset from your computer to finish. (Uploading via URL is not affected by this, if you’re uploading from URL you can close your computer.)
Click on the collection in your history to view it
Click on Editgalaxy-pencil next to the collection name at the top of the history panel
Click on Add Tagsgalaxy-tags
Add a tag starting with #
Tags starting with # will be automatically propagated to the outputs any tools using this dataset.
Click Savegalaxy-save
Check that the tag appears below the collection name
Changing the data type of multiple datasets or collections
This will set the data type for multiple datasets, collections, and the datasets therein. Does not change the datasets themselves.
Click on galaxy-selectorSelect Items at the top of the history panel
Check all the datasets and collections in your history you would like to change the data type for
Click n of N selected and choose Change data type
In the drop-down field, select your desired data type
tip: you can start typing the data type into the field to filter the dropdown menu
Click the OK button
Changing the datatype of a collection
This will set the datatype for all files in your collection. Does not change the files themselves.
Click on Editgalaxy-pencil next to the collection name in your history
In the central panel, click on the galaxy-chart-select-dataDatatypes tab on the top
Under new type, select your desired datatype
tip: you can start typing the datatype into the field to filter the dropdown menu
Click the Save button
Cannot find the feature?
If you are on a smaller Galaxy server, i.e. not one of the large (multi)national public servers, you may not be able to find this operation, and there is no indication it is missing or why it is disabled.
This will convert all files in your collection to a different format. This will change the files themselves and create a new collection.
Click on Editgalaxy-pencil next to the collection name in your history
In the central panel, click on the galaxy-gearConvert tab on the top
Under Converter Tool, select your desired conversion
Click the Convert Collection button
Creating a dataset collection
Click on galaxy-selectorSelect Items at the top of the history panel
Check all the datasets in your history you would like to include
Click n of N selected and choose Advanced Build List
You are in collection building wizard. Choose Flat List and click ‘Next’ button at the right bottom corner.
Double clcik on the file names to edit. For example, remove file extensions or common prefix/suffixes to cleanup the names.
Enter a name for your collection
Click Build to build your collection
Click on the checkmark icon at the top of your history again
Creating a dataset collection with autobuild
Click on galaxy-selectorSelect Items at the top of the history panel (letter a)
Check all the datasets in your history you would like to include (letter b)
Click n of N selected (see letter b below) and choose Auto build List
Enter a name for your collection (letter c)
Turn off Remove file extension (letter d)
Click Build to build your collection (letter e)
Click on the checkmark icon at the top of your history again (first letter a)
Once the collection is created, all files turn green. You can limit visible files using the eye icons in the history panel.
Creating a paired collection
Click on galaxy-selectorSelect Items at the top of the history panel
Check all the datasets in your history you would like to include
Click n of N selected and choose Advanced Build List
You are in the collection building wizard. Choose List of Paired Datasets and click ‘Next’ button at the right bottom corner.
Check and configure auto-pairing. Commonly matepairs have suffix _1 and _2 or _R1 and _R2. Click on ‘Next’ at the bottom.
Edit the List Identifier as required.
Enter a name for your collection
Click Build to build your collection
Click on the checkmark icon at the top of your history again
Force a tool to process collection jobs one by one instead of using the collection as input
To map over or not to map over
Galaxy tools can either use a collection as a single input or map over a collection to process each element individually. Whether a collection is consumed as a whole or mapped over depends entirely on how the tool is designed. For example, fastp ( Galaxy version 1.0.1+galaxy3) processes each FASTQ file individually. When you supply a collection to fastp, Galaxy indicates that: The supplied input will be mapped over this tool.
Other tools can process an entire collection at once. For example collection_column_join ( Galaxy version 0.0.3) operates on all files in the collection together.
The catch
Some tools allow a collection as a single input, but you may want them to process each element one-by-one instead. A common example is metaspades ( Galaxy version 4.2.0+galaxy0): If you supply a collection of FASTA files, the tool will treat them as a single dataset and perform co-assembly, which is its default behavior. However, in many workflows you want to assemble each sample individually, not all together.
Because the tool form does not offer an option to switch this behavior, you can force mapping-over by creating a nested list.
Solution - Create a nested collection
Convert your original collection into a collection of collections (list:list:). This forces any tool - including ones that normally process the whole collection - to run on each subcollection individually.
Solution for Galaxy Server with Version > 25.1: Create a nested collection using Nest collection (where available)
Use the Nest collection tool to convert your original collection into a collection of collections.
Solution for Galaxy Server with Version < 25.1 or if nest collection isn’t available: Create a nested collection using APPLY_RULES
Use the Apply rules tool to convert your original collection into a collection of collections.
Open Apply rules
Select your collection
Click Edit
Adding another nesting level to create list:list requires a few changes:
From Column menu select Basename of Path of URL
From Column A
Click Apply This creates a new Column B with the same list identifier as Column A.
From Rules menu select Add / Modify Column Definitions
Click Add Definition button and select List Identifier(s)
“Select a column”: A
“… Assign Another Column”: B
Click Apply
Click Save
Click Run Tool
The rule logic in a workflow editor to follow for paired reads in the Apply rules tool looks like this:
Explanation of why collections are needed and what they are
Datasets versus collections
In Galaxy’s history datasets can be present as individual entries or they can be combined into Collections. Why do we need collections? Collections combine multiple individual datasets into a single entity which is easy to manage. Galaxy tools can use collections directly as inputs. Collection can be simple or nested.
Simple collections
Imagine that you’ve uploaded a hundred FASTQ files corresponding to a hundred samples. These will appear as a hundred individual datasets in your history making it very long. But the chances are that when you analyze these data you will do the same thing on each dataset.
To simplify this process you can combine all hundred datasets into a single entity called a dataset collection (or simply a collection or a list). It will appear as a single box in your history making it much easier to understand. Galaxy tools are designed to take collections as inputs. So, for example, if you want to map each of these datasets against a reference genome using, say, Minimap2, you will need to provide minmap2 with just one input, the collection, and it will automatically start 100 jobs behind the scenes and will combine all outputs into a single collection containing BAM files.
There is a number of situations when simple collections are not sufficient to reflect the complexity of the data. To deal with this situation Galaxy allows for nested collections.
Nested collections
Probably the most common example of this is paired end data when each sample is represented by two files: one containing forward reads and another containing reverse reads. In Galaxy you can create nested collection that reflects the hierarchy of the data. In the case of paired data Galaxy supports paired collections.
This section will guide you through downloading experimental metadata, organizing the metadata to short lists corresponding to conditions and replicates, and finally importing the data from NCBI SRA in collections reflecting the experimental design.
Downloading metadata
It is critical to understand the condition/replicate structure of an experiment before working with the data so that it can be imported as collections ready for analysis. Direct your browser to SRA Run Selector and in the search box enter GEO data set identifier (for example: GSE72018). Once the study appears, click the box to download the “RunInfo Table”.
Organizing metadata
The “RunInfo Table” provides the experimental condition and replicate structure of all of the samples. Prior to importing the data, we need to parse this file into individual files that contain the sample IDs of the replicates in each condition. This can be achieved by using a combination of the ‘group’, ‘compare two datasets’, ‘filter’, and ‘cut’ tools to end up with single column lists of sample IDs (SRRxxxxx) corresponding to each condition.
Importing data
Provide the files with SRR IDs to NCBI SRA Tools (fastq-dump) to import the data from SRA to Galaxy. By organizing the replicates of each condition in separate lists, the data will be imported as “collections” that can be directly loaded to a workflow or analysis pipeline.
Go to UCSC Genome Browser, navigate to “genomes”, then the species of interest.
On the home page for the genome build, immediately under the top navigation box, in the blue bar next to the full genome build name, you will find View sequences button.
Click on the View sequences button and it will take you to a detail page with a table listing out the contents.
Option 2
Use the tool Get Data -> UCSC Main.
In the Table Browser, choose the target genome and build.
For “group” choose the last option “All Tables”.
For “table” choose “chromInfo”.
Leave all other options at default and send the output to Galaxy.
This new dataset will load as a tabular dataset into your history.
It will list out the contents of the genome build, including the chromosome identifiers (in the first column).
How can I upload data using EBI-SRA?
Search for your data directly in the tool and use the Galaxy links.
Be sure to check your sequence data for correct quality score formats and the metadata “datatype” assignment.
Importing data from Sierra LIMS
This section will guide you through generating external links to your data stored in the Sierra LIMS system to be downloaded directly into Galaxy.
Click on the Sample ID of the sample you want to download data from.
Click on the Edit Sample Details button.
At the bottom of the page there will be an input box for creating a link, enter a description for the link in the Reason for link section, and click Create link. This will reload the page and add a new link to the sample under Authorised links to this sample.
Go back to the sample page or click on the hyperlink called link to take you back.
In the Results section select the lane you want to access your data from.
The bottom of the page, under the Links section, will now contain a list of wget commands with links for accessing all the files within that sample/lane.
Since this list is for wget commands, you need to extract out the links from the command. You can copy the link in the first set of double quotes for each line and galaxy-wf-editPaste/Fetch Data them directly into Galaxy to download the files.
Importing data from a data library
As an alternative to uploading the data from a URL or your computer, the files may also have been made available from a shared data library:
Go into Libraries (left panel)
Navigate to the correct folder as indicated by your instructor.
On most Galaxies tutorial data will be provided in a folder named GTN - Material –> Topic Name -> Tutorial Name.
Select the desired files
Click on Add to Historygalaxy-dropdown near the top and select as Datasets from the dropdown menu
In the pop-up window, choose
“Select history”: the history you want to import the data to (or create a new one)
Click on Import
Importing data from repositories
As an alternative to uploading the data from a URL or your computer, the files may also have been made available from a Choose from repositories:
Click on Upload Data on the top of the left panel
Click on Choose from repository and scroll down to find your repository or type the repository name in the search box on the top.
Select the datasets you want to import
click on OK
Click on Start
Click on Close
You can find the dataset has begun loading in you history.
Importing via links
Copy the link location
Click galaxy-uploadUpload at the top of the activity panel
Select galaxy-wf-editPaste/Fetch Data
Paste the link(s) into the text field
Press Start
Close the window
NCBI SRA sourced fastq data
In these FASTQ data:
The quality score identifier (+) is sometimes not a match for the sequence identifier (@).
The forward and reverse reads may be interlaced and need to be separated into distinct datasets.
Both may be present in a dataset. Correct the first, then the second, as explained below.
Format problems of any kind can cause tool failures and/or unexpected results.
Fix the problems before running any other tools (including FastQC, Fastq Groomer, or other QA tools)
For inconsistent sequence (@) and quality (+) identifiers
Correct the format by running the tool Replace Text in entire line with these options:
Find pattern: ^\+SRR.+
Replace with: +
Note: If the quality score line is named like “+ERR” instead (or other valid options), modify the pattern search to match.
For interlaced forward and reverse reads
Solution 1 (reads named /1 and /2)
Use the tool FASTQ de-interlacer on paired end reads
Solution 2 (reads named /1 and /2)
Create distinct datasets from an interlaced fastq dataset by running the tool Manipulate FASTQ reads on various attributes on the original dataset. It will run twice.
Note: The solution does NOT use the FASTQ Splitter tool. The data to be manipulated are interlaced sequences. This is different in format from data that are joined into a single sequence.
Use the Manipulate FASTQ settings to produce a dataset that contains the /1 reads**
Match Reads
Match Reads by Name/Identifier
Identifier Match Type Regular Expression
Match by .+/2
Manipulate Reads
Manipulate Reads by Miscellaneous Actions
Miscellaneous Manipulation Type Remove Read
Use these Manipulate FASTQ settings to produce a dataset that contains the /2 reads**
Exact same settings as above except for this change: Match by .+/1
Solution 3 (reads named /1 and /3)
Use the same operations as in Solution 2 above, except change the first Manipulate FASTQ query term to be:
Match by .+/3
Solution 4 (reads named without /N)
If your data has differently formatted sequence identifiers, the “Match by” expression from Solution 2 above can be modified to suit your identifiers.
Click on the Genome Ark button and then click on species
You can find the data by following this path: /species/${Genus}_${species}/${specimen_code}/genomic_data. Inside a given datatype directory (e.g.pacbio), select all the relevant files individually until all the desired files are highlighted and click the Ok button. Note that there may be multiple pages of files listed. Also note that you may not want every file listed.
Upload few files (1-10)
Click on Upload Data on the top of the left panel
Click on Choose local file and select the files or drop the files in the Drop files here part
Click on Start
Click on Close
Upload many files (>10) via FTP
Some Galaxies offer FTP upload for very large datasets.
Note: the “Big Three” Galaxies (Galaxy Main, Galaxy EU, and Galaxy Australia) no longer support FTP upload, due to the recent improvements of the default web upload, which should now support large file uploads and almost all use cases. For situations where uploading via the web interface is too tedious, the galaxy-upload commandline utility is also available as an alternative to FTP.
To upload files via FTP, please
Check that your Galaxy supports FTP upload and look up the FTP settings.
Make sure to have an FTP client installed
There are many options. We can recommend FileZilla, a free FTP client that is available on Windows, MacOS, and Linux.
Establish FTP connection to the Galaxy server
Provide the Galaxy server’s FTP server name (e.g. ftp.mygalaxy.com)
Provide the username (usually the e-mail address) and the password on the Galaxy server
Connect
Add the files to the FTP server by dragging/dropping them or right clicking on them and uploading them
The FTP transfer will start. We need to wait until they are done.
Tags can help you to better organize your history and track datasets.
Datasets can be tagged. This simplifies the tracking of datasets across the Galaxy interface. Tags can contain any combination of letters or numbers but cannot contain spaces.
To tag a dataset:
Click on the dataset to expand it
Click on Add Tagsgalaxy-tags
Add tag text. Tags starting with # will be automatically propagated to the outputs of tools using this dataset (see below).
Press Enter
Check that the tag appears below the dataset name
Tags beginning with # are special!
They are called Name tags. The unique feature of these tags is that they propagate: if a dataset is labelled with a name tag, all derivatives (children) of this dataset will automatically inherit this tag (see below). The figure below explains why this is so useful. Consider the following analysis (numbers in parenthesis correspond to dataset numbers in the figure below):
a set of forward and reverse reads (datasets 1 and 2) is mapped against a reference using Bowtie2 generating dataset 3;
dataset 3 is used to calculate read coverage using BedTools Genome Coverageseparately for + and - strands. This generates two datasets (4 and 5 for plus and minus, respectively);
datasets 4 and 5 are used as inputs to Macs2 broadCall datasets generating datasets 6 and 8;
datasets 6 and 8 are intersected with coordinates of genes (dataset 9) using BedTools Intersect generating datasets 10 and 11.
Now consider that this analysis is done without name tags. This is shown on the left side of the figure. It is hard to trace which datasets contain “plus” data versus “minus” data. For example, does dataset 10 contain “plus” data or “minus” data? Probably “minus” but are you sure? In the case of a small history like the one shown here, it is possible to trace this manually but as the size of a history grows it will become very challenging.
The right side of the figure shows exactly the same analysis, but using name tags. When the analysis was conducted datasets 4 and 5 were tagged with #plus and #minus, respectively. When they were used as inputs to Macs2 resulting datasets 6 and 8 automatically inherited them and so on… As a result it is straightforward to trace both branches (plus and minus) of this analysis.
You can tell Galaxy which dbkey (e.g. reference genome) your dataset is associated with. This may be used by tools to automatically use the correct settings.
Click the desired dataset’s name to expand it.
Click on the “?” next to database indicator:
In the central panel, change the Database/Build field
Select your desired database key from the dropdown list
Click the Save button
Changing the datatype
Galaxy will try to autodetect the datatype of your files, but you may need to manually set this occasionally.
Click on the galaxy-pencilpencil icon for the dataset to edit its attributes
In the central panel, click galaxy-chart-select-dataDatatypes tab on the top
In the galaxy-chart-select-dataAssign Datatype, select your desired datatype from “New Type” dropdown
Tip: you can start typing the datatype into the field to filter the dropdown menu
Click the Save button
Converting the file format
Some datasets can be transformed into a different format. Galaxy has some built-in file conversion options depending on the type of data you have.
Click on the galaxy-pencil pencil icon for the dataset to edit its attributes.
In the central panel, click galaxy-chart-select-data Datatypes tab on the top.
In the galaxy-gear Convert to Datatype section, select your desired datatype from “Target datatype” dropdown.
Click the Create Dataset button to start the conversion.
Creating a new file
Galaxy allows you to create new files from the upload menu. You can supply the contents of the file.
Click galaxy-uploadUpload Data at the top of the tool panel
Select galaxy-wf-editPaste/Fetch Data at the bottom
Paste the file contents into the text field
Press Start and Close the window
Datasets not downloading at all
Check to see if pop-ups are blocked by your web browser. Where to check can vary by browser and extensions.
Double check your API key, if used. Go to User > Preferences > Manage API key.
Check the sharing/permission status of the Datasets. Go to Dataset > Pencil icon galaxy-pencil > Edit attributes > Permissions. If you do not see a “Permissions” tab, then you are not the owner of the data.
Notes:
If the data was shared with you by someone else from a Shared History, or was copied from a Published History, be aware that there are multiple levels of data sharing permissions.
All data are set to not shared by default.
Datasets sharing permissions for a new history can be set before creating a new history. Go to User > Preferences > Set Dataset Permissions for New Histories.
User > Preferences > Make all data private is a “one click” option to unshare ALL data (Datasets, Histories). Note that once confirmed and all data is unshared, the action cannot be “undone” in batch, even by an administrator. You will need to re-share data again and/or reset your global sharing preferences as wanted.
Only the data owner has control over sharing/permissions.
Any data you upload or create yourself is automatically owned by you with full access.
You may not have been granted full access if the data were shared or imported, and someone else is the data owner (your copy could be “view only”).
After you have a fully shared copy of any shared/published data from someone else, then you become the owner of that data copy. If the other person or you make changes, it applies to each person’s copy of the data, individually and only.
Histories can be shared with included Datasets. Datasets can be downloaded/manipulated by others or viewed by others.
Share access to Datasets is distinct but it relates to Histories’ access.
Detecting the datatype (file format)
Click on the galaxy-pencilpencil icon for the dataset to edit its attributes
In the central panel, click on the galaxy-chart-select-dataDatatypes tab on the top
Click the Auto-detect button to have Galaxy try to autodetect it.
Different dataset icons and their usage
Icons provide a visual experience for objects, actions, and ideas
Dataset icons and their usage:
galaxy-eye“Eye icon”: Display dataset contents.
galaxy-pencil“Pencil icon”: Edit attributes of dataset metadata: labels, datatype, database.
galaxy-delete“Trash icon”: Delete the dataset.
galaxy-save“Disc icon”: Download the dataset.
galaxy-link“Copy link”: Copy link URL to the dataset.
How to find the reference sequence identifiers inside of a BAM file
Explore the content of your BAM.
Run Samtools: IdxStats on your bam dataset.
The reference sequence identifiers inside the “BAM header” will be listed in the result report.
The report is a summary of the BAM content that includes: reference sequence identifiers (chromosome names), their lengths, and a count of the reads mapping to that reference sequence within the BAM file.
Compare the sequence identifiers in your BAM file to the the sequence identifiers (aka “chrom” field) field in all other inputs: VCF, GTF, GFF3, BED, Interval, Tabular.
It is usually important to use the same reference assembly for all steps within the same analysis. If you discover differences, you may need to choose different reference data.
tip Notes
This method will not work for “sequence-only” bam datasets, as these usually have no header and are not associated with a reference assembly yet.
Finding Datasets
To review all active Datasets in your account, go to User > Datasets.
Notes:
Logging out of Galaxy while the Upload tool is still loading data can cause uploads to abort. This is most likely to occur when a dataset is loaded by browsing local files.
If you have more than one browser window open, each with a different Galaxy History loaded, the Upload tool will load data into the most recently used history.
Click on refresh icon galaxy-refresh at the top of the History panel to display the current active History with the datasets.
How to delete datasets?
Deleting datasets individually
To delete datasets individually simply click the galaxy-delete button with dataset’s box. That’s it! This action is reversible: datasets can be undeleted.
Deleting datasets in bulk
To delete multiple datasets at once:
Click history-select-multiple icon at the top of the history pane;
Select datasets you want to delete;
Click the dropdown that would appear at the top of the history;
Select “Delete” option.
This action is also reversible: datasets can be undeleted.
Deleting datasets permanentlywarningDanger zone!
Warning: Permanent is ... PERMANENT!
Datasets deleted in this fashion CANNOT be undeleted!
To delete multiple datasets PERMANENTLY:
Click history-select-multiple icon at the top of the history pane;
Select datasets you want to delete;
Click the dropdown that would appear at the top of the history;
Select “Delete (permanently)” option.
How to hide datasets?
To hide datasets:
Click history-select-multiple icon at the top of the history pane;
Select datasets you want to hide;
Click the dropdown that would appear at the top of the history;
Select “Hide” option.
How to un-delete datasets?
If your history contains deleted datasets you will see galaxy-delete“Include deleted” button directly above dataset display.
To un-delete datasets:
Type deleted:true in the search box
Select datasets you want to un-delete
Click the dropdown that would appear at the top of the history;
Select “Undelete” option.
Alternatively, you can:
click galaxy-delete“Include deleted” button directly above dataset display. This will cause deleted datasets to appear in history along with normal (un-deleted) datasets;
deleted datasets are distinguished by having dataset-undelete within dataset box. Clicking on this icon will un-delete a given dataset;
How to un-hide datasets?
If your history contains hidden datasets you will see galaxy-show-hidden“Include hidden” button directly above the dataset display.
To un-hide datasets:
Type visible:hidden in the search box
Select datasets you want to un-hide
Click the dropdown that would appear at the top of the history;
Select “Unhide” option.
Alternatively, you can:
click galaxy-show-hidden“Include hidden” button directly above dataset display. This will cause hidden datasets to appear in history along with normal (un-hidden) datasets;
hidden datasets are distinguished by having galaxy-show-hidden within dataset box. Clicking on this icon will un-hide a given dataset;
Mismatched Chromosome identifiers and how to avoid them
Reference data mismatches are similiar to bad reagents in a wet lab experiment: all sorts of odd problems can come up!
You inputs must be all based on an identical genome assembly build to achieve correct scientific results.
There are two areas to review for data to be considered identical.
The data are based on the same exact genome assembly (or “assembly release”).
The “assembly” refers to the nucleotide sequence of the genome.
If the base order and length of the chromosomes are not the same, then your coordinates will have scientific problems.
Converting coordinates between assemblies may be possible. Search tool panel with CrossMap.
The data are based on the same exact genome assembly build.
The “build” refers to the labels used inside the file. In this context, pay attention to the chromosome identifiers.
These all may mean the same thing to a person but not to a computer or tool: chr1, Chr1, 1, chr1.1
Converting identifiers between builds may be possible. Search tool panel with Replace.
The methods listed below help to identify and correct errors or unexpected results when the underlying genome assembly build for all inputs are not identical.
Native reference genomes (FASTA) are built as pre-computed indexes on the Galaxy server where you are working.
Different servers host both common and different reference genome data.
Most reference annotation (tabular, GTF, GFF3) is supplied from the history by the user, even when the genome is indexed.
Public Galaxy servers source reference genomes preferentially from UCSC.
A reference transcriptome (FASTA) is supplied from the history by the user.
Many experiements use a combination of all three types of reference data. Consider pre-preparing your files at the start!
The default variant for a native genome index is “Full”. Defined as: all primary chromosomes (or scaffolds/contigs) including mitochondrial plus associated unmapped, plasmid, and other segments.
When only one version of a genome is available for a tool, it represents the default “Full” variant.
Some genomes will have more than one variant available.
The “Canonical Male” or sometimes simply “Canonical” variant contains the primary chromosomes for a genome. For example a human “Canonical” variant contains chr1-chr22, chrX, chrY, and chrM.
The “Canonical Female” variant contains the primary chromosomes excluding chrY.
Moving datasets between Galaxy servers
On the origin Galaxy server:
Click on the name of the dataset to expand the info.
Click on the Copy link icongalaxy-link.
On the destination Galaxy server:
Click on Upload data > Paste / Fetch Data and paste the link. Select attributes, such as genome assembly, if required. Hit the Start button.
Note: The copy link icon galaxy-link cannot be used to move HTML datasets (but this can be downloaded using the download button galaxy-save) and SQLite datasets.
Purging datasets
All account Datasets can be reviewed under User > Datasets.
To permanently delete: use the link from within the dataset, or use the Operations on Multiple Datasets functions, or use the Purge Deleted Datasets option in the History menu.
Notes:
Within a History, deleted/permanently deleted Datasets can be reviewed by toggling the deleted link at the top of the History panel, found immediately under the History name.
Both active (shown by default) and hidden (the other toggle link, next to the deleted link) datasets can be reviewed the same way.
Click on the far right “X” to delete a dataset.
Datasets in a deleted state are still part of your quota usage.
Datasets must be purged (permanently deleted) to not count toward quota.
Quotas for datasets and histories
Deleted datasets and deleted histories containing datasets are considered when calculating quotas.
Permanently deleted datasets and permanently deleted histories containing datasets are not considered.
Histories/datasets that are shared with you are only partially considered unless you import them.
Click on the galaxy-pencilpencil icon for the dataset to edit its attributes
In the central panel, change the Name field
Click the Save button
Understanding job statuses
Job statuses will help you understand the stages of your work.
Compare the color of your datasets to these job processing stages.
Grey: The job is queued. Allow this to complete!
Yellow: The job is executing. Allow this to complete!
Green: The job has completed successfully.
Red: The job has failed. Check your inputs and parameters with Help examples and GTN tutorials. Scroll to the bottom of the tool form to find these.
Light Blue: The job is paused. This indicates either an input has a problem or that you have exceeded the disk quota set by the administrator of the Galaxy instance you are working on.
Grey, Yellow, Grey again: The job is waiting to run due to admin re-run or an automatic fail-over to a longer-running cluster.
galaxy-info Don’t lose your queue placement! It is essential to allow queued jobs to remain queued, and to never interrupt an executing job. If you delete/re-run jobs, they are added back to the end of the queue again.
Working with GFF GFT GTF2 GFF3 reference annotation
All annotation datatypes have a distinct format and content specification.
Data providers may release variations of any, and tools may produce variations.
GFF3 data may be labeled as GFF.
Content can overlap but is generally not understood by tools that are expecting just one of these specific formats.
Best practices
The sequence identifiers must exactly match between reference annotation and reference genomes transcriptomes exomes.
Most tools expect GFT format unless the tool form specifically notes otherwise.
Get the GTF version from the data providers if it is available.
If only GFF3 is available, you can attempt to transform it with the tool gffread.
Was GTF data detected as GFF during Upload? It probably has headers. -Remove the headers (lines that start with a “#”) with the Select tool using the option “NOT Matching” with the regular expression: ^#
Find annotation under their Downloads area. The path will be similar to: https://hgdownload.soe.ucsc.edu/goldenPath/<database>/bigZips/genes/
Copy the URL from UCSC and paste it into the Upload tool, allowing Galaxy to detect the datatype.
Working with deleted datasets
Deleted datasets and histories can be recovered by users as they are retained in Galaxy for a time period set by the instance administrator. Deleted datasets can be undeleted or permanently deleted within a History. Links to show/hide deleted (and hidden) datasets are at the top of the History panel.
To review or adjust an individual dataset:
Click on the name to expand it.
If it is only deleted, but not permanently deleted, you’ll see a message with links to recover or to purge.
Click on Undelete it to recover the dataset, making it active and accessible to tools again.
Click on Permanently remove it from disk to purge the dataset and remove it from the account quota calculation.
To review or adjust multiple datasets in batch:
Click on the checked box icon galaxy-selector near the top left of the history panel (Select Items) to switch into “Operations on Multiple Datasets” mode.
Accordingly for each individual dataset, choose the selection box. Check the datasets you want to modify and choose your option (show, hide, delete, undelete, purge, and group datasets).
Working with very large fasta datasets
Run FastQC on your data to make sure the format/content is what you expect. Run more QA as needed.
Search GTN tutorials with the keyword “qa-qc” for examples.
Search Galaxy Help with the keywords “qa-qc” and “fasta” for more help.
Assembly result?
Consider filtering by length to remove reads that did not assemble.
Formatting criteria:
All sequence identifiers must be unique.
Some tools will require that there is no description line content, only identifiers, in the fasta title line (“>” line). Use NormalizeFasta to remove the description (all content after the first whitespace) and wrap the sequences to 80 bases.
Only appropriate for smaller genomes (bacterial, viral, most insects).
Not appropriate for any mammalian genomes, or some plants/fungi.
Sequence identifiers must be an exact match with all other inputs or expect problems. See GFF GFT GFF3.
Formatting criteria:
All sequence identifiers must be unique.
ALL tools will require that there is no description content, only identifiers, in the fasta title line (“>” line). Use NormalizeFasta to remove the description (all content after the first whitespace) and wrap the sequences to 80 bases.
The only exception is when executing the MakeBLASTdb tool and when the input fasta is in NCBI BLAST format (see the tool form).
Working with very large fastq datasets
Run FastQC on your data to make sure the format/content is what you expect. Run more QA as needed.
Search GTN tutorials with the keyword “qa-qc” for examples.
Search Galaxy Help with the keywords “qa-qc” and “fastq” for more help.
How to create a single smaller input. Search the tool panel with the keyword “subsample” for tool choices.
How to create multiple smaller inputs. Start with Split file to dataset collection, then merge the results back together using a tool specific for the datatype. Example: BAM results? Use MergeSamFiles.
As of release 17.09, fastq data will have the datatype fastqsanger auto-detected when that quality score scaling is detected and “autodetect” is used within the Upload tool. Compressed fastq data will be converted to uncompressed in the history.
To preserve fastq compression, directly assign the appropriate datatype (eg: fastqsanger.gz).
If the data is close to or over 2 GB in size, be sure to use FTP.
If the data was already loaded as fastq.gz, don’t worry! Just test the data for correct format (as needed) and assign the metadata type.
Compressed FASTQ files, (`*.gz`)
Files ending in .gz are compressed (zipped) files.
The fastq.gz format is a compressed version of a fastq dataset.
The fastqsanger.gz format is a compressed version of the fastqsanger datatype, etc.
Compression saves space (and therefore your quota).
Tools can accept the compressed versions of input files
Make sure the datatype (compressed or uncompressed) is correct for your files, or it may cause tool errors.
FASTQ files: `fastq` vs `fastqsanger` vs ..
FASTQ files come in various flavours. They differ in the encoding scheme they use. See our QC tutorial for a more detailed explanation of encoding schemes.
Nowadays, the most commonly used encoding scheme is sanger. In Galaxy, this is the fastqsanger datatype. If you are using older datasets, make sure to verify the FASTQ encoding scheme used in your data.
Be Careful: choosing the wrong encoding scheme can lead to incorrect results!
Tip: There are 2 Galaxy datatypes that have similar names, but are not the same, please make sure you fastqsanger and fastqcssanger (not the additional cs).
Tip: When in doubt, choose fastqsanger
How do `fastq.gz` datasets relate to the `.fastqsanger` datatype metadata assignment?
Before assigning fastqsanger or fastqsanger.gz, be sure to confirm the format.
TIP:
Using non-fastqsanger scaled quality values will cause scientific problems with tools that expected fastqsanger formatted input.
Even if the tool does not fail, get the format right from the start to avoid problems. Incorrect format is still one of the most common reasons for tool errors or unexpected results (within Galaxy or not).
How to format fastq data for tools that require .fastqsanger format?
Most tools that accept FASTQ data expect it to be in a specific FASTQ version: .fastqsanger. The .fastqsanger datatype must be assigned to each FASTQ dataset.
Run FASTQ Groomer if the data needs to have the quality scores rescaled.
If you are certain that the quality scores are already scaled to Sanger Phred+33 (the result of an Illumina 1.8+ pipeline), the datatype .fastqsanger can be directly assigned. Click on the pencil icon galaxy-pencil to reach the Edit Attributes form. In the center panel, click on the “Datatype” tab, enter the datatype .fastqsanger, and save.
Run FastQC again on the entire dataset if any changes were made to the quality scores for QA.
Other tips
If you are not sure what type of FASTQ data you have (maybe it is not Illumina?), see the help directly on the FASTQ Groomer tool for information about types.
For Illumina, first run FastQC on a sample of your data (how to read the full report). The output report will note the quality score type interpreted by the tool. If not .fastqsanger, run FASTQ Groomer on the entire dataset. If .fastqsanger, just assign the datatype.
For SOLiD, run NGS: Fastq manipulation → AB-SOLID DATA → Convert, to create a .fastqcssanger dataset. If you have uploaded a color space fastq sequence with quality scores already scaled to Sanger Phred+33 (.fastqcssanger), first confirm by running FastQC on a sample of the data. Then if you want to double-encode the color space into psuedo-nucleotide space (required by certain tools), see the instructions on the tool form Fastq Manipulation for the conversion.
If your data is FASTA, but you want to use tools that require FASTQ input, then using the tool NGS: QC and manipulation → Combine FASTA and QUAL. This tool will create “placeholder” quality scores that fit your data. On the output, click on the pencil icon galaxy-pencil to reach the Edit Attributes form. In the center panel, click on the “Datatype” tab, enter the datatype .fastqsanger, and save.
Identifying and formatting Tabular Datasets
Format help for Tabular/BED/Interval Datasets
A Tabular datatype is human readable and has tabs separating data columns. Please note that tabular data is different from comma separated data (.csv) and the common datatypes are: .bed, .gtf, .interval, or .txt.
Click the pencil icon galaxy-pencil to reach the Edit Attributes form.
Change the datatype (3rd tab) and save.
Label columns (1st tab) and save.
Metadata will be assigned, then the dataset can be used.
If the required input is a BED or Interval datatype, adjusting (.tab → .bed, .tab → .interval) maybe possible using a combination of Text Manipulation tools, to create a dataset that matches required specifications.
Some tools require that BED format be followed, even if the datatype Interval (with less strict column ordering) is accepted on the tool form.
These tools will fail, if they are run with malformed BED datasets or non-specific column assignments.
Solution: reorganize the data to be in BED format and rerun.
Understanding Datatypes
Allow Galaxy to detect the datatype during Upload, and adjust from there if needed.
Tool forms will filter for the appropriate datatypes it can use for each input.
Directly changing a datatype can lead to errors. Be intentional and consider converting instead when possible.
Dataset content can also be adjusted (tools: Data manipulation) and the expected datatype detected. Detected datatypes are the most reliable in most cases.
If a tool does not accept a dataset as valid input, it is not in the correct format with the correct datatype.
Once a dataset’s content matches the datatype, and that dataset is repeatedly used (example: Reference annotation) use that same dataset for all steps in an analysis or expect problems. This may mean rerunning prior tools if you need to make a correction.
Tip: Not sure what datatypes a tool is expecting for an input?
Create a new empty history
Click on a tool from the tool panel
The tool form will list the accepted datatypes per input
Warning: In some cases, tools will transform a dataset to a new datatype at runtime for you.
This is generally helpful, and best reserved for smaller datasets.
Why? This can also unexpectedly create hidden datasets that are near duplicates of your original data, only in a different format.
For large data, that can quickly consume working space (quota).
Deleting/purging any hidden datasets can lead to errors if you are still using the original datasets as an input.
Consider converting to the expected datatype yourself when data is large.
Then test the tool directly on converted data. If it works, purge the original to recover space.
Using compressed fastq data as tool inputs
If the tool accepts fastq input, then .gz compressed data assigned to the datatype fastq.gz is appropriate.
If the tool accepts fastqsanger input, then .gz compressed data assigned to the datatype fastqsanger.gz is appropriate.
Using uncompressed fastq data is still an option with tools. The choice is yours.
TIP: Avoid labeling compressed data with an uncompressed datatype, and the reverse. Jobs using mismatched datatype versus actual format will fail with an error.
If you performed your data analysis in Galaxy, you can easily export a list of all the tools you used—and should cite—as follows:
Click on the History options button ( galaxy-history-options ) in the right-hand panel.
Select Export Tool Citations from the menu.
The middle panel will display a list of tools used in your history, with citation information provided in two formats: APA and BibTeX.
Don’t forget to also cite Galaxy itself in your publication.
Proper citation helps support the developers and ensures reproducibility—thank you for taking this step!
How do I manage my Galaxy storage?
Now, it is possible to bring your own Storage to Galaxy for computation, storage, and archiving of your results. You can add more storage options to your account by following these steps:
Click on your Username on top right part of the website and then click on Preferences.
From the middle panel, click on the Manage Your Galaxy Storage (previously called Storage location).
Click on the + Create button on top of the page. Here, you get multiple options to connect various storage options to your account.
For all of the possible storage options, you should fill the following fields:
In the Name section, give a name to your storage. This name will be used to choose the storage on Galaxy when you want to select a Storage using User preferences > Preferred Galaxy Storage.
Optionally, you can provide a Description for this Storage. This is a note for yourself.
Hands-on: Choose Your Own Tutorial
This is a 'Choose Your Own Tutorial' (CYOT) section (also known as 'Choose Your Own Analysis' (CYOA)), where you can select between multiple paths. Click one of the buttons below to select how you want to follow the tutorial
Select the Storage you like to add to your Galaxy account.
If you have an account in Onedata, you can use such an object store as a Storage for your Galaxy datasets; they will be stored in the Onedata space of your choice. The minimal supported Onezone version is 21.02.4. More information on Onedata can be found on Onedata’s website.
There are extensive tutorials for setting up and utilizing of OneData on Galaxy Training Network (GTN). At the moment, we have the following tutorials for Onedata on GTN:
In short, you can connect your Galaxy account to an Onedata Storage as follows:
In the Onezone domain field, please fill in the address to your Onezone domain. It could be something like “datahub.egi.eu”.
In case you want to disable validation of SSL certificates, you can use Disable tls certificate validation? option. However, we strongly recommend you to not use this option unless you know what your are doing.
Provide name of a space that Galaxy data will be stored on Onedata using Space Name. If there is more than one space with the same name, you can explicitly specify which one to select by using the format <space_name>@<space_id> (for example demo@7285220ecc636075ae5759aec7ad65d3cha8f9).
If you want to provide a path to store Galaxy data, you can use the Galaxy root directory field. If this field is empty, the data will be stored in the space’s root directory.
You should provide an Access Token to Galaxy for the Onedata space. Your access token, suitable for REST API access in a Oneprovider service. Must allow both read and write data access.
Click on Create.
Amazon’s Simple Storage Service (S3) is Amazon’s primary cloud storage service. More information on S3 can be found in Amazon’s documentation. You have to create a bucket to use in your AWS web console before using this feature.
You have to provide an Access Key ID to be able to use AWS Storage on Galaxy. A security credential for interacting with AWS services can be created from your AWS web console. Creating an “Access Key” creates a pair of keys used to identify and authenticate access to your AWS account - the first part of the pair is “Access Key ID” and should be entered here. The second part of your key is the secret part called the “Secret Access Key”. Place that in the secure part of this form below.
Provide the AWS S3 Bucket to store your datasets in the Bucket field.
You should enter the second part of the key you created above, Access Key ID, in the Secret Access Key section. Read more on access keys on AWS documentation.
Click on Create.
To setup access to your Azure Blob Storage within the Galaxy, follow the steps:
Provide the name of your Azure Blob Storage account in the Container Name field. More information about container’s name could be found on the Microsoft documentation here.
Fill the Storage Account Name based on your account. More information is available on Microsoft website.
Please provide the account access key to your Azur Blob Storage account, using Account Key field. This is the documentation on Managing storage account access keys.
Click on Create.
For the setup you will need to generate HMAC Keys - these can be linked to your user or a service account. Additionally, you will need to define a default Google cloud project to allow Galaxy to access your Google Cloud Storage via the interfaces described in this FAQs.
To connect Galaxy to your Google Cloud Storage, you have to generate HMAC Keys. You can use the information after generating the keys to fill the Access ID field.
You will receive a Secret Key after you generated HMAC Keys. Secret Key should be 40 characters long and look something like the example used the Google documentation - bGoa+V7g/yqDXvKRqq+JTFn4uQZbPiQJo4pf9RzJ.
Click on Create.
The APIs used to connect to Amazon’s S3 (Simple Storage Service) have become something of an unofficial standard for cloud storage across a variety of vendors and services. Many vendors offer storage APIs compatible with S3. Here, you can configure such service as a Galaxy storage as long as you are able to find the connection details and have the relevant credentials.
Provide the Access Key ID. This is part of your access tokens or access keys that describe the user that is accessing the data. The Amazon documentation calls these an “access key ID”, the CloudFlare documentation describes these as “aws_access_key_id”. Internally to Galaxy, we often just call this the “access_key”.
Provide the Bucket name. The bucket to store your datasets in. How to setup buckets for your storage will vary from service to service but all S3 compatible storage services should have the concept of a bucket to namespace a grouping of your data together with.
Using the S3-Compatible API Endpoint, you should provide the endpoint URL for your storage service. It is also called “endpoint URL” in some services and the format varies based on the providers. For example, CloudFlare endpoint URL is something like john.r2.cloudflarestorage.com and MinIO endpoint URL is similar to https://play.min.io:9000.
Secret Access Key compliment your Access Key ID to connect to the S3 compatible storage. The Amazon documentation calls these an “secret access key” and the CloudFlare documentation describes these as “aws_secret_access_key”. Internally to Galaxy, we often just call this the “secret_key”.
Click on Create.
You can pick the connected Storage for your analysis as follows:
Click on your username. Click on Preferences.
Click on Preferred Galaxy Storage. Here, you can pick the Storage of your choice. The default option is Galaxy Storage.
Instead of using a default storage location for your account, it is also possible to select it at different levels: per History, per Tool, and Workflow.
To set a Storage for a specific History, you should click on the Galaxy History Storage choice (galaxy-history-storage-choice) icon on the right panel. Then, select the added external storage as the preferred storage location for the History. If you execute a Workflow in this history, the all results of the workflow will be stored in the external storage (that you selected). To verify it, you can click on the Dataset details icon (details) of a job on the right panel and you can see that the user’s external storage is used as the “Dataset Storage”.
Of course, if instead of a workflow, you can run just one tool using your connected Storage. To do this, you have to set the Galaxy History Storage choice (galaxy-history-storage-choice) as described above. Then, you can run one (or more) tool in this history and the results will be available on your Storage.
How do I manage my repositories on Galaxy?
Here, we are going to briefly explain how you can Bring-Your-Own-Data to Galaxy or export your dataset, results, or history to 3rd party repositories. In order to add a new repository to your account follow these steps:
Click on your Username on top right part of the website and then click on Preferences.
From the middle panel, click on the Manage Your Repositories (previously called Manage your remote file sources).
Click on the + Create button on top of the page. Here, you get multiple options to connect various repositories to your account.
For all of the possible repositories, you should fill the following fields:
In the Name section, give a name to your repository. This name will be used to choose the repository on Galaxy for importing or exporting datasets.
Optionally, you can provide a Description for this repository. This is a note for yourself.
Hands-on: Choose Your Own Tutorial
This is a 'Choose Your Own Tutorial' (CYOT) section (also known as 'Choose Your Own Analysis' (CYOA)), where you can select between multiple paths. Click one of the buttons below to select how you want to follow the tutorial
Select the repository you like to add to your Galaxy account.
If you have an Onedata account, you can use this repository to import and/or export your data directly from and to Onedata. The minimal supported Onezone version is 21.02.4. More information on Onedata can be found on Onedata’s website.
There are extensive tutorials for setting up and utilizing of OneData on Galaxy Training Network (GTN). At the moment, we have the following tutorials for Onedata on GTN:
In short, you can connect your Galaxy account to an Onedata repository as follows:
In the Onezone domain field, please fill in the address to your Onezone domain. It could be something like “datahub.egi.eu”.
Using the Writable? option you can decide whether to grant access to Galaxy to export (write) to your Onedata or not.
You should provide an Access Token to Galaxy so it can read (import) and write (export) data to your OneData. Read more on access tokens here. You can limit the access to read-only data access, unless you wish to export data to your repository (write permissions are needed then).
In case you want to disable validation of SSL certificates, you can use Disable tls certificate validation? option. However, we strongly recommend you to not use this option unless you know what your are doing.
Click on Create.
To connect an AWS private bucket to your Galaxy account, you need to submit the following information on the form:
Please fill in the Access Key ID (something like AKIAIOSFODNN7EXAMPLE) and Secret Access Key (similar to wJalrXUtnFEMI/K7MDENG/bPxRfiCYEXAMPLEKEY) in the corresponding fields on the Galaxy interface.
Please enter the URL to your Bucket (for example, https://amzn-s3-demo-bucket.s3.us-west-2.amazonaws.com) in the Bucket section.
Click on Create.
To connect anonymously to an AWS public bucket using your Galaxy account, you need to enter the Bucket address in the Bucket section. For more information about AWS Bucket, please read AWS documentaion. Click on Create.
To setup access to your Azure Blob Storage within the Galaxy, follow the steps:
Provide the name of your Azure Blob Storage account in the Container Name field. More information about container’s name could be found on the Microsoft documentation here.
Fill the Storage Account Name based on your account. More information is available on the Microsoft website.
Using the Hierarchical? option you can determine whether your storage is hierarchical or not. More information on Data Lake Storage namespaces can be found in the Azure Blob Storage documentation.
Please provide the account access key to your Azur Blob Storage account, using Account Key field. This is the documentation on Managing storage account access keys.
If you want to be able to export data to your Azure Blob Storage container, please set Writable? option to “Yes”.
Click on Create.
We recommend to first login to your Dropbox account.
On the Galaxy website, click on the Create button of the Dropbox section. You will be redirected to the Dropbox website for authentication.
You have to login there and grant access for the Galaxy.
Click on Create.
eLabFTW is a free and open source electronic lab notebook from Deltablot. Each lab can either host their own installation or go for Deltablot’s hosted solution. Using Galaxy, you can connect to an eLabFTW instance of your choice.
Provide a URL with the protocol (http or https) and the domain name in the eLabFTW instance endpoint (e.g. https://demo.elabftw.net) field.
If you want to let Galaxy to export data to your eLabFTW, please set the Allow Galaxy to export data to eLabFTW? to “Yes” to grant required access to Galaxy. Keep in mind that your API key must have matching permissions.
You should provide an API Key to your eLabFTW as well. To do so, navigate to the Settings page on your eLabFTW server and go to the API Keys tab to generate a new key. Choose “Read/Write” permissions to enable both importing and exporting data. “Read Only” API keys still work for importing data to Galaxy, but they will cause Galaxy to error out when exporting data to eLabFTW. You will receive a string (similar to 2-50dd721027f56a2e119b3bdbf64f4b8518b3f82b97e7876d56dad74109c8be73d8919b88097d3c9eb8952) and you should enter this in the API Key field of Galaxy interface.
Click on Create.
You can setup connections to FTP and FTPS servers to import and export files as follows:
Provide the address to your FTP server using the FTP Host field.
If you want to login with a specific user, provide the username in the FTP User field. Leave this blank to connect to the server anonymously (if allowed by the server).
If you want to export data to this FTP, you should set the Writable? option to “Yes”.
Please specify the port that Galaxy should use to connect to your FTP server using the FTP Port field.
In the FTP Password field provide the password to connect to the FTP server. Leave this blank to connect to the server anonymously (if allowed by the server).
Click on Create.
We recommend to login to your Google account first.
On the Galaxy website, click on Select button of Export to Google Drive. You will be redirected to the Google.
Pick the account that you want to connect to Galaxy for import and export. Grant the required permissions.
You will be back on the Galaxy portal and you can access your Google Drive for import and export (depending on your how you set up your accuont).
Click on Create.
InvenioRDM is a research data management platform that allows you to store, share, and publish research data. You can connect to an InvenioRDM instance of your choice by following these steps:
Please fill the address to your InvenioRDM in the following field: InvenioRDM instance endpoint (for example, https://inveniordm.web.cern.ch/). This should include the protocol (http or https).
Use the Allow Galaxy to export data to InvenioRDM? option to give permission to Galaxy to export data to your repository or not.
Click on Create.
You should fill Publication Name with a name as the “creator” metadata of the records. This could be a person or an organization. You can later modify this. If left blank, an anonymous user will be used as the creator.
You should also enter your Personal Access Token. You can get this information in your InvenioRDM instance. Navigate to Account Settings. Then, go to Applications to generate a new token. This will allow Galaxy to display your draft records and upload files to them.
Click on Create.
Using WebDAV you can connect various services that supports WebDAV protocol such as OwnCloud and NextCloud among others. The configuration of WebDAV is slightly variable from service to service but the general principles apply everywhere.
Provide the server address to this repository in the Server Domain field.
In the WebDAV server Path, you have to provide the path on this server to WebDAV.
In the Username field, you should write the username you use to login to this server.
You can grant write access for this repository using the Writable? (set to Yes) and therefore make it possible to export datasets, or histories to your connected repository.
Click on Create.
As an example, if I want to connect my nextCloud repository to my Galaxy account, I should login to my nextCloud server and find the information from File settings (bottom left of the page) under the WebDAV section to fill this template. It could be something like: https://server_address.com/remote.php/dav/files/username_or_text. Here, the Server Domain is https://server_address.com and WebDAV server Path is remote.php/dav/files/username_or_text.
In some cases, you may need to activate some features on your ownCloud or nextCloud to allow this integration. For example, some nextCloud servers require the user to use “App Passwords”. This can be done using the Settings > Security > Devices & sessions > Create new app password.
Zenodo is an open-access repository for research data, software, publications, and other digital artifacts. It is developed and maintained by CERN and funded by the European Commission as part of the OpenAIRE project. Zenodo provides a free platform for researchers to share and preserve their work, ensuring long-term access and reproducibility. Zenodo is widely used by researchers, institutions, and organizations to share scientific knowledge and comply with open-access mandates from funding agencies.
Using the Allow Galaxy to export data to Zenodo?, you can decide whether you like to give write access to Galaxy or not. Set it to “Yes” if you want to export data from Galaxy to Zenodo, set it to “No” if you only need to import data from Zenodo to Galaxy.
Provide a name for the “creator” metadata of your records on Zenodo using the Publication Name field. You can always change this value later by editing the records in Zenodo. If left blank, an anonymous user will be used as the creator.
You have to provide a Personal Access Token from your Zenodo account to Galaxy. To do so, you need to log into your account. Then, visit this site: https://zenodo.org/account/settings/applications/. Alternatively, you can click on your username on top right and then click on “Applications”. Here, you need to create a “Personal Access Token”. This will allow Galaxy to display your draft records and upload files to them. If you enabled the option to export data from Galaxy to Zenodo, make sure to enable the deposit:write scope when creating the token.
Click on Create.
Importing data to your Galaxy account
When you connect a repository to your Galaxy account, you can use it to import data to Galaxy. To do so, you can click on the Upload Icon on the left panel. In the poped up window, you can click on Choose from repository to select a repository that you have added to your account. Navigate to a file that you want to upload to your Galaxy account, check the box of the file, and click on Select. You can determine the format of the file, give it a name, and then click on Start to upload the file to your Galaxy account.
Exporting histories, datasets, and results to connected repositories
If you have given Galaxy the permission to write to your repository, you can export your histories, datasets and reulsts in the history to that repository.
Histories
If you want to export a history, you should click on the History Options icon (galaxy-history-options) on the right panel. Then, you can click on Export History to File. Next, you can click on to repository on the middle panel. If you click on the Click to select directory, there will be a pop up window. Here, you can pick a repository that you have added to your account and when you are in that repository, click on Select. You can give a Name to your exported history, so you can find it easier in your connected repository. Finally, click on Export to write the history to your repository. Similarly, you can use to RDM repository or to Zenodo instead of the to repository option in the middle panel to export your history to connected RDM repositories or Zenodo.
To have more options on exporting your history, you can click on Show advanced export options on top of the middle panel. This provides further control over the format and datasets that will be included in your exported history.
Datasets
If you are interested to export a single dataset or results to a connected repository, you can use a tool called Export datasets.
Select the desired option from What would you like to export?.
Using the Directory URI option, you can Select a connected repository. You can also give it a directory name here.
We recommend to export the metadata with your datasets and results using the Include metadata files in export?.
How do I re-use equivalent jobs in Galaxy (aka Job Cache)?
We can reuse the reproducibility of Galaxy to detect if a tool has been run with the exact same parameters and inputs before. In this case, we can simply skip the computational step and just reuse the data we have previously computed. We call this feature the job cache. Part of the job cache is all your personal data and all data in public histories. This can be highly helpful, e.g., for training events, if the instructor makes a respective training history public before the event. If the trainee activates this option in their account and uses the same input and parameters, they will immediately receive the results. This feature reduces the waiting time in the training sessions, saves energy and computational resources, and therefore reduces environmental impact.
To activate this feature, take the following steps:
To activate this option for your account, click on your username at the top right of the page.
Select Preferences and navigate to your user-references.
In your middle panel search for Manage Information and select them. You can also navigate to “https:///user" — for example, https://usegalaxy.eu/user.
Find the grey box: Do you want to be able to re-use equivalent jobs?
Within the box, change the slider from no to yes.
Scroll down to the bottom of the page and click the Save button.
For every tool you want to run now, you will notice the option Attempt to re-use jobs with identical parameters?. To test this:
Click on any tool you would like to run
If you scroll down to the end of the Tool Parameters section until you see the Run tool button, you will notice the new option Attempt to re-use jobs with identical parameters? above the Run tool button.
You can enable this option by sliding the No to Yes
Once you click on the Run tool, Galaxy will check if this tool was run before with the exact same parameters and inputs. If so, the results will be retrieved from the job cache and not be calculated.
⚠️ At the moment, this feature only works with data shared/reused inside Galaxy. If you upload the same file twice, we can not detect that it is the same file.
Switching Galaxy Labs
Explains how to switch to Galaxy Labs (subdomains)
Galaxy offers different domain-specific views of its interface. These are sometimes called Galaxy Labs, or Galaxy subsites, or Galaxy subdomains.
This is the same Galaxy, but with a few differences:
Different home page, containing information aimed at domain researchers
Different tool bar, filtered for most useful tools for that domain
You may have to re-login, you do this with the same account as always, and you can access all your existing histories etc from any subsite.
On the top menu bar, on the right, click on the “switch sites” icon, galaxy_sites or galaxy_sites2 depending on the version of Galaxy
Select the Lab you want to start using
The options will be different per Galaxy instance
You can always switch back to the main Galaxy site by selecting “base site” in this list
Using the Window Manager to view multiple datasets
If you would like to view two or more datasets at once, you can use the Window Manager feature in Galaxy:
Click on the Window Manager icon galaxy-scratchbook on the top menu bar.
You should see a little checkmark on the icon now
Viewgalaxy-eye a dataset by clicking on the eye icon galaxy-eye to view the output
You should see the output in a window overlayed over Galaxy
You can resize this window by dragging the bottom-right corner
Viewgalaxy-eye a second dataset from your history
You should now see a second window with the new dataset
This makes it easier to compare the two outputs
Repeat this for as many files as you would like to compare
You can turn off the Window Managergalaxy-scratchbook by clicking on the icon again
Why not use Excel?
Excel is a fantastic tool and a great place to build simple analysis models, but when it comes to scaling, Galaxy wins every time.
You could just as easily use Excel to answer the same question, and if the goal is to learn how to use a tool, then either tool would be great! But what if you are working on a question where your analysis matters? Maybe you are working with human clinical data trying to diagnose a set of symptoms, or you are working on research that will eventually be published and maybe earn you a Nobel Prize?
In these cases your analysis, and the ability to reproduce it exactly, is vitally important, and Excel won’t help you here. It doesn’t track changes and it offers very little insight to others on how you got from your initial data to your conclusions.
Galaxy, on the other hand, automatically records every step of your analysis. And when you are done, you can share your analysis with anyone. You can even include a link to it in a paper (or your acceptance speech). In addition, you can create a reusable workflow from your analysis that others (or yourself) can use on other datasets.
Another challenge with spreadsheet programs is that they don’t scale to support next generation sequencing (NGS) datasets, a common type of data in genomics, and which often reach gigabytes or even terabytes in size. Excel has been used for large datasets, but you’ll often find that learning a new tool gives you significantly more ability to scale up, and scale out your analyses.
If you want to remove the history from your active histories but keep it around for reference, you can move it to the Archived Histories section.
Select galaxy-history-optionsHistory Options which is on the top of the list of datasets in the history panel
Select galaxy-history-archiveArchive History
Select the Archive history button
Your history is now archived! To find it again, you will need to go to Data → Histories → Archived Histories.
Copy a dataset between histories
Sometimes you may want to use a dataset in multiple histories. You do not need to re-upload the data, but you can copy datasets from one history to another.
There 3 ways to copy datasets between histories
From the original history
Click on the galaxy-gear icon which is on the top of the list of datasets in the history panel
Click on Copy Datasets
Select the desired files
Give a relevant name to the “New history”
Validate by ‘Copy History Items’
Click on the new history name in the green box that have just appear to switch to this history
Using the galaxy-columnsShow Histories Side-by-Side
Click on the galaxy-dropdown dropdown arrow top right of the history panel (History options)
Click on galaxy-columnsShow Histories Side-by-Side
If your target history is not present
Click on ‘Select histories’
Click on your target history
Validate by ‘Change Selected’
Drag the dataset to copy from its original history
Drop it in the target history
From the target history
Click on User in the top bar
Click on Datasets
Search for the dataset to copy
Click on its name
Click on Copy to current History
Creating a new history
Histories are an important part of Galaxy, most people use a new history for every new analysis. Always make sure to give your histories good names, so you can easily find your results back later.
To create a new history simply click the new-history icon at the top of the history panel:
Dataset colors
Explains meaning of dataset colors in Galaxy's history
There are several different “states” a dataset can be in. These states are indicated by colors:
ok: everything is fine, life is good;
new: the dataset was just created. Galaxy does not yet know when it is available;
queued: indicates that the job generating this dataset is scheduled for execution but not running yet;
running: job generating this dataset is running;
setting metadata: when a new dataset is uploaded Galaxy examines it to understand what kind of data it is (e.g., BAM, FASTQ, fasta, BED, etc.). This is called “setting metadata”;
deferred: sometimes it does not make sense to upload the dataset until it is needed for an analysis. Galaxy will download deferred datasets later during the job execution. Those datasets do not count toward your quota;
paused: in some cases, workflow executions or upstream errors can prevent subsequent jobs from starting to create datasets in “paused” state. Rerun the errored tool with the option Resume dependencies from this job? to resume paused jobs;
discarded: something went wrong. For example, a job producing this dataset might have been cancelled;
error: everything is not fine; life is bad! Click on the information i button to know more about what happened;
placeholder: similar to “new”; we know something will be there, but are not yet sure what;
failed populated state: this refers to collections (not individual datasets). Here, a collection has failed to be populated with datasets;
new populated state: this refers to collections (not individual datasets). A collection was created but not populated yet.
Dataset snippet
Describes features of a single dataset element in the history
A single Galaxy dataset can either be “collapsed” or “expanded”.
Collapsed dataset view
Datasets in the panel are initially shown in a “collapsed” view:
It contains the following elements:
Dataset number: (“1”) order of dataset in the history;
Dataset name: (“M117-bl_1.fq.gz”) its name;
galaxy-eye: click this to view the dataset contents;
galaxy-pencil: click this to edit dataset properties;
galaxy-delete: click this to delete the dataset from the history (don’t worry, you can undo this action!).
Clicking on a collapsed dataset will expand it.
Some of the buttons above may be disabled if the dataset is in a state that doesn’t allow the action. For example, the ‘edit’ button is disabled for datasets that are still queued or running
Expanded dataset view
Expanded dataset view adds a preview element and many additional controls.
In addition to the elements described above for the collapsed dataset, its expanded view contains:
Add tagsgalaxy-tags: click on this to tag this dateset;
Dataset size: (“2 lines, 18 comments”) lists the size of the dataset. When datasets are small (like in this example) the exact size is shown. For large datasets, Galaxy gives an approximate estimate.
format: (“VCF”) lists the datatype;
database: (“?”) lists which genome built this dataset corresponds to. This usually lists “?” unless the genome build is set explicitly or the dataset is derived from another dataset with defined genome build information;
info field: (“INFO [2024-03-26 12:08:53,435]…”) displays information provided by the tool that generated this dataset. This varies widely and depends on the type of job that generated this dataset.
dataset-save: Saves dataset to disk;
dataset-link: Copies dataset link into clipboard;
dataset-info: Displays additional details about the dataset in the center pane;
dataset-rerun: Reruns job that generated this dataset. This button is unavailable for datasets uploaded into history because they were not produced by a Galaxy tool;
dataset-visualize: Displays visualization options for this dataset. The list of options is dependent on the datatype;
dataset-related-datasets: Shows datasets related to this dataset. This is useful for tracking down parental datasets - those that were used as inputs into a job that produced this particular dataset.
Downloading histories
Click on the gear icon galaxy-gear on the top of the history panel.
Select “Export History to File” from the History menu.
Click on the “Click here to generate a new archive for this history” text.
Wait for the Galaxy server to prepare history for download.
Click on the generated link to download the history.
Export tool citations from a history
When you publish your analysis, you will have to cite the tools you used. Galaxy makes this easy for you:
Click on History optionsgalaxy-history-options
Select Export Tool References
Here you will find all known citations for the tools used in your current history
They are provided in 2 formats, References (APA) and Bibtex
Exporting a history
Click on History options galaxy-history-options
Select Export history to file
Select the format. RO-crate or compressed TGZ file.
Select a destination. Options include:
Temporary Direct Download (will generate a download link valid for 24 hours)
Find all Histories and purge (aka permanently delete)
Login to your Galaxy account.
On the top navigation bar Click on User.
On the drop down menu that appears Click on Histories.
Click on Advanced Search, additional fields will be displayed.
Next to the Status field, click All, a list of all histories will be displayed.
Check the box next to Name in the displayed list to select all histories.
Click Delete Permanently to purge all histories.
A pop up dialogue box will appear letting you know history contents will be removed and cannot be undone, then click OK to confirm.
Finding Histories
To review all histories in your account, go to Historiesgalaxy-histories-activity in the Activity Bar (on the left).
There you will find 4 tabs with histories:
My Histories
Historires Shared with Me
Public Histories
Archived Histories
At the top of each tab is a search bar
Click Advanced Searchgalaxy-advanced-search at the right of the search bar for more search options
Searching by taggalaxy-tags
Filtering by state (e.g. published, deleted, purged)
Histories in all states are listed for registered accounts. Meaning one will always find their data here if it ever appears to be “lost”.
Note: Permanently deleted (purged) Histories may be fully removed from the server at any time. The data content inside the History is always removed at the time of purging (by a double-confirmed user action), but the purged History artifact may still be in the listing. Purged data content cannot be restored, even by an administrator.
Finding and working with shared histories
How to find and work on histories shared with you
To find shared histories
Select Histories from the Activity Bar
Click on the Histories shared with me tab
Published workflows are available from the Public Histories tab
To work with shared histories:
Click on viewgalaxy-eye on the history item.
Preview the history to make sure it is the one you want
Click on Import this history button at the top to make a copy under your own account
Note: Shared Histories (when copied into your account or not) do count in portion toward your total account data quota usage. More details on histories shared concerning account quota usage can be found in this link.
History annotation
Explains how to annotate a history
Sometimes tags and names are not enough to describe the work done within a history. Galaxy allows you to create history annotations: longer text entries that allow for more formatting options. The formatting of the text is preserved. Later, if you publish or share the history, the annotation will be displayed automatically - allowing you to share additional notes about the analysis. Multiple lines, spaces, and emoji! 😹🏳️⚧️🌈 can be used while writing annotations.
To annotate a history:
Click on galaxy-pencil (Edit) next to the history name. A larger text section will appear displaying any existing annotation or Annotation (optional) if empty.
Add your text. Enter will move the cursor to the next line. (Tabs cannot be entered since the ‘Tab’ button is used to switch between controls on the page - tabs can be pasted in, however).
Click on Savegalaxy-save.
To cancel, click the galaxy-undo “Cancel” button.
History options
Explains different history options
Clicking the galaxy-history-options button will open a drop-down menu with several options:
Show histories side-by-side - brings up a view in which multiple histories can be viewed and manipulated simultaneously. Datasets can be dragged between histories in this view.
Resume Paused Jobs - restarts paused jobs in history.
Copy this history - creates an exact copy of the current history in the current account.
Delete this history - deletes the current history.
Export tool citations - export citations for tools that were used in the current history.
Export history to File - creates a compressed archive containing data from the current history.
Archive history - moves history to a non-active, archived, state.
Extract workflow - converts the current history into a workflow
Show invocations - shows a list of all workflows that were run in the current history
Share or Publish - allows controlling access to history. It can be made public or shared with a specific user.
Set Permissions - allows to set the rules on who can access daysets in the current history.
Make Private - resets all permission and makes the current history private.
History tagging
Explains how to add tags to a history
Tags are short pieces of text used to describe the thing they’re attached to and many things in Galaxy can be tagged. Each item can have many tags and you can add new tags or remove them at any time. Tags can be another useful way to organize and search your data. For instance, you might tag a history with the type of analysis you did in it: assembly or variants. Or you may tag them according to data sources or some other metadata: long-term-care-facility or yellowstone-park:2014.
To tag a history:
Click on galaxy-pencil (Edit) next to the history name (which by default is “Unnamed history”).
Click on Add tagsgalaxy-tags and start typing. Any tags that you’ve used previously will show below your partial entry - allowing you to use this ‘autocomplete’ data to re-use your previous tags without typing them in full.
Click on Savegalaxy-save.
To cancel, click the galaxy-undo “Cancel” button.
Warning: Do not use spaces
It is strongly recommended to replace spaces in tags with _ or -, as spaces will automatically be removed when the tag is saved.
How to set Data Privacy Features?
Privacy controls are only enabled if desired. Otherwise, datasets by defaults remain private and unlisted in Galaxy. This means that a dataset you’ve created is virtually invisible until you publish a link to it.
Below are three optional steps to setting private Histories, a user can make use of any of the options below depending on what the user want to achieve:
Changing the privacy settings of individual dataset.
Click on the dataset name for a dropdown.
Clicking the ‘pencil - galaxy-pencil icon
Move on the Permissions tab.
On the permission tab is two input tab
On the second input with a label of access
Search for the name of the user to grant permission
Click on save permission
Note: Adding additional roles to the ‘access’ permission along with your “private role” does not do what you may expect. Since roles are always logically added together, only you will be able to access the dataset, since only you are a member of your “private role”.
Make all datasets in the current history private.
Open the History Options galaxy-gear menu galaxy-gear at the top of your history panel
Click the Make Private option in the dropdown menu available
Sets the default settings for all new datasets in this history to private.
Set the default privacy settings for new histories
Click user button on top of the main channel for a dropdown galaxy-dropdown
Click on the preferences under the dropdown galaxy-dropdown
Select Set Dataset Permissions for New Histories icon cofest
Add a permission and click save permission
Note: Changes made here will only affect histories created after these settings have been stored.
Importing a history
Open the link to the shared history
Click on the Import this history button on the top left
Enter a title for the new history
Click on Copy History
Manipulating multiple history datasets
Explains how to manipulate multiple history datasets at once
You can also hide, delete, and purge multiple datasets at once by multi-selecting datasets:
galaxy-selector Click the multi-select button containing the checkbox just below the history size.
Checkboxes will appear inside each dataset in the history.
Scroll and click the checkboxes next to the datasets you want to manage.
Click the ‘n of N selected’ to choose the action. The action will be performed on all selected datasets, except for the ones that don’t support the action. That is, if an action doesn’t apply to a selected dataset, like deleting a deleted dataset, nothing will happen to that dataset, while all other selected datasets will be deleted.
You can click the multi-select button again to hide the checkboxes.
Renaming a history
Explains how to rename a history
Click on galaxy-pencil (Edit) next to the history name (which by default is “Unnamed history”)
Type the new name
Click on Save
To cancel renaming, click the galaxy-undo “Cancel” button
If you do not have the galaxy-pencil (Edit) next to the history name (which can be the case if you are using an older version of Galaxy) do the following:
Click on Unnamed history (or the current name of the history) (Click to rename history) at the top of your history panel
Type the new name
Press Enter
Searching your history
To make it easier to find datasets in large histories, you can filter your history by keywords as follows:
Click on the search datasets box at the top of the history panel.
Type a search term in this box
For example a tool name, or sample name
To undo the filtering and show your full history again, press on the clear search button galaxy-clear next to the search box
Sharing your History
You can share your work in Galaxy. There are various ways you can give access to one of your histories to other users.
Sharing your history allows others to import and access the datasets, parameters, and steps of your history.
Access the history sharing menu via the History Options dropdown (galaxy-history-options), and clicking “history-share Share or Publish”
Share via link
Open the History Optionsgalaxy-history-options menu at the top of your history panel and select “history-share Share or Publish”
galaxy-toggleMake History accessible
A Share Link will appear that you give to others
Anybody who has this link can view and copy your history
Publish your history
galaxy-toggleMake History publicly available in Published Histories
Anybody on this Galaxy server will see your history listed under the Published Histories tab opened via the galaxy-histories-activityHistories activity
Share only with another user.
Enter an email address for the user you want to share with in the Please specify user email input below Share History with Individual Users
Your history will be shared only with this user.
Finding histories others have shared with me
Click on the galaxy-histories-activityHistories activity in the activity bar on the left
Click the Shared with me tab
Here you will see all the histories others have shared with you directly
Note: If you want to make changes to your history without affecting the shared version, make a copy by going to History Optionsgalaxy-history-options icon in your history and clicking Copy this History
Switching to an existing history
Shows how to switch to another existing history in your account
To switch to an existing history simply click the switch-histories icon at the top of the history panel. This opens a list of histories existing in a given Galaxy account in the middle part of the interface.
Top level history controls
Description of three history buttons for creating a new histiory, switching histories, and opening history options dropdown
Above the current history panel are three buttons:
The new-history “Create new history” button will create an empty history.
The switch-histories “Switch to history” will open a window letting you easily swap to any of your other histories.
The galaxy-history-options “History options” (formerly the galaxy-gear “Gear menu”) gives you access to advanced options to work with your history.
Transfer entire histories from one Galaxy server to another
Transfer a Single Dataset
At the sender Galaxy server, set the history to a shared state, then directly capture the galaxy-link link for a dataset and paste the URL into the Upload tool at the receiver Galaxy server.
Transfer an Entire History
Have an account at two different Galaxy servers, and be logged into both.
Click into the History Options menu in the history panel.
Select from the menu galaxy-history-archiveExport History to File.
Choose the option for How do you want to export this History? as to direct download.
Click on Generate direct download.
Allow the archive generation process to complete. *
Copy the galaxy-link link for your new archive.
At the receiver Galaxy server
Confirm that you are logged into your account.
Click on Data in the top menu, and choose Histories to reach your Saved Histories.
Click on Import history in the grey button on the top right.
Paste in your link’s URL from step 7.
Click on Import History.
Allow the archive import process to complete. *
The transfered history will be uncompressed and added to your Saved Histories.
* For steps 6 and 13: It is Ok to navigate away for other tasks during processing. If enabled, Galaxy will send you status notifications.
tip If the history to transfer is large, you may copy just your important datasets into a new history, and create the archive from that new smaller history. Clearing away deleted and purged datasets will make all histories smaller and faster to archive and transfer!
Undeleting history
Undelete your deleted histories
Deleted histories can be undeleted:
Select “Histories” from the activity bar on the left
Toggle “Advanced search”
Click “Deleted”
Click on the title of the history you want to un-delete and un-delete it!
Unsharing unwanted histories
All account Histories owned by others but shared with you can be reviewed under User > Histories shared with me.
The other person does not need to unshare a history with you. Unshare histories yourself on this page using the pull-down menu per history.
Dataset and History privacy options, including sharing, can be set under User > Preferences.
Three key features to work with shared data are:
View is a review feature. The data cannot be worked with, but many details, including tool and dataset metadata/parameters, are included.
Copy those you want to work with. This will increase your quota usage. This will also allow you to manipulate the datasets or the history independently from the original owner. All History/Dataset functions are available if the other person granted full access to the datasets to you.
Unshare any on the list not needed anymore. After a history is copied, you will still have your version of the history, even if later unshared or the other person who shared it with you changes their version later. Meaning, that each account’s version of a History and the Datasets in it are distinct (unless the Datasets were not shared, you will still only be able to “view” but not work with or download them).
Note: “Histories shared with me” result in only a tiny part of your quota usage. Unsharing will not significantly reduce quota usage unless hundreds (or more!) or many significant histories are shared. If you share a History with someone else, that does not increase or decrease your quota usage.
View a list of all histories
This FAQ demonstrates how to list all histories for a given user
There are multiple ways in which you can view your histories:
Viewing histories using switch-histories “Switch to history” button. This is best for quickly switching between multiple histories.
Click the “Switch history” icon at the top of the history panel to bring up a list of all your histories:
Using the “Activity Bar”:
Click the “Show all histories” button within the Activity Bar on the left:
Using “Data” drop-down:
Click the “Data” link on the top bar of Galaxy interface and select “Histories”:
Using the Multi-view, which is best for moving datasets between histories:
Click the galaxy-history-options menu, and select galaxy-multihistoryShow histories side-by-side
View histories side-by-side
This FAQ demonstrates how to view histories side-by-sde
You can view multiple Galaxy histories at once. This allows to better understand your analyses and also makes it possible to drag datasets between histories. This is called “History multiview”. The multiview can be enabled either view History menu or via the Activity Bar:
Option 1: Enabling Multiview via History menu is done by first clicking on the galaxy-history-options “History options” drop-down and selecting galaxy-multihistory “Show Histories Side-by-Side option”:
Option 2: Clicking the galaxy-multihistory “History Multiview” button within the Activity Bar:
One of the other nice features of RMarkdown documents is making lovely presentation-quality worthy documents. You can take, for example, a tutorial and produce a nice report like output as HTML, PDF, or .doc document that can easily be shared with colleagues or students.
Now you’re ready to preview the document:
Click Preview. A window will popup with a preview of the rendered verison of this document.
The preview is really similar to the GTN rendering, no cells have been executed, and no output is embedded yet in the preview document. But if you have run cells (e.g. the first few loading a library and previewing the msleep dataset:
When you’re ready to distribute the document, you can instead use the Knit button. This runs every cell in the entire document fresh, and then compiles the outputs together with the rendered markdown to produce a nice result file as HTML, PDF, or Word document.
tip Tip: PDF + Word require a LaTeX installation
You might need to install additional packages to compile the PDF and Word document versions
And at the end you can see a pretty document rendered with all of the output of every step along the way. This is a fantastic way to e.g. distribute read-only lesson materials to students, if you feel they might struggle with using an RMarkdown document, or just want to read the output without doing it themselves.
Interactive Jupyter Notebook. Note that on some Galaxies this is called Interactive JupyTool and notebook:
Click Run Tool
The tool will start running and will stay running permanently
This may take a moment, but once the Executed notebook in your history is orange, you are up and running!
On the left menu bar you should see the Interactive Tools Icon now. Click on it to open the Active Interactive Tools and locate the JupyterLab instance you started.
Click on your JupyterLab instance (JupyTool interactive tool)
If JupyterLab is not available on the Galaxy instance:
Depending on which server you are using, you may be able to run RStudio directly in Galaxy. If that is not available, RStudio Cloud can be an alternative.
The tool will start running and will stay running permanently
Click on the “User” menu at the top and go to “Active InteractiveTools” and locate the RStudio instance you started.
If RStudio is not available on the Galaxy instance:
Register for RStudio Cloud, or login if you already have an account
Create a new project
Learning with RMarkdown in RStudio
Learning with RMarkdown is a bit different than you might be used to. Instead of copying and pasting code from the GTN into a document you’ll instead be able to run the code directly as it was written, inside RStudio! You can now focus just on the code and reading within RStudio.
Load the notebook if you have not already, following the tip box at the top of the tutorial
Open it by clicking on the .Rmd file in the file browser (bottom right)
The RMarkdown document will appear in the document viewer (top left)
You’re now ready to view the RMarkdown notebook! Each notebook starts with a lot of metadata about how to build the notebook for viewing, but you can ignore this for now and scroll down to the content of the tutorial.
You can switch to the visual mode which is way easier to read - just click on the gear icon and select Use Visual Editor.
You’ll see codeblocks scattered throughout the text, and these are all runnable snippets that appear like this in the document:
And you have a few options for how to run them:
Click the green arrow
ctrl+enter
Using the menu at the top to run all
When you run cells, the output will appear below in the Console. RStudio essentially copies the code from the RMarkdown document, to the console, and runs it, just as if you had typed it out yourself!
One of the best features of RMarkdown documents is that they include a very nice table browser which makes previewing results a lot easier! Instead of needing to use head every time to preview the result, you get an interactive table browser for any step which outputs a table.
Open a Terminal in Jupyter
This tutorial will let you accomplish almost everything from this view, running code in the cells below directly in the training material. You can choose between running the code here, or opening up a terminal tab in which to run it.Here are some instructions for how to do this on various environments.
Jupyter on UseGalaxy.* and MyBinder.org
Use the File → New → Terminal menu to launch a terminal.
Disable “Simple” mode in the bottom left hand corner, if it activated.
Drag one of the terminal or notebook tabs to the side to have the training materials and terminal side-by-side
CoCalc
Use the Split View functionality of cocalc to split your view into two portions.
Change the view of one panel to a terminal
Open interactive tool
Go to Interactive Tools on the Activity Bar on the left
Wait for your interactive tool to be in the running state (Job Info)
Click on the tool name
Clicking on the external-link icon will open it in a new tab
Stop RStudio
When you have finished your R analysis, it’s time to stop RStudio.
First, save your work into Galaxy, to ensure reproducibility:
You can use gx_put("example.csv") to save individual files by supplying the filename
You can use gx_save() to save the entire analysis transcript and any data objects loaded into your environment.
Once you have saved your data, you can proceed in 2 different ways:
Deleting the corresponding history dataset named RStudio and showing a “in progress state”, so yellow, OR
Clicking on the “User” menu at the top and go to “Active InteractiveTools” and locate the RStudio instance you started, selecting the corresponding box, and finally clicking on the “Stop” button at the bottom.
Stop an Interactive Tool
Go to Interactive Tools on the Activity Bar on the left
Click on the stop button stop next to your interactive tool
A reference genome contains the nucleotide sequence of the chromosomes, scaffolds, transcripts, or contigs for single species. It is representative of a specific genome assembly build or release.
There are two options for reference genomes in Galaxy.
Native
Index provided by the server administrators.
Found on tool forms in a drop down menu.
A database key is automatically assigned. See tip 1.
The database is what links your data to a FASTA index. Example: used with BAM data
Custom
FASTA file uploaded by users.
Input on tool forms then indexed at runtime by the tool.
There are five basic steps to use a Custom Reference Genome, plus one optional.
Obtain a FASTA copy of the target genome. See tip 2.
Upload the genome to Galaxy and to add it as a dataset in your history.
Clean up the format with the tool NormalizeFasta using the options to wrap sequence lines at 80 bases and to trim the title line at the first whitespace.
tip TIP 2: When choosing your reference genome, consider choosing your reference annotation at the same time. Standardize the format of both as a preparation step. Put the files in a dedicated “reference data” history for easy reuse.
Sorting Reference Genome
Certain tools expect that reference genomes are sorted in lexicographical order. These tools are often downstream of the initial mapping tools, which means that a large investment in a project has already been made, before a problem with sorting pops up in conclusion layer tools. How to avoid? Always sort your FASTA reference genome dataset at the beginning of a project. Many sources only provide sorted genomes, but double checking is your own responsibility, and super easy in Galaxy!
Convert Formats -> FASTA-to-Tabular
Filter and Sort -> Sort on column: c1 with flavor: Alphabetical everything in: Ascending order
Convert Formats -> Tabular-to-FASTA
Note: The above sorting method is for most tools, but not all. In particular, GATK tools have a tool-specific sort order requirement.
Troubleshooting Custom Genome fasta
If a custom genome/transcriptome/exome dataset is producing errors, double check the format and that the chromosome identifiers between ALL inputs. Clicking on the bug icon galaxy-bug will often provide a description of the problem. This does not automatically submit a bug report, and it is not always necessary to do so, but it is a good way to get some information about why a job is failing.
Custom genome not assigned as FASTA format
Symptoms include: Dataset not included in custom genome “From history” pull down menu on tool forms.
Solution: Check datatype assigned to dataset and assign fasta format.
How: Click on the dataset’s pencil icon galaxy-pencil to reach the “Edit Attributes” form, and in the Datatypes tab > redetect the datatype.
If fasta is not assigned, there is a format problem to correct.
Incomplete Custom genome file load
Symptoms include: Tool errors result the first time you use the Custom genome.
Solution: Use Text Manipulation → Select last lines from a dataset to check last 10 lines to see if file is truncated.
How: Reload the dataset (switch to FTP if not using already). Check your FTP client logs to make sure the load is complete.
Extra spaces, extra lines, inconsistent line wrapping, or any deviation from strict FASTA format
Symptoms include: RNA-seq tools (Cufflinks, Cuffcompare, Cuffmerge, Cuffdiff) fails with error Error: sequence lines in a FASTA record must have the same length!.
Solution: File tested and corrected locally then re-upload or test/fix within Galaxy, then re-run.
How:
Quick re-formatting Run the tool through the tool NormalizeFasta using the options to wrap sequence lines at 80 bases and to trim the title line at the first whitespace.
Optional Detailed re-formatting Start with FASTA manipulation → FASTA Width formatter with a value between 40-80 (60 is common) to reformat wrapping. Next, use Filter and Sort → Select with “>” to examine identifiers. Use a combination of Convert Formats → FASTA-to-Tabular, Text Manipulation tools, then Tabular-to-FASTA to correct.
With either of the above, finish by using Filter and Sort → Select with ^\w*$ to search for empty lines (use “NOT matching” to remove these lines and output a properly format fasta dataset).
Inconsistent line wrapping, common if merging chromosomes from various Genbank records (e.g. primary chroms with mito)
Symptoms include: Tools (SAMTools, Extract Genomic DNA, but rarely alignment tools) may complain about unexpected line lengths/missing identifiers. Or they may just fail for what appears to be a cluster error.
Solution: File tested and corrected locally then re-upload or test/fix within Galaxy.
How: Use NormalizeFasta using the options to wrap sequence lines at 80 bases and to trim the title line at the first whitespace. Finish by using Filter and Sort → Select with ^\w*$ to search for empty lines (use “NOT matching” to remove these lines and output a properly format fasta dataset).
Unsorted fasta genome file
Symptoms include: Tools such as Extract Genomic DNA report problems with sequence lengths.
Solution: First try sorting and re-formatting in Galaxy then re-run.
How: To sort, follow instructions for Sorting a Custom Genome.
Identifier and Description in “>” title lines used inconsistently by tools in the same analysis
Symptoms include: Will generally manifest as a false genome-mismatch problem.
Solution: Remove the description content and re-run all tools/workflows that used this input. Mapping tools will usually not fail, but downstream tools will. When this comes up, it usually means that an analysis needs to be started over from the mapping step to correct the problems. No one enjoys redoing this work. Avoid the problems by formatting the genome, by double checking that the same reference genome was used for all steps, and by making certain the ‘identifiers’ are a match between all planned inputs (including reference annotation such as GTF data) before using your custom genome.
How: To drop the title line description content, use NormalizeFasta using the options to wrap sequence lines at 80 bases and to trim the title line at the first whitespace. Next, double check that the chromosome identifiers are an exact match between all inputs.
Unassigned database
Symptoms include: Tools report that no build is available for the assigned reference genome.
Solution: This occurs with tools that require an assigned database metadata attribute. SAMTools and Picard often require this assignment.
How: Create a Custom Build and assign it to the dataset.
Enhancing tabular dataset previews in reports/pages
There are lots of fun advanced features!
There are a number of options, specifically for tabular data, that can allow it to render more nicely in your workflow reports and pages and anywhere that GalaxyMarkdown is used.
title to give your table a title
footer allows you to caption your table
show_column_headers=false to hide the column headers
compact=true to make the table show up more inline, hiding that it was embedded from a Galaxy dataset.
The existing history_dataset_display directive displays the dataset name and some useful context at the expense of potentially breaking the flow of the document
The existing history_dataset_embedded directive was implemented to try to inline results more and make the results more readable within a more… curated document. It is dispatches on tabular types and puts the results in a table but the table doesn’t have a lot of options.
The history_dataset_as_table directive mirrors the history_dataset_as_image directive: it tries harder to coerce the data into a table and provides new table—specific options. The first of these is “show_column_headers which defaults to true`.
Figures in general should have titles and legends — so there is the “title” and “footer” options also.
Code In: Galaxy Markdown
```galaxy
history_dataset_as_table(history_dataset_id=1e8ab44153008be8,show_column_headers=false,title='Binding Site Results',footer='Here is a very good figure caption for this table.')
```
Code Out: Example Screenshot
Making an element collapsible in a report
If you have extraneous information you might want to let a user collapse it.
This applies to any GalaxyMarkdown elements, i.e. the things you’ve clicked in the left panel to embed in your Workflow Report or Page
By adding a collapse="" attribute to a markdown element, you can make it collapsible. Whatever you put in the quotes will be the title of the collapsible box.
Illumina MiSeq sequencing is based on sequencing by synthesis. As the name suggests, fluorescent labels are measured for every base that bind at a specific moment at a specific place on a flow cell. These flow cells are covered with oligos (small single strand DNA strands). In the library preparation the DNA strands are cut into small DNA fragments (differs per kit/device) and specific pieces of DNA (adapters) are added, which are complementary to the oligos. Using bridge amplification large amounts of clusters of these DNA fragments are made. The reverse string is washed away, making the clusters single stranded. Fluorescent bases are added one by one, which emit a specific light for different bases when added. This is happening for whole clusters, so this light can be detected and this data is basecalled (translation from light to a nucleotide) to a nucleotide sequence (Read). For every base a quality score is determined and also saved per read. This process is repeated for the reverse strand on the same place on the flow cell, so the forward and reverse reads are from the same DNA strand. The forward and reversed reads are linked together and should always be processed together!
Nanopore sequencing has several properties that make it well-suited for our purposes
Long-read sequencing technology offers simplified and less ambiguous genome assembly
Long-read sequencing gives the ability to span repetitive genomic regions
Long-read sequencing makes it possible to identify large structural variations
When using Oxford Nanopore Technologies (ONT) sequencing, the change in electrical current is measured over the membrane of a flow cell. When nucleotides pass the pores in the flow cell the current change is translated (basecalled) to nucleotides by a basecaller. A schematic overview is given in the picture above.
When sequencing using a MinIT or MinION Mk1C, the basecalling software is present on the devices. With basecalling the electrical signals are translated to bases (A,T,G,C) with a quality score per base. The sequenced DNA strand will be basecalled and this will form one read. Multiple reads will be stored in a fastq file.
If your data is not sensitive (i.e. human patient) but just private (sequencing from other animals/bacteria/etc), then it is absolutely ok to use a public galaxy server like usegalaxy.eu or usegalaxy.org!
Data uploaded is private to your account, it isn’t available to others publicly. No one will scoop your results, if you use a public galaxy server to analyse your data :)
A great benefit of this is then when your paper is being reviewed you can share that history or workflow with reviewers, and when it’s published you can click a button to share those results with the world as well, such that others can reproduce your analysis!
(of course system administrators can see the files on disk but they are not interested and will not be looking at your data. If you file a bug report they may see your data but they are system administrators, not bioinformatics experts that might be interested in your results.)
Contacting Galaxy Administrators
If you suspect there is something wrong with the server, or would like to request a tool to be installed, you should contact the server administrators for the Galaxy you are on.
Other Galaxy servers? Check the homepage for more information.
How can I use the Matrix messaging system for Galaxy Project communication?
When you are directed to use Matrix for a Galaxy working group or for your support question, but you don't know what Matrix or how to access it. Learn what Matrix is, why it is used, and how to use Matrix to connect to us.
Introduction
The Galaxy community uses Matrix – a secure, decentralized, open-source messaging protocol – as its primary chat system. Matrix enables real-time communication across Galaxy contributors, developers, trainers, and users. Common uses include:
Getting help from the community
Discussing tool and workflow development
Organizing training events and materials
Collaborating on Galaxy infrastructure or scientific questions
Matrix provides an open alternative to proprietary platforms like Slack and Microsoft Teams, with broader flexibility and user privacy in mind.
🔰 For Newbies: Getting Started with Matrix
If you are new to messaging systems, here’s how to get started with Galaxy on Matrix:
Step 1: Choose and install a Matrix app
Install a Matrix client app: Download and install a Matrix client:
If you’re using the Element client, click Explore (the compass icon) and search for “Galaxy” – look for a room named Galaxy or Galaxy Lobby (often with an address like #galaxyproject:matrix.org).
Alternatively, you can use a direct Matrix link if provided, which will prompt your app to join the room.
In addition to the Lobby room, join other Matrix rooms via direct links once logged in:
Say hello and ask questions: Once in the Galaxy Lobby, feel free to introduce yourself or ask your question. This Lobby room is a friendly starting point – community members will welcome you, answer basic questions, and guide you to more specific Galaxy channels/rooms if needed. You will be redirected to the right room if needed.
💡 For Experienced Users (Slack/Teams/Discord Users)
If you’ve used tools like Slack, Microsoft Teams, or Discord, Matrix will feel familiar — with a few important differences:
✅ Key Similarities
Rooms ≈ Channels: Rooms are topic-based, like Slack channels.
DMs supported: You can message users privately.
Multiple devices: Stay logged in on phone, tablet, laptop.
❗ Key Differences
Federated, decentralized network: There is no single “Galaxy workspace” to be invited to. Join any Matrix room directly via a public server.
Flexible clients: You can use different Matrix client apps across platforms. They all show the same chats.
Room discovery: Galaxy may provide a Matrix Space to group related rooms to organize communities (e.g. training, user help, development, working groups/wg, infrastructure).
Bridged rooms: Some rooms are connected to Gitter or other services, but behave normally in Matrix. For example:
#galaxyproject_Lobby:gitter.im
This is a Matrix room that also syncs with users on Gitter. You can treat them as normal Matrix rooms; messages are synced across the platforms.
🔐 Security and Privacy
Matrix supports end-to-end encryption (E2EE) in private conversations and invite-only rooms.
However, public Galaxy rooms are not encrypted. This is intentional so people can easily join and search history. Therefore:
🔍 Assume public visibility: Don’t share passwords, private research data, or anything sensitive.
🙈 Use nicknames if preferred: Your Matrix ID is visible in public rooms, but you don’t have to use your real name.
🔐 Private DMs are encrypted by default.
⚠️ Be cautious: Even with encryption, nothing is foolproof. Use common sense.
Matrix is designed for open collaboration. When in doubt, treat public rooms like an open forum.
Galaxy Help Forum: You can also have a look at the Galaxy Help Forum. Your question may already have been answered here before. If not, you can post your question here.
Tools are frequently updated to new versions. Your Galaxy may have multiple versions of the same tool available. By default, you will be shown the latest version of the tool.
Switching to a different version of a tool:
Open the tool
Click on the tool-versions versions logo at the top right
Select the desired version from the dropdown list
If a Tool is Missing
To use the tools installed and available on the Galaxy server:
At the top of the left tool panel, type in a tool name or datatype into the tool search box.
Shorter keywords find more choices.
Tools can also be directly browsed by category in the tool panel.
If you can’t find a tool you need for a tutorial on Galaxy, please:
Check that you are using a compatible Galaxy server
Navigate to the overview box at the top of the tutorial
Find the “Supporting Materials” section
Check “Available on these Galaxies”
If your server is not listed here, the tutorial is not supported on your Galaxy server
You can create an account on one of the supporting Galaxies
Use the Tutorial mode feature
Open your Galaxy server
Click on the curriculum icon on the top menu, this will open the GTN inside Galaxy.
Navigate to your tutorial
Tool names in tutorials will be blue buttons that open the correct tool for you
Sometimes there are multiple tools with very similar names. If the parameters in the tutorial don’t match with what you see in Galaxy, please try the following:
Use Tutorial Modecurriculum in Galaxy, and click on the blue tool button in the tutorial to automatically open the correct tool and version (not available for all tutorials yet)
Tools are frequently updated to new versions. Your Galaxy may have multiple versions of the same tool available. By default, you will be shown the latest version of the tool. This may NOT be the same tool used in the tutorial you are accessing. Furthermore, if you use a newer tool in one step, and try using an older tool in the next step… this may fail! To ensure you use the same tool versions of a given tutorial, use the Tutorial mode feature.
Open your Galaxy server
Click on the curriculum icon on the top menu, this will open the GTN inside Galaxy.
Navigate to your tutorial
Tool names in tutorials will be blue buttons that open the correct tool for you
Note: this does not work for all tutorials (yet)
You can click anywhere in the grey-ed out area outside of the tutorial box to return back to the Galaxy analytical interface
Warning: Not all browsers work!
We’ve had some issues with Tutorial mode on Safari for Mac users.
Try a different browser if you aren’t seeing the button.
Check that the entire tool name matches what you see in the tutorial.
Organizing the tool panel
Galaxy servers can have a lot of tools available, which can make it challenging to find the tool you are looking for. To help find your favourite tools, you can:
Keep a list of your favourite tools to find them back easily later.
Adding tools to your favourites
Open a tool
Click on the star icongalaxy-star next to the tool name to add it to your favourites
Viewing your favourite tools
Click on the star icongalaxy-star at the top of the Galaxy tool panel (above the tool search bar)
This will filter the toolbox to show all your starred tools
Change the tool panel view
Click on the galaxy-panelview icon at the top of the Galaxy tool panel (above the tool search bar)
Here you can view the tools by EDAM ontology terms
EDAM Topics (e.g. biology, ecology)
EDAM Operations (e.g. quality control, variant analysis)
You can always get back to the default view by choosing “Full Tool Panel”
Re-running a tool
Expand one of the output datasets of the tool (by clicking on it)
Click re-run galaxy-refresh the tool
This is useful if you want to run the tool again but with slightly different paramters, or if you just want to check which parameter setting you used.
Regular Expressions 101
Regular expressions are a standardized way of describing patterns in textual data. They can be extremely useful for tasks such as finding and replacing data. They can be a bit tricky to master, but learning even just a few of the basics can help you get the most out of Galaxy.
Finding
Below are just a few examples of basic expressions:
Regular expression
Matches
abc
an occurrence of abc within your data
(abc|def)
abcordef
[abc]
a single character which is either a, b, or c
[^abc]
a character that is NOT a, b, nor c
[a-z]
any lowercase letter
[a-zA-Z]
any letter (upper or lower case)
[0-9]
numbers 0-9
\d
any digit (same as [0-9])
\D
any non-digit character
\w
any alphanumeric character
\W
any non-alphanumeric character
\s
any whitespace
\S
any non-whitespace character
.
any character
\.
literal . (period)
{x,y}
between x and y repetitions
^
the beginning of the line
$
the end of the line
Note: you see that characters such as *, ?, ., + etc have a special meaning in a regular expression. If you want to match on those characters, you can escape them with a backslash. So \? matches the question mark character exactly.
Examples
Regular expression
matches
\d{4}
4 digits (e.g. a year)
chr\d{1,2}
chr followed by 1 or 2 digits
.*abc$
anything with abc at the end of the line
^$
empty line
^>.*
Line starting with > (e.g. Fasta header)
^[^>].*
Line not starting with > (e.g. Fasta sequence)
Replacing
Sometimes you need to capture the exact value you matched on, in order to use it in your replacement, we do this using capture groups (...), which we can refer to using \1, \2 etc for the first and second captured values. If you want to refer to the whole match, use &.
Regular expression
Input
Captures
chr(\d{1,2})
chr14
\1 = 14
(\d{2}) July (\d{4})
24 July 1984
\1 = 24, \2 = 1984
An expression like s/find/replacement/g indicates a replacement expression, this will search (s) for any occurrence of find, and replace it with replacement. It will do this globally (g) which means it doesn’t stop after the first match.
Example: s/chr(\d{1,2})/CHR\1/g will replace chr14 with CHR14 etc.
You can also use replacement modifier such as convert to lower case \L or upper case \U. Example: s/.*/\U&/g will convert the whole text to upper case.
Note: In Galaxy, you are often asked to provide the find and replacement expressions separately, so you don’t have to use the s/../../g structure.
There is a lot more you can do with regular expressions, and there are a few different flavours in different tools/programming languages, but these are the most important basics that will already allow you to do many of the tasks you might need in your analysis.
Tip:RegexOne is a nice interactive tutorial to learn the basics of regular expressions.
Tip:Regex101.com is a great resource for interactively testing and constructing your regular expressions, it even provides an explanation of a regular expression if you provide one.
Tip:Cyrilex is a visual regular expression tester.
Request Galaxy tools on a specific server
To request tools that already exist in the Galaxy toolshed, but not in your server, please raise an issue at:
Select several files by keeping the Ctrl (or COMMAND) key pressed and clicking on the files of interest
Selecting a dataset collection as input
Click on param-collectionDataset collection in front of the input parameter you want to supply the collection to.
Select the collection you want to use from the list
Sorting Tools
Sometimes input errors are caused because of non-sorted inputs. Try using these:
Picard SortSam: Sort SAM/BAM by coordinate or queryname.
Samtools Sort: Alternate for SAM/BAM, best when used for coordinate sorting only.
SortBED order the intervals: Best choice for BED/Interval.
Sort data in ascending or descending order: Alternate choice for Tabular/BED/Interval/GTF.
VCFsort: Best choice for VFC.
Tool Form Options for Sorting: Some tools have an option to sort inputs during job execution. Whenever possible, sort inputs before using tools, especially if jobs fail for not having enough memory resources.
Tool doesn't recognize input datasets
The expected input datatype assignment is explained on the tool form. Review the input select areas and the help section below the Run Tool button.
Individual datasets and dataset collections are selected differently on tool forms.
To select a collection input on a tool form see this FAQ.
Using tutorial mode
Tutorial mode saves you screen space, finds the tools you need, and ensures you use the correct versions for the tutorials to run.
Tools are frequently updated to new versions. Your Galaxy may have multiple versions of the same tool available. By default, you will be shown the latest version of the tool. This may NOT be the same tool used in the tutorial you are accessing. Furthermore, if you use a newer tool in one step, and try using an older tool in the next step… this may fail! To ensure you use the same tool versions of a given tutorial, use the Tutorial mode feature.
Open your Galaxy server
Click on the curriculum icon on the top menu, this will open the GTN inside Galaxy.
Navigate to your tutorial
Tool names in tutorials will be blue buttons that open the correct tool for you
Note: this does not work for all tutorials (yet)
You can click anywhere in the grey-ed out area outside of the tutorial box to return back to the Galaxy analytical interface
Warning: Not all browsers work!
We’ve had some issues with Tutorial mode on Safari for Mac users.
Try a different browser if you aren’t seeing the button.
Viewing tool logs (`stdout` and `stderr`)
Most tools create log files as output, which can contain useful information about how the tool ran (stdout, or standard output), and what went wrong (stderr, or standard error).
To view these log files in Galaxy:
Expand one of the outputs of the tool in your history
Click on View detailsdetails
Scroll to the Job Information section
Here you will find links to the log files (stdout and stderr).
Where is the tool help?
Finding tool support
There is documentation available on the tool form itself which mentions the following information:
Parameters
Expected format for input dataset(s)
Links to publications and ToolShed source repositories
How to find and correct tool errors related to Metadata?
Finding and Correcting Metadata
Tools can error when the wrong dataset attributes (metadata) are assigned. Some of these wrong assignments may be:
Tool outputs, which are automatically assigned without user action.
Incorrect autodetection of datatypes, which need manual modification.
Undetected attributes, which require user action (example: assigning database to newly uploaded data).
How to notice missing Dataset Metadata:
Dataset will not be downloaded when using the disk icon galaxy-save.
Tools error when using a previously successfully used specific dataset.
Tools error with a message that ends with: OSError: [Errno 2] No such file or directory.
Solution:
Click on the dataset’s pencil icon galaxy-pencil to reach the Edit Attributes forms and do one of the following as applies:
Directly reset metadata
Find the tab for the metadata you want to change, make the change, and save.
Autodetect metadata
Click on the Auto-detect button. The dataset will turn yellow in the history while the job is processing.
Incomplete Dataset Download
In case the dataset downloads incompletely:
Use the Google Chrome web browser. Sometimes Chrome works better at supporting continuous data transfers.
Use the command-line option instead. The data may really be too large to download OR your connection is slower. This can also be a faster way to download multiple datasets plus ensure a complete transfer (small or large data).
Understanding 'canceled by admin' or cluster failure error messages
The initial error message could be:
This job failed because it was cancelled by an administrator.
Please click the bug icon to report this problem if you need help.
Or
job info:
Remote job server indicated a problem running or monitoring this job.
Causes:
Server or cluster error.
Less frequently, input problems are a factor.
Solutions:
Try at least one rerun. Server/cluster errors like this are usually transient.
job info:
This job was terminated because it used more memory than it was allocated.
Please click the bug icon to report this problem if you need help.
Tool-specific formatting requirements for inputs were not met.
Parameters set on a tool form are a mismatch for the input data content or format.
Inputs were in an error state (red) or were putatively successful (green) but are empty.
Inputs do not meet the datatype specification.
Inputs do not contain the exact content that a tool is expecting or that was input in the form.
Annotation files are a mismatch for the selected or assigned reference genome build.
Special case: Some of the data were generated outside of Galaxy, but later a built-in indexed genome build was assigned in Galaxy for use with downstream tools. This scenario can work, but only if those two reference genomes are an exact match.
For most analysis, allowing Galaxy to detect the datatype during Upload is best and adjusting a datatype later should rarely be needed. If a datatype is modified, the change has a specific purpose/reason.
Does your data have headers? Is that in specification for the datatype? Does the tool form have an option to specify if the input has headers or not? Do you need to remove headers first for the correct datatype to be detected? Example GTF.
Large inputs? Consider modifying your inputs to be smaller. Examples: FASTQ and FASTA.
Run quality checks on your data.
Search GTN tutorials with the keyword “qa-qc” for examples.
Search Galaxy Help with the keywords “qa-qc” and your datatype(s) for more help.
Search Galaxy Help with the keywords “gtf” and “gff3” for more help.
Input mismatch tips.
Do the chromosome/sequence identifiers exactly match between all inputs? Search Galaxy Help for more help about how to correct build/version identifier mismatches between inputs.
“Chr1” and “chr1” and “1” do not mean the same thing to a tool.
Custom genome transcriptome exome tips. See FASTA.
Understanding walltime error messages
The full error message will be reported as below, and can be found by clicking on the bug icon for a failed job run (red dataset):
job info:
This job was terminated because it ran longer than the maximum allowed job run time.
Please click the bug icon to report this problem if you need help.
Or sometimes,
job stderr:
slurmstepd: error: *** JOB XXXX ON XXXX CANCELLED AT 2019-XX-XXTXX:XX:XX DUE TO TIME LIMIT ***

job info:
Remote job server indicated a problem running or monitoring this job.
Causes:
The job execution time exceeded the “wall-time” on the cluster node that ran the job.
The server may be undergoing maintenance.
Very often input problems also cause this same error.
Solutions:
Try at least one rerun.
Check the server homepage for banners or notices. Selected servers also post to the Galaxy status page.
Your data may actually be too large to process at a public Galaxy server. Alternatives include setting up a private Galaxy server.
What information should I include when reporting a problem?
Writing bug reports is a good skill to have as bioinformaticians, and a key point is that you should include enough information from the first message to help the process of resolving your issue more efficient and a better experience for everyone.
What to include
Which commands did you run, precisely, we want details. Which flags did you set?
Which server(s) did you run those commands on?
What account/username did you use?
Where did it go wrong?
What were the stdout/stderr of the tool that failed? Include the text.
Did you try any workarounds? What results did those produce?
(If relevant) screenshot(s) that show exactly the problem, if it cannot be described in text. Is there a details panel you could include too?
If there are job IDs, please include them as text so administrators don’t have to manually transcribe the job ID in your picture.
It makes the process of answering ‘bug reports’ much smoother for us, as we will have to ask you these questions anyway. If you provide this information from the start, we can get straight to answering your question!
What does a GOOD bug report look like?
The people who provide support for Galaxy are largely volunteers in this community, so try and provide as much information up front to avoid wasting their time:
I encountered an issue: I was working on (this server> and trying to run (tool)+(version number) but all of the output files were empty. My username is jane-doe.
Here is everything that I know:
The dataset is green, the job did not fail
This is the standard output/error of the tool that I found in the information page (insert it here)
I have read it but I do not understand what X/Y means.
The job ID from the output information page is 123123abdef.
I tried re-running the job and changing parameter Z but it did not change the result.
Log out of Galaxy, then back in again. This refreshes the disk usage calculation displayed in the Masthead usage (summary) and under User > Preferences (exact).
Note:
Your account usage quota can be found at the bottom of your user preferences page.
Forgot Password
Go to the Galaxy server you are using.
Click on Login or Register.
Enter your email on the Public Name or Email Address entry box.
Click on the link under the password entry box titled Forgot password? Click here to reset your password.
An email will be sent with a password reset link. This email may be in your email Spam or Trash folders, depending on your filters.
Click on the reset link in the email or copy and paste it into a web browser window.
Enter your new password and click on Save new password.
Getting your API key
In your browser, open your Galaxy homepage
Log in, or register a new account, if it’s the first time you’re logging in
Go to User -> Preferences in the top menu bar, then click on Manage API key
If there is no current API key available, click on Create a new key to generate it
Copy your API key to somewhere convenient, you will need it throughout this tutorial
Click on galaxy-pencilEdit Attributes on the top right
Write a description of the workflow in the Annotation box
Add a tag (which will help to search for the workflow) in the Tags section
Creating a new workflow
You can create a Galaxy workflow from scratch in the Galaxy workflow editor.
Click Workflow on the top bar
Click the new workflow galaxy-wf-new button
Give it a clear and memorable name
Clicking Save will take you directly into the workflow editor for that workflow
Need more help? Please see the How to make a workflow subsectionhere
Downloading workflows
Click on Workflowsgalaxy-workflows-activity in the Galaxy Activity Bar.
You will see a list of all your workflows
Click on the Downloaddownload button of the workflow you would like to download
Ensuring Workflows meet Best Practices
When you are editing a workflow, there are a number of additional steps you can take to ensure that it is a Best Practice workflow and will be more reusable.
Open a workflow for editing
In the workflow menu bar, you’ll find the galaxy-wf-optionsWorkflow Options dropdown menu.
Click on it and select galaxy-wf-best-practicesBest Practices from the dropdown menu.
This will take you to a new side panel, which allows you to investigate and correct any issues with your workflow.
publishing the workflow on GitHub, a public GitLab server, or another public version-controlled repository
registering the workflow with a workflow registry such as WorkflowHub or Dockstore
Extracting a workflow from your history
Galaxy can automatically create a workflow based on the analysis you have performed in a history. This means that once you have done an analysis manually once, you can easily extract a workflow to repeat it on different data.
Clean up your history: remove any failed (red) jobs from your history by clicking on the galaxy-delete button.
This will make the creation of the workflow easier.
Click on galaxy-gear (History options) at the top of your history panel and select Extract workflow.
The central panel will show the content of the history in reverse order (oldest on top), and you will be able to choose which steps to include in the workflow.
Replace the Workflow name to something more descriptive.
Rename each workflow input in the boxes at the top of the second column.
If there are any steps that shouldn’t be included in the workflow, you can uncheck them in the first column of boxes.
Click on the Create Workflow button near the top.
You will get a message that the workflow was created.
Get the workflow id
Go to the galaxy-workflows-activityworkflows panel in Galaxy and find the workflow you’ve just created.
Click on galaxy-pencil Edit or history-share Share
The URL in your browser will look something like https://usegalaxy.eu/workflow/editor?id=34d18f081b73cb15. Copy the part after ?id= - this is the workflow ID, in our case: 34d18f081b73cb15
Get the workflow invocation
Go to the workflow invocations page
Before Galaxy 24.0: Go to User > Workflow Invocations
In Galaxy 24.0: Go to Data > Workflow Invocations
Above Galaxy 24.1: Go to Workflow Invocation in the activity bar on the left
Open the most recent item
Find the invocation id:
Below 24.0, you can get it here:
Above Galaxy 24.1 (activity bar), you can find the workflow invocation id from the URL. For example, https://usegalaxy.org/workflows/invocations/be5c48c113145dd5 means that the workflow invocation id is be5c48c113145dd5.
Hiding intermediate steps
When a workflow is executed, the user is usually primarily interested in the final product and not in all intermediate steps. By default all the outputs of a workflow will be shown, but we can explicitly tell Galaxy which outputs to show and which to hide for a given workflow. This behaviour is controlled by clicking on the eye icon on for all dataset that should be hidden:
Import workflows from DockStore
Dockstore is a free and open source platform for sharing reusable and scalable analytical tools and workflows.
Ensure that you are logged in to your Galaxy account.
Click on “Galaxy” dropdown within the “Launch with” panel located in the upper right corner.
Select a galaxy instance you want to launch this workflow with.
You will be redirected to Galaxy and presented with a list of workflow versions.
Click the version you want (usually the latest labelled as “main”)
You are done!
The following short video walks you through this uncomplicated procedure:
Video: Importing from Dockstore
Importing a workflow
Click on galaxy-workflows-activityWorkflows in the Galaxy activity bar (on the left side of the screen, or in the top menu bar of older Galaxy instances). You will see a list of all your workflows
Click on galaxy-uploadImport at the top-right of the screen
Provide your workflow
Option 1: Paste the URL of the workflow into the box labelled “Archived Workflow URL”
Option 2: Upload the workflow file in the box labelled “Archived Workflow File”
Click the Import workflow button
Below is a short video demonstrating how to import a workflow from GitHub using this procedure:
Video: Importing a workflow from URL
Importing a workflow using the Tool Registry Server (TRS) search
Click on galaxy-workflows-activityWorkflows in the Galaxy activity bar (on the left side of the screen, or in the top menu bar of older Galaxy instances). You will see a list of all your workflows
Click on galaxy-uploadImport at the top-right of the screen
On the new page, select the GA4GH servers tab, and configure the GA4GH Tool Registry Server (TRS) Workflow Search interface as follows:
“TRS Server”: the TRS Server you want to search on (Dockstore or workflowhub.eu)
Type in the search query
Expand the correct workflow by clicking on it
Select the version you would like to galaxy-upload import
The workflow will be imported to your list of workflows. Note that it will also carry a little blue-white shield icon next to its name, which indicates that this is an original workflow version imported from a TRS server. If you ever modify the workflow with Galaxy’s workflow editor, it will lose this indicator.
Below is a short video showing the entire uncomplicated procedure:
Ensure the “TRS server” is set to “workflowhub.eu”
Provide your your “TRS ID” (WorkflowHub’s numerical identifier of your workflow that appears in the link to its WorkflowHub page)
Select the workflow version you want to import
Importing and launching a GTN workflow
Find the material you are interested in
View its workflows, which can be found in the metadata box at the top of the tutorial
Click the button on any workflow to run it.
Make a workflow public
Click on galaxy-workflows-activityWorkflows in the Galaxy activity bar (on the left side of the screen, or in the top menu bar of older Galaxy instances). You will see a list of all your workflows
Click on the history-shareShare button of the workflow you would like to publish
Click on Make Workflow accessible. This makes the workflow publicly accessible but unlisted.
To also list the workflow for all users on the Public workflows tab of the galaxy-workflows-activityWorkflows page, click Make Workflow publicly available in Published Workflows
Opening the workflow editor
Click on galaxy-workflows-activityWorkflows in the Galaxy activity bar (on the left side of the screen, or in the top menu bar of older Galaxy instances)
Click on the galaxy-wf-editEdit button of the workflow you would like to edit
Make your desired changes in the workflow editor
Click on the dataset-saveSave icon, which appears next to the workflow title if you have unsaved changes, to save your changes and continue editing, or on dataset-saveSave + Exit in the activity bar to save your changes and leave the workflow editor.
Publish your workflow in IWC
IWC stands for Intergalactic Workflow Commission.
The IWC maintains high-quality Galaxy Workflows. These production workflows target at users that want to analyze their own data. As such, the workflow should be sufficiently generic that users can provide their own data. These workflows usually use workflow parameter explained in this tutorial.
Click on the tool in the workflow to get the details of the tool on the right-hand side of the screen.
Scroll down to the Configure Output section of your desired parameter, and click it to expand it.
Under Rename dataset, give it a meaningful name
Running a workflow
Click on Workflows on the Activity Bar on the left.
At the top of the resulting page you will have the option to switch between the My workflows, Workflows shared with me and Public workflows tabs.
Select the tab you want to see all workflows in that category
Search for your desired workflow.
Click on the workflow name: a pop-up window opens with a preview of the workflow.
To run it directly: click Run (top-right).
Recommended: click Import (left of Run) to make your own local copy under Workflows / My Workflows.
Setting parameters at run-time
Open the workflow editor
Click on the tool in the workflow to get the details of the tool on the right-hand side of the screen.
Scroll down to the parameter you want users to provide every time they run the workflow
Click on the arrow in front of the name workflow-runtime-toggle to toggle to set at runtime
Share
Click on galaxy-workflows-activityWorkflows in the Galaxy activity bar (on the left side of the screen, or in the top menu bar of older Galaxy instances). You will see a list of all your workflows
Click on the history-shareShare button of the workflow you would like to publish
Go to Share Workflow with Individual Users
Enter the email address of the user you want to share the workflow with.
They will be able to find and import your workflow under Workflows shared with me tab in the Workflows section of the Activity bar
Viewing a workflow report
You can find the workflow report from the workflow invocation
Go to User on the top menu bar of Galaxy.
Click on Workflow invocations
Here you will find a list of all the workflows you have run
Click on the name of a workflow invocation to expand it
Click on View Report to go to the workflow report page
Note: The report can also be downloaded in PDF format by clicking on the galaxy-wf-report-download icon.


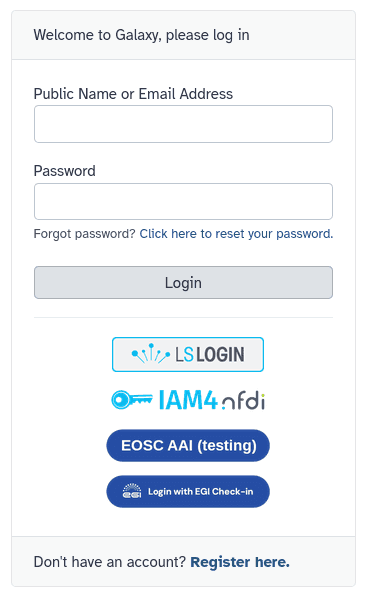
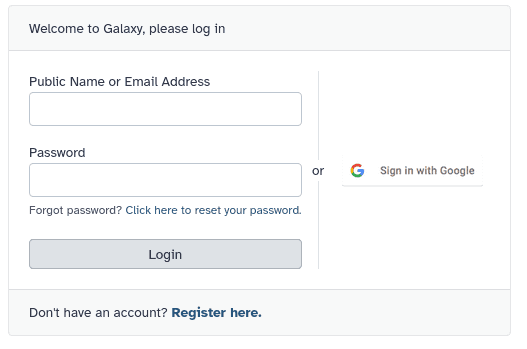
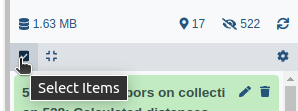
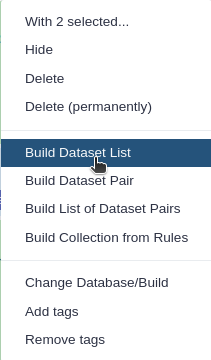


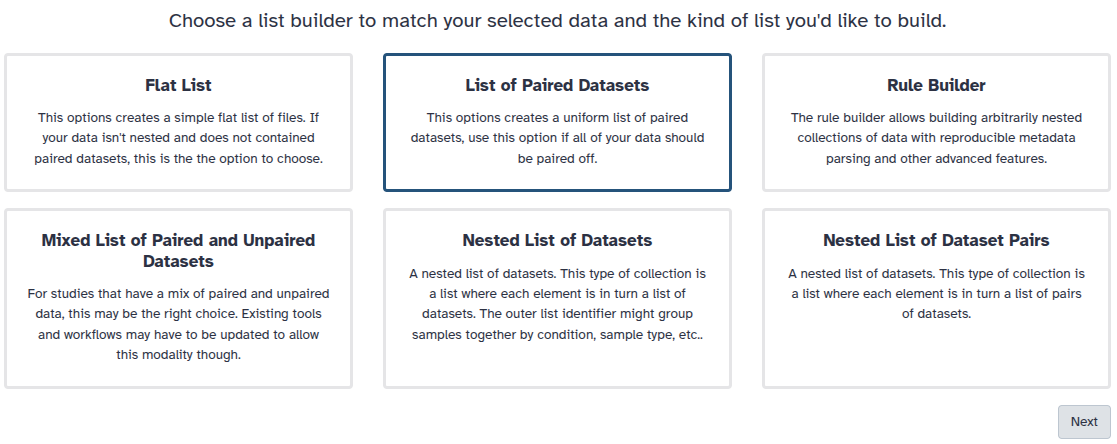
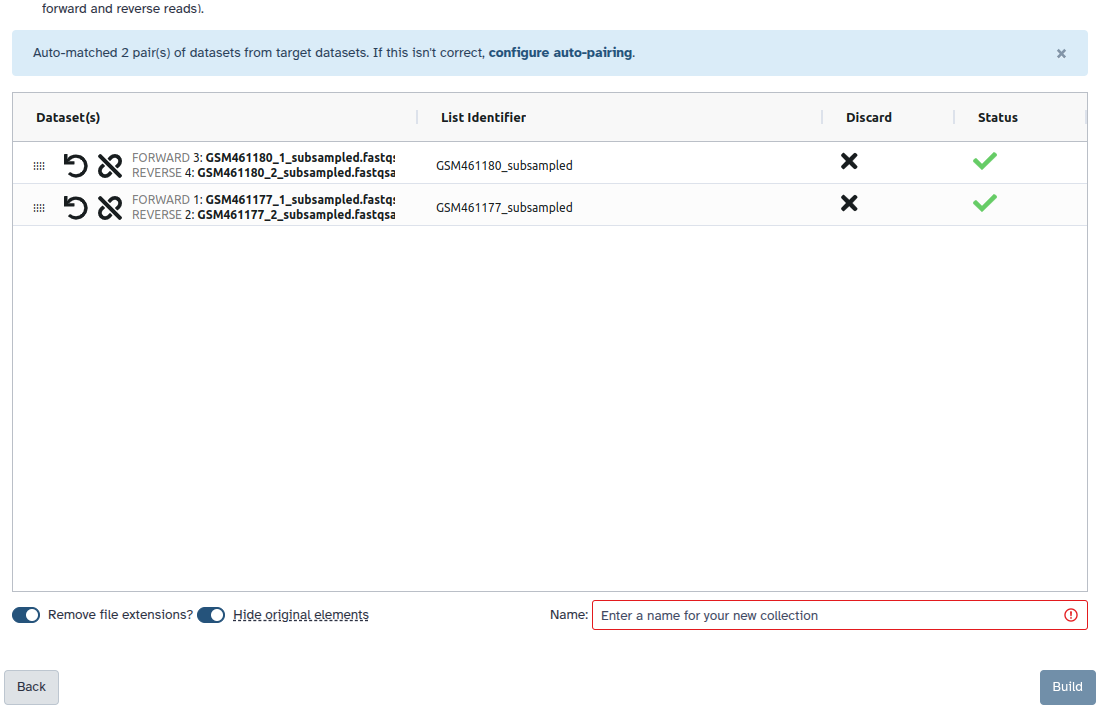


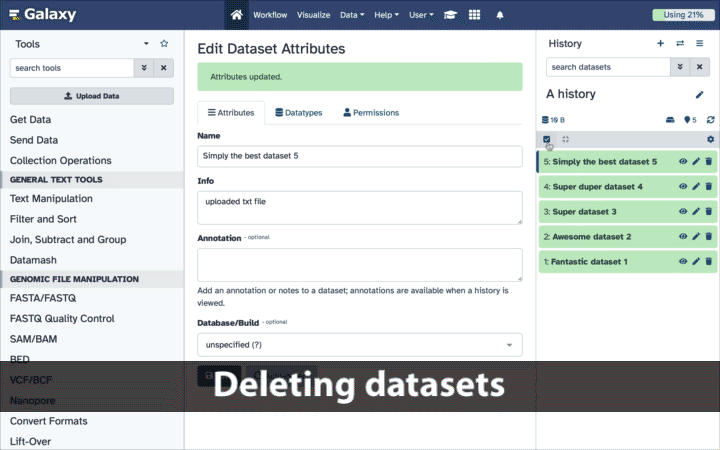
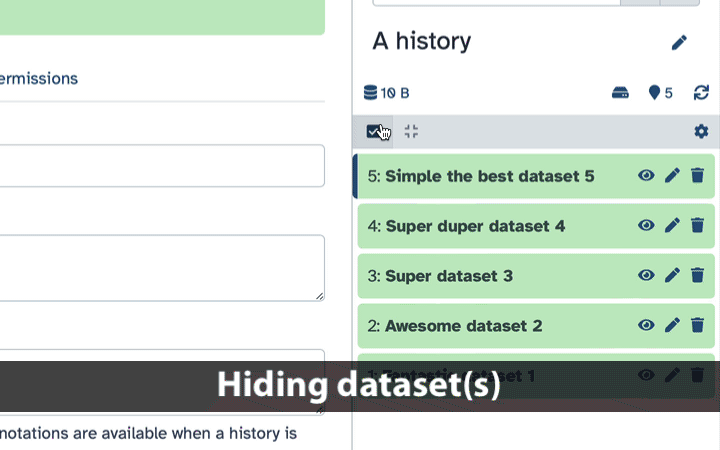
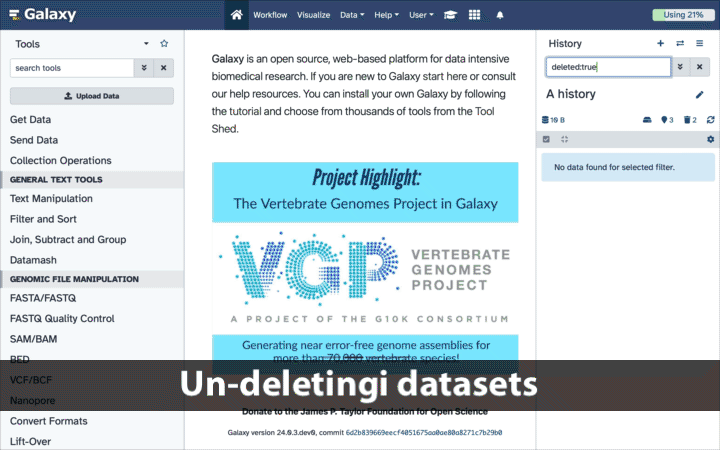
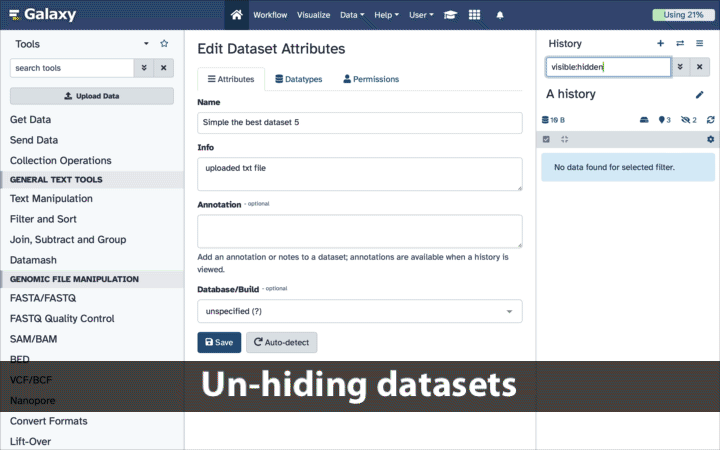


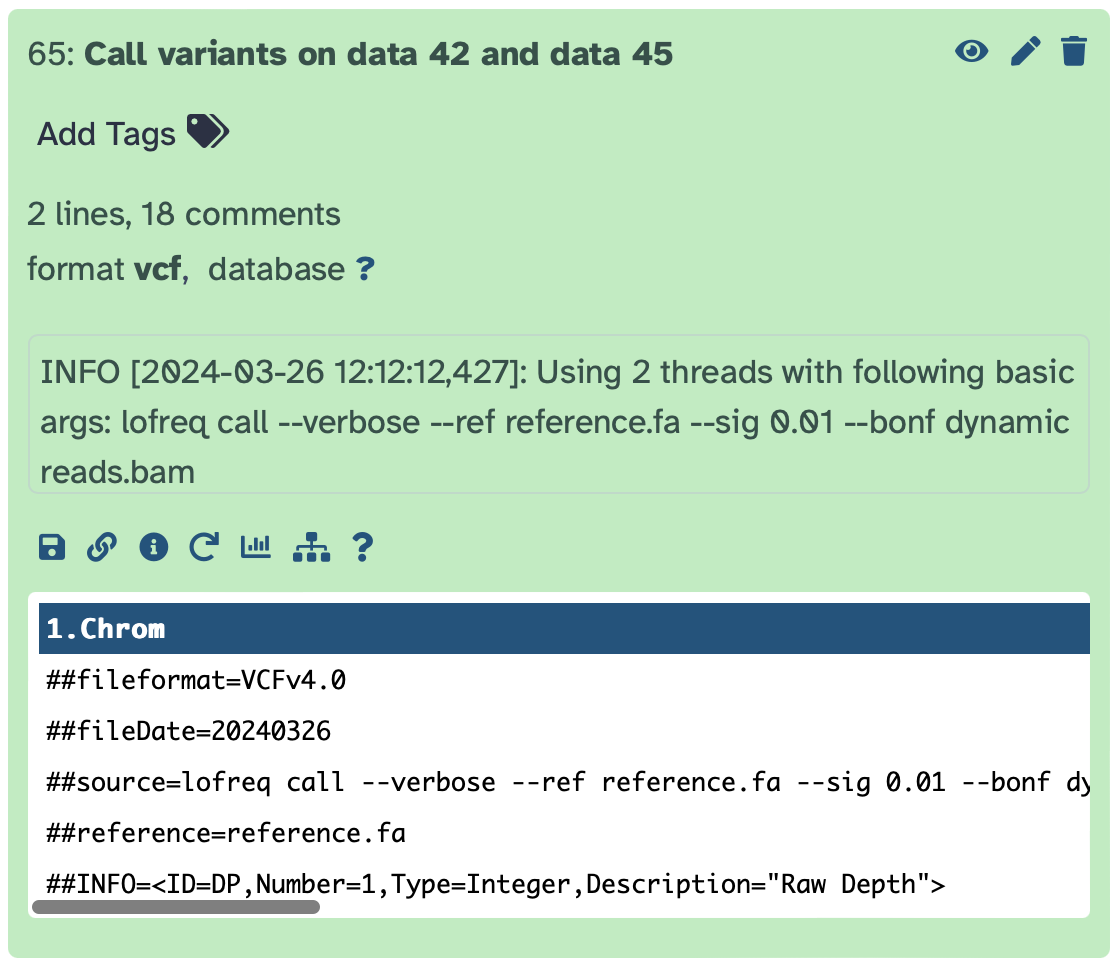
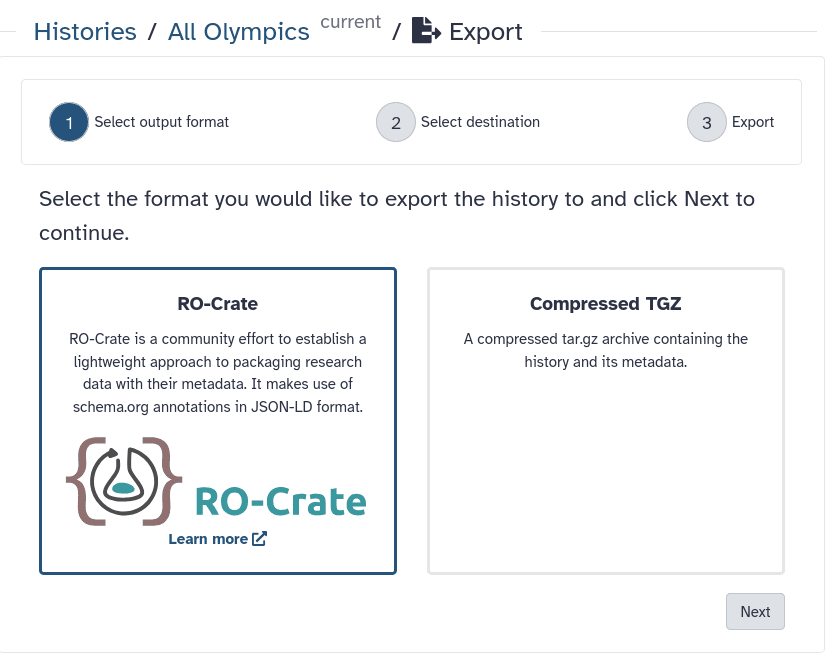
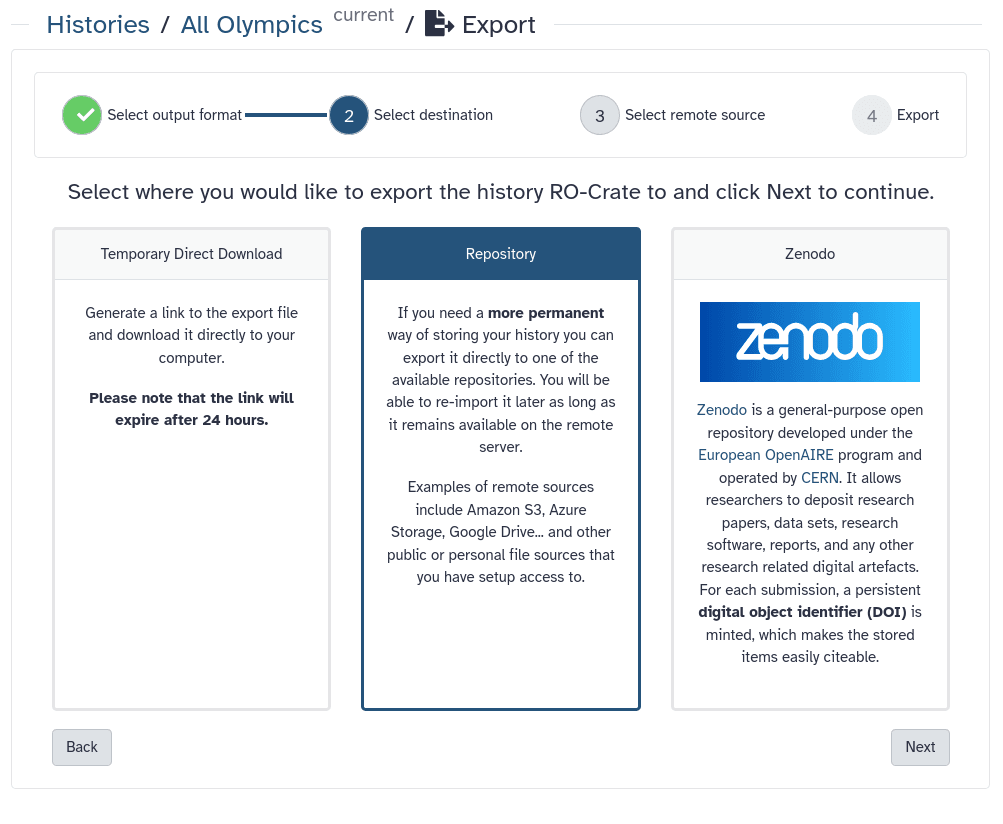


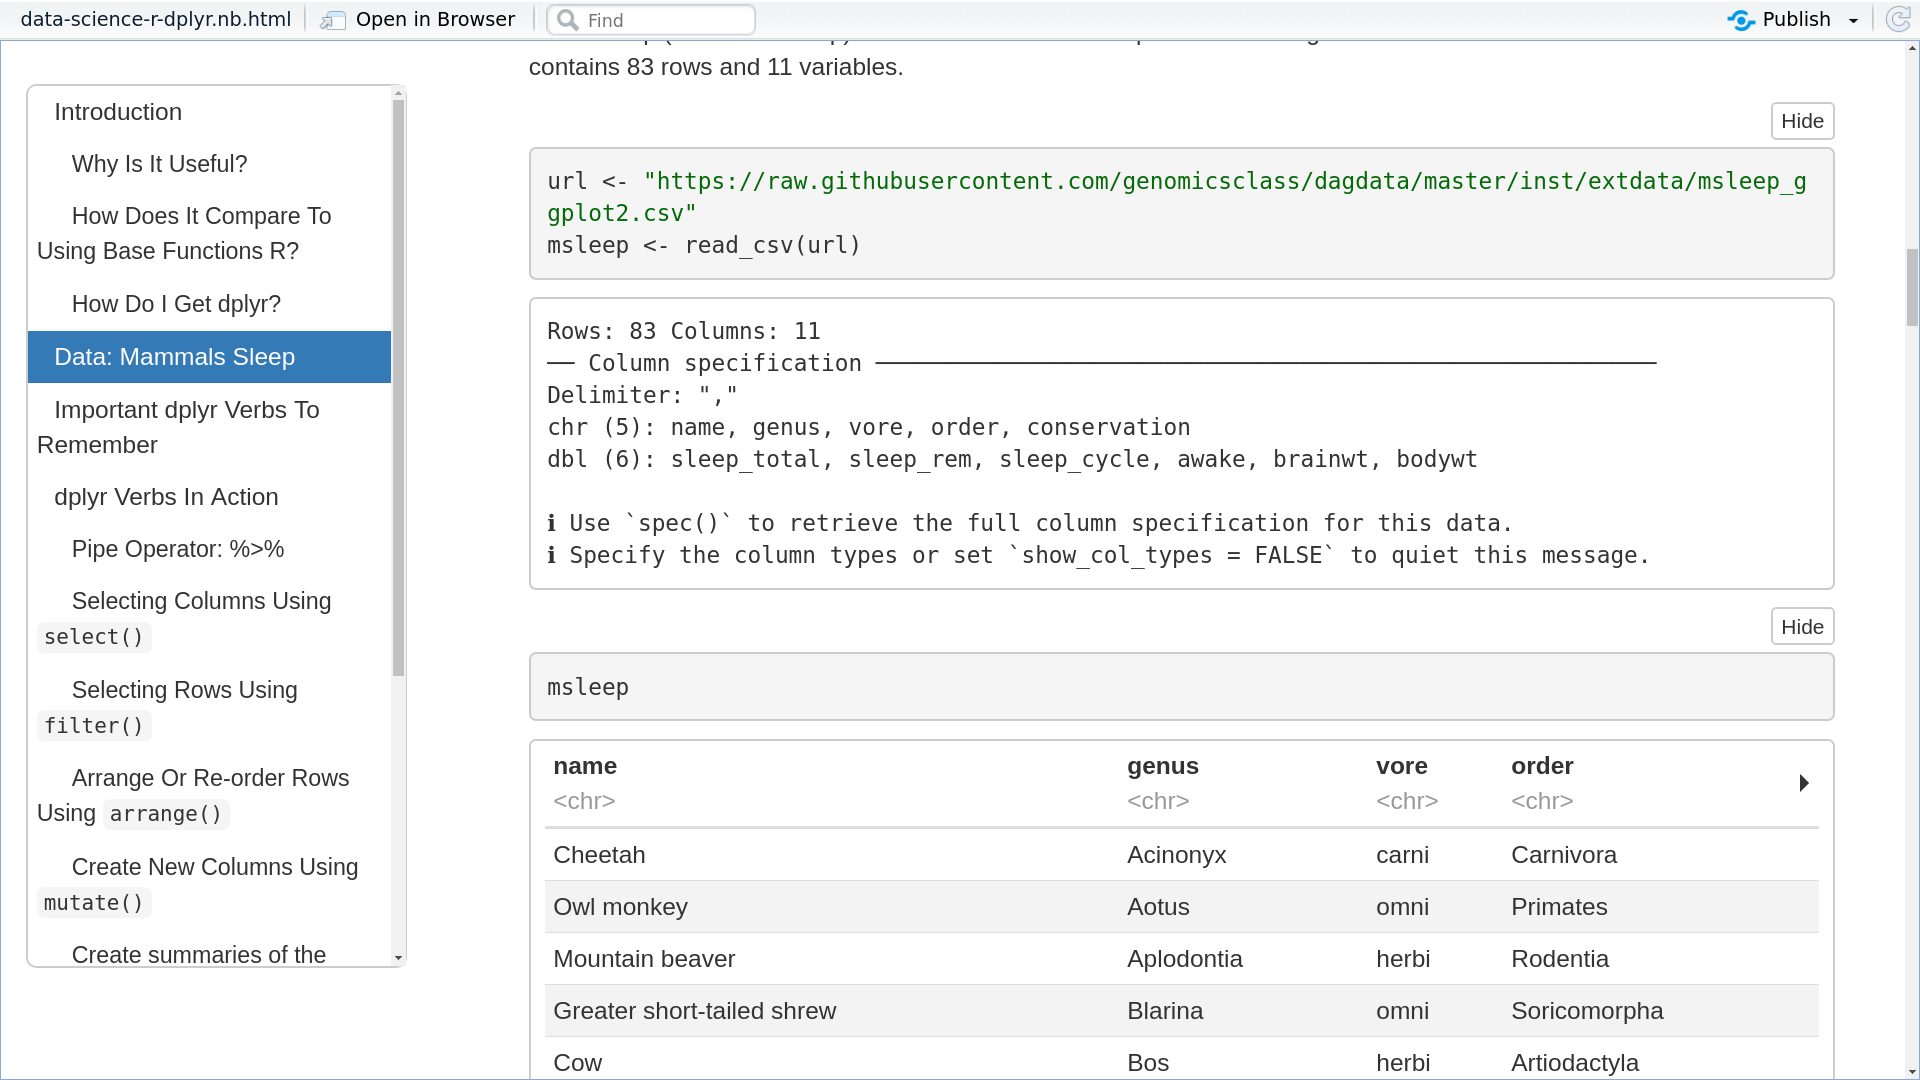
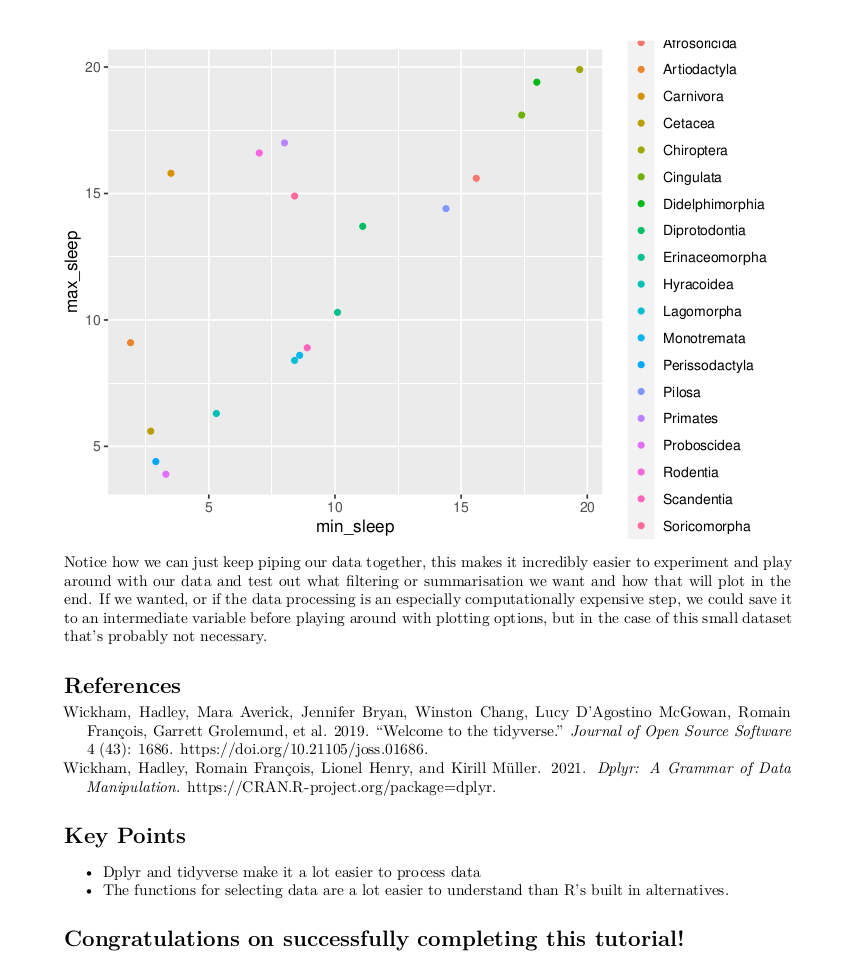
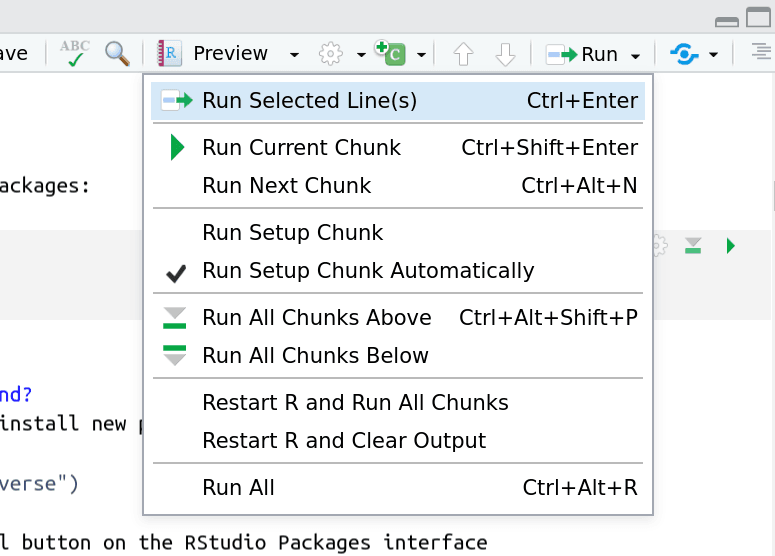
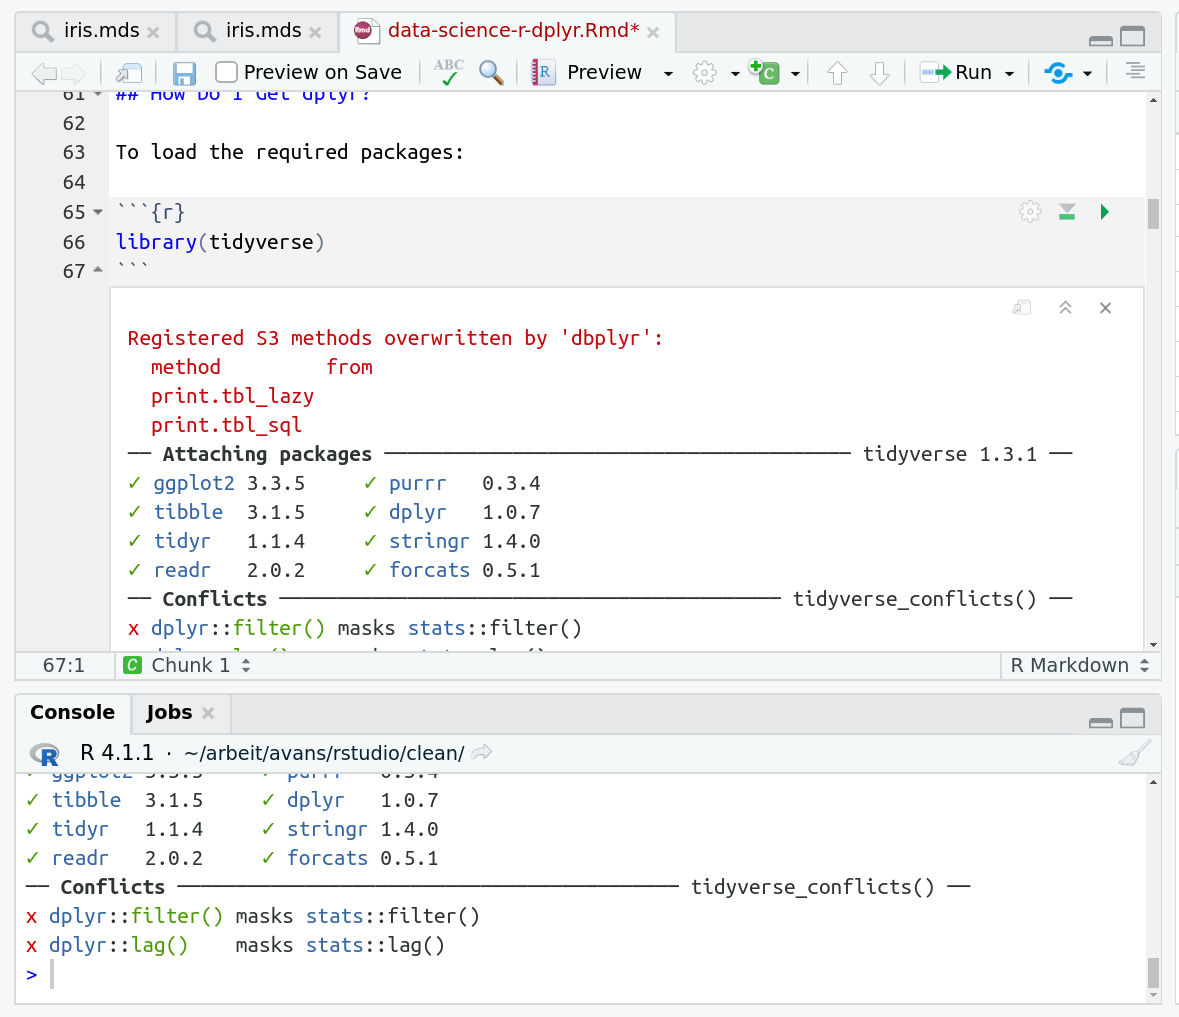
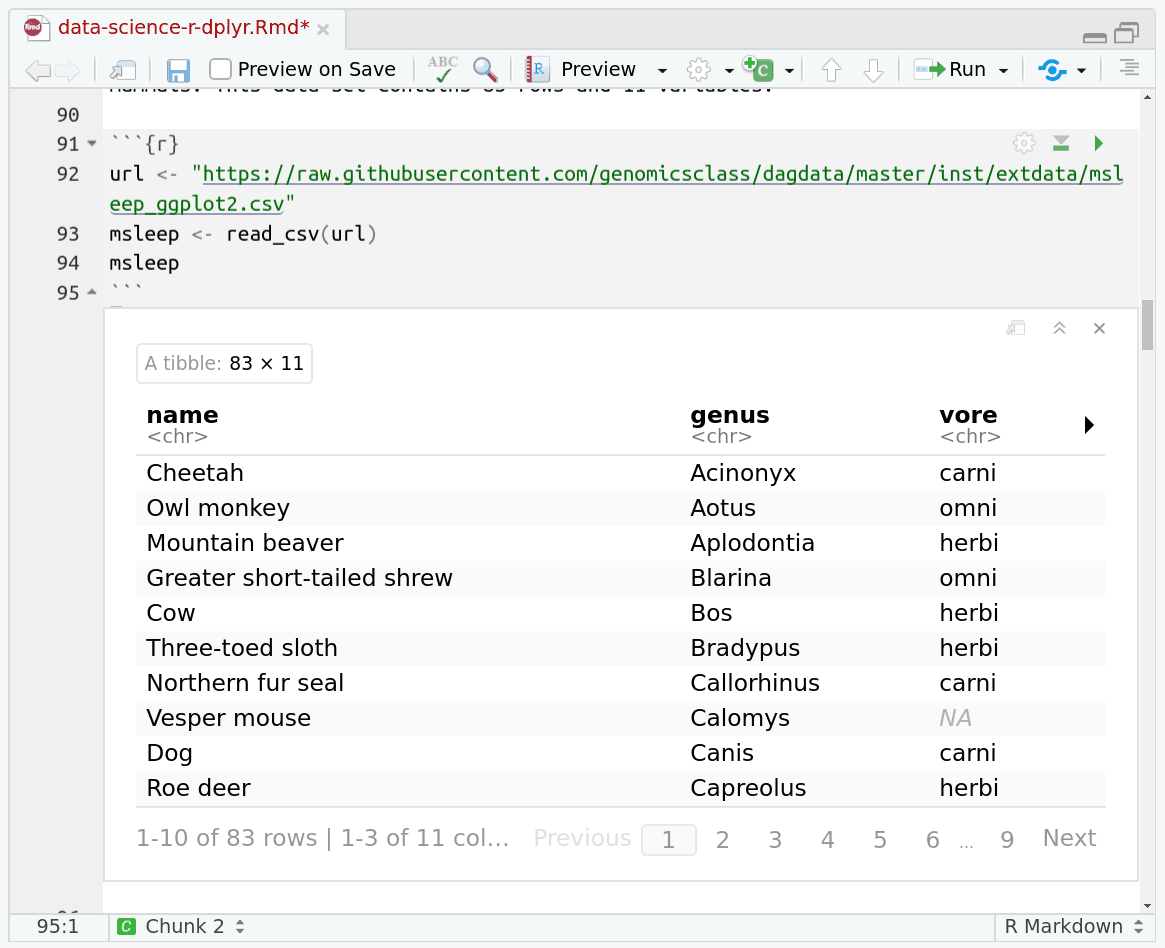
")