The tutorial’s content should be placed in the file tutorial.md. Its syntax and structure are simple, and will have the following structure:
---layout:tutorial_hands_ontitle:Title of the tutorialzenodo_link:''questions:-Which biological questions are addressed by the tutorial?-Which bioinformatics techniques are important to know for this type of data?objectives:-The learning objectives are the goals of the tutorial-They will be informed by your audience and will communicate to them and to yourselfwhat you should focus on during the course-They are single sentences describing what a learner should be able to do once theyhave done completed tutorial-You can use Bloom's Taxonomy to write effective learning objectivestime_estimation:''key_points:-The take-home messages-They will appear at the end of the tutorialcontributors:-contributor1-contributor2---
introduction text
> <agenda-title></agenda-title>>> In this tutorial we will deal with:>> 1. TOC> {:toc}# Section 1
blabla
## Subsection 1
blabla
# Section 2
blabla
## Subsection 2
blabla
# Conclusion
blabla
Metadata
The tutorial.md needs to start with some metadata at the top:
layout: tutorial_hands_on: keep the default
title: title of the tutorial (it will appear on the tutorial page and the topic page)
level: Introductory, Intermediate or Advanced
zenodo_link: link on Zenodo to the input data for the tutorial
contributions: eveybody who has contributed to this tutorial (usernames must match those in CONTRIBUTORS.yaml file)
Hands On: Fill the basic metadata
Update the tutorial information in the header section of your tutorial:
title: "Similarity search with BLAST"
(Optional) Add the Zenodo link (if created)
This information is used to display the data from the topic and tutorial page. They are also used to check which information is missing for the tutorials.
We also define metadata related to the pedagogical content of the tutorial, which will appear at the top (“Overview” box) and bottom of the online tutorial:
A dictionary/map
(Required) layout
Free Text
This must be set to tutorial_hands_on
Possible Values:
tutorial_hands_on
Example(s)
layout:"tutorial_hands_on"
(Required) title
Free Text
Title of the tutorial (it will appear on the tutorial page and the topic page)
Example(s)
title:Clustering in Machine Learning
title:Breve introducción a Galaxy - en español
title:Pangeo ecosystem 101 for everyone - Introduction to Xarray Galaxy Tools
(Required) contributions
A dictionary/map
List of tutorial contributors. Here we break them down into several broad categories to help contributors identify how they contributed to a specific tutorial.
true to hide your tutorial from the topic page (optional). This is useful if you need a tutorial for a workshop, but have not finished making it up to GTN standards.
List of Items
A dictionary/map
Any additional variables you want to set on the page
List of Items
list of resources that the reader of the material could follow at the end of the tutorial
[Internal Only] List of required tutorials inside that topic
Decimal Number
Currently unused.
Free Text
Link to a gitter channel that is more relevant for the tutorial than the default. E.g. a single cell tutorial could use Galaxy-Training-Network/galaxy-single-cell to link to their specific chat room.
Example(s)
gitter:Galaxy-Training-Network/galaxy-single-cell
gitter:galaxy-genome-annotation/Lobby
Free Text
This must be set to external to link to an external tutorial
Required Pattern: Must match the following regular expression
/[0-9]{4,}-[0-9]{2}-[0-9]{2}/
List of Items
List of take-home messages. This information will appear at the end
of the tutorial. These should really be a key point, something that
should stick in their mind; what you want them to take home from
the tutorial.
Example(s)
key_points:-Pangeo ecosystem enables big data analysis in geosciences-The MiModD suite of tools bundles most of the functionality required to perform mapping-by-sequencing analyses with Galaxy-It can drastically simplify management of large numbers of VMs
Free Text
The document language.
Possible Values:
es
en
fr
Example(s)
lang:"es"
lang:"en"
lang:"fr"
Free Text
Here give a feeling of what level the material is at.
Possible Values:
Introductory
Intermediate
Advanced
Example(s)
level:"Introductory"
level:"Intermediate"
level:"Advanced"
Free Text
An SPDX identifier for the alternative license that is used for that particular material. This is only relevant for materials which have been imported from an external source and were originally licensed under another license. For new materials we strongly encourage contributors to not use this key as materials are CC-BY, by default.
However, it means we can run a lot of our Python training
directly in the GTN! And in the future, hopefully, we will
be able to embed individual cells of the notebook directly
in the Python training, so the user doesn’t even need to
switch pages.
Enabling this field will enable pyolite links for this notebook.
Free Text
If you have an alternative preamble for your notebook that students should know before following (e.g. they must load X datasets in their history), it can be listed here.
This text will be shown in the GTN tutorial, but it will not be included in the notebook, giving you a bit better control over mixing setup content which is relevant for Galaxy, with notebook content that can be easy to run for students.
List of Specific, Measurable, Achievable, Relevant, and Time-bound (SMART) learning objectives for the tutorial
A learning objective is a single sentence describing what a learner will be able to do once they have done the tutorial. Generally it is best to follow a 2C or 3C learning objective such as:
Compute (Skill)
multiple whole genome assemblies (Objective)
in such a way to develop big data processing skills (Result)
Example(s)
objectives:-Understand the basic concepts behind phylogenetic trees, as applied to *Mycobacterium tuberculosis*-Explore Biodiversity data with taxonomic, temporal and geographical informations-Generate a DotPlot emulating the original paper using a different analysis tool
Free Text
A custom image to show on the link preview in external applications (e.g. when the URL is pasted into Twitter)
Example(s)
og_image:/assets/images/gat.png
Required Pattern: Must match the following regular expression
/^\/.*/
Integer Number
This field allows ordering tutorials within the tutorial list. Tutorials with lower numbered priority come before tutorials with higher numbers.
Example(s)
List of Items
list of questions that will be addressed in the tutorial
Example(s)
questions:-How does Genome assembly work?-How do I change Galaxy configs?-How to detect and quantify differentially abundant proteins in a HEK-Ecoli Benchmark DIA datatset?-What kinds of data do programs store?
List of Items
A dictionary/map
(Required) date
Free Text
Required Pattern: Must match the following regular expression
/[0-9]{4}-[0-9]{2}-[0-9]{2}/
Free Text
Integer Number
List of Items
Boolean
Free Text
Free Text
Required Pattern: Must match the following regular expression
/[0-9]{2}\.[0-9]{1,2}/
Free Text
Required Pattern: Must match the following regular expression
List of resources that the reader of the material should be familiar with before starting this training. The structure is identical to follow_up_training.
[Internal Only] List of required tutorials inside that topic
Free Text
if the topic has multiple subtopics defined, you can assign your tutorial to one of those subtopics here. Without this, the tutorial will appear in the “Other tutorials” section on the topic page.
Example(s)
subtopic:single-cell
List of Items
A free form list of tags that are relevant for your tutorial.
Example(s)
tags:-covid-19-git-gat
List of Items
If alternative translations of a material are available, then use this key to indicate which languages have been manually translated.
Example(s)
translations:-en
A dictionary/map
For materials which are automatically converted into videos via the available mechanisms, this field declares which voice should be used. If this field is not declared, a random voice will be chosen from a list of the best available voices from AWS Polly.
Example(s)
voice:id:Lupelang:es-USneural:true
(Required) id
Free Text
(Required) lang
Free Text
(Required) neural
Boolean
Free Text
link on Zenodo to the input data for the tutorial
Example(s)
zenodo_link:https://zenodo.org/record/3706539
Required Pattern: Must match the following regular expression
For this category of metadata, we have taken inspiration from what Software Carpentry has done and particularly what they described in their Instructor training.
Hands On: Fill out the pedagogical metadata
Define 2 questions that will be addressed during the tutorial and add them to the metadata
Define 2 learning objectives for the tutorial and add them to the metadata
Comment: When filling the pedagogical metadata
We recommend that you fill out the questions and the learning objectives before starting writing the tutorial content. You can still refine them afterwards, but it will help to guide you in developing your tutorial, and gives you some time to think beforehand on what topics are worth being covered.
For the take-home messages, it is easier to define them once the tutorial is written and you identified the issues.
Listing contributors
All tutorials and slides must give credit to all contributors. This can be any type of contribution, adding them in GitHub, creating images for it, etc.
Make sure all contributors are listed in the CONTRIBUTORS.yaml file.
Each contributor is defined in this file like:
contributor-username:# GitHub username (if the contributor has one)name:Full Name# mandatoryjoined:2020-06# mandatoryemail:saskia.hiltemann@gmail.com# optionaltwitter:shiltemann# optionallinkedin:shiltemann# optionalgitter:shiltemann# optionalorcid:0000-0003-3803-468X# optionalbio:Researcher at EMC# optional
Add all contributors to the metadata of the tutorial or slide deck:
Make sure these names match the usernames you used in the CONTRIBUTORS.yaml file.
Optional: Specifying types of contributions. If you want to give more detailed credit for conributions, you can do the following (instead of step 2 above)
To define a funding body in the CONTRIBUTORS.yaml there are a few extra fields available:
gallantries:name:Gallantries Projectjoined:2020-09avatar:"https://www.erasmusplus.nl/assets/images/logo.png"github:falsefunder:truefunding_id:2020-1-NL01-KA203-064717funding_statement:|This project ([`2020-1-NL01-KA203-064717`](https://erasmus-plus.ec.europa.eu/projects/search/details/2020-1-NL01-KA203-064717)) is funded with the support of the Erasmus+ programme of the European Union. Their funding has supported a large number of tutorials within the GTN across a wide array of topics.<img src="https://gallantries.github.io/assets/images/logosbeneficaireserasmusright_en.jpg" alt="eu flag with the text: with the support of the erasmus programme of the european union. " loading="lazy">
Funding bodies will be credited at the bottom of the tutorial with the appropriate funding statement, and will get a page in the hall of fame listing all tutorials that list them as a funder.
For an example of how this all looks, see the R basics tutorial (top and bottom of the tutorial).
(Required) Contributions Schema
A dictionary/map
List of tutorial contributors. Here we break them down into several broad categories to help contributors identify how they contributed to a specific tutorial.
These entities wrote the bulk of the training material, they may have done the analysis, built the workflow, and wrote the text themselves.
List of Items
These entities provided data for this resource
List of Items
These entities edited the text, either for spelling and grammar, flow, GTN-fit, or other similar editing categories
List of Items
These entities provided funding support for the development of this resource
List of Items
These entities managed and provided infrastructure to the GTN or for training purposes
List of Items
This person reviewed this material for accuracy and correctness
List of Items
These entities tested the tutorial to ensure it works correctly for students, or reported issues with the tutorial.
List of Items
These entities did translation and localisation work on this resource
List of Items
These entities contributed UX or Design improvements to this tutorial or the GTN as a whole
A dictionary/map
Example(s)
hexylena:name:Helenatwitter:hexylenabio:I wrote this documentation! I do super cool things.
A dictionary/map
This ideally is your GitHub handle. If you do not have, or do not wish to provide a GitHub username, you may make up another identifier here, but then you must set github: false as described below.
(Required) name
Free Text
Your preferred name. If you prefer an alias or another name, this is welcome, it does not need to be your legal name.
Example(s)
name:张三
name:Alice
name:Jane Doe
name:Madame Tout-le-Monde
name:Γιάννης Παπαδόπουλος
(Required) joined
Free Text
The year and month in which you joined
Example(s)
joined:2020-01
Required Pattern: Must match the following regular expression
/[0-9]{4,}-[0-9]{2}/
List of Items
A set of organisations or grants your are affiliated with
Free Text
Free Text
A short biography of yourself, if you wish to add additional details or context.
Example(s)
bio:Research at the [South African National Bioinformatics Institute](https://www.sanbi.ac.za/)
Free Text
Your bluesky handle
Example(s)
bluesky:gtn.bsky.social
Required Pattern: Must match the following regular expression
/[0-9a-zA-Z.]+/
Boolean
Are you open to being contacted for hosting training, or being involved with local training events? Instructors might use this to contact you, if they are looking for regional trainers who can help with their event.
Free Text
The 2 letter code identifying the ELIXIR node to which you are a member or are associated with. If you are from norway, you will need to quote your value, "no", unlike everyone else, due to the Norway Problem with YAML
Possible Values:
au
be
ch
cz
de
dk
ee
es
fi
fr
gr
hu
ie
il
it
lu
nl
no
pt
se
si
uk
Example(s)
elixir_node:"au"
elixir_node:"be"
elixir_node:"ch"
elixir_node:"cz"
elixir_node:"de"
elixir_node:"dk"
elixir_node:"ee"
elixir_node:"es"
elixir_node:"fi"
elixir_node:"fr"
elixir_node:"gr"
elixir_node:"hu"
elixir_node:"ie"
elixir_node:"il"
elixir_node:"it"
elixir_node:"lu"
elixir_node:"nl"
elixir_node:"no"
elixir_node:"pt"
elixir_node:"se"
elixir_node:"si"
elixir_node:"uk"
Free Text
Your email address, if you wish to provide it.
Example(s)
email:jane.doe@gmail.com
Required Pattern: Must match the following regular expression
/@/
Free Text
The URL to your fediverse profile
Example(s)
fediverse:http://genomic.social/@abretaud
Required Pattern: Must match the following regular expression
/^https:\/\/[0-9a-zA-Z.]+/@?[0-9a-zA-Z._]+$/
Free Text
The flavor of the fediverse server (used in our webfinger endpoint.)
Possible Values:
mastodon
akkoma
Example(s)
fediverse_flavor:"mastodon"
fediverse_flavor:"akkoma"
List of Items
A set of organisations you were previously affiliated with
Boolean
If your identifier in this file is not a GitHub account (or not your account), then this must be set to true, so we do not link to that account.
Free Text
Set this to no if you would like to be excluded from the GTN hall of fame.
Possible Values:
no
Example(s)
gtn-halloffame:"no"
Free Text
Set this to no if you would like to be excluded from the Galaxy Hub hall of fame.
Possible Values:
no
Example(s)
hub-halloffame:"no"
Free Text
If this community member is deceased, you can use this field
to write a small in memoriam section that will display in
their Hall of Fame profile.
Free Text
Required Pattern: Must match the following regular expression
/[0-9a-zA-Z]+/
A dictionary/map
Free Text
The country you work in, ISO-3166-2 code.
Example(s)
country:NL
country:DE
Decimal Number
Latitude in decimal numbers
Example(s)
lat:4.12
Decimal Number
Longitude in decimal numbers
Example(s)
lon:55.0
Free Text
Preferred contact method
Free Text
Your matrix identifier and home server
Example(s)
matrix:hexylena:matrix.org
Required Pattern: Must match the following regular expression
/[0-9a-zA-Z]+:.*/
Free Text
Your identifier at orcid.org
Example(s)
orcid:0000-0001-9760-8992
Required Pattern: Must match the following regular expression
/[0-9A-Z]{4}-[0-9A-Z]{4}-[0-9A-Z]{4}-[0-9A-Z]{4}/
Free Text
Your twitter handle, without the @
Example(s)
twitter:gxytraining
Required Pattern: Must match the following regular expression
/[0-9a-zA-Z]+/
Content
The tutorial’s content is written directly after the section of metadata. This is written in Markdown, a simple markup language.
The Markdown content is then transformed into a user friendly webpage through a templating system. With this approach, there is no need to add the name of every tutorial each time, since they are automatically added based on the tutorial’s metadata.
To help developing the tutorial, we recommend to create a workflow of the different steps of the tutorial inside Galaxy first, and then you can create the structure of the tutorial automatically from that:
Hands On: Create the structure of the tutorial from a workflow
Create a small workflow with one or two steps on a running Galaxy instance
Add the topic name as Tag and the tutorial title as Annotation/Notes to the workflow using the workflow editor.
Get the workflow id
Go the “Share” page of the workflow
Copy the information after id= in the URL of the page
Get your API key for this Galaxy instance
Click on User –> Preferences
Click on Manage API key
Click on Create a new key (if none is available)
Copy the API key
Generate the skeleton of the tutorial locally
$ planemo training_generate_from_wf \
         --topic_name "my-topic" \
         --tutorial_name "my-new-tutorial" \
         --galaxy_url "URL to Galaxy instance in which you created the workflow" \
         --galaxy_api_key "Your API key on the Galaxy instance" \
         --workflow_id "ID of the workflow on the Galaxy instance" \
         --zenodo_link "URL to the Zenodo record (Optional)"
Comment: Using a local workflow
It is also possible to download the workflow locally (with the .ga extension), and then run a slightly different command:
$ planemo training_generate_from_wf \
         --topic_name "my-topic" \
         --tutorial_name "my-new-tutorial" \
         -- workflow PATH/to/the/file.ga \
         --zenodo_link "URL to the Zenodo record (Optional)"
Inspect the generated tutorial.md
The generated tutorial is structured with:
An introduction, to give an overview of the tutorial with its use cases, data, and methods
Multiple sections representing the steps of the analysis, complete with automatically generated hands-on blocks, as practicing is a vital part of the learning process
A conclusion to summarize what has been done in the tutorial (with a graphic)
Hands On: Filling out the structure of the tutorial
Fill out the “Introduction” with a general introduction of the tutorial and a small description of the dataset (goals)
Rename/restructure the sections with several levels and more explication
Add some theory about the tool used to introduce each section
Add a small conclusion and relate the results to the original question
Self Study Tutorials
By following all of the guidelines in this file you can be sure that your tutorial will be optimised for self-study.
The GTN framework encourages the use of snippets, and PTDK ensures tutorials have fully detailed parameters learners should configure.
If you make use of snippets in appropriate places, learners can easily follow a tutorial despite different skill levels with Galaxy.
Additionally use of Question and Solution boxes can ensure that students can self-check their understanding and progress as they progress through the tutorial.
Generally we recommend one or more questions (and associated correct solutions!) after every hands-on box (which might have a one or more steps to follow.)
These questions will let students be sure their work is correct before they proceed too far.
As such you should design your questions carefully in order to catch common and likely failure modes that learners may encounter.
If a student might forget to select a less-common or deeply-nested parameter, be sure that your question following that hands on tests that properly, and if possible explain that in the solutions.
Adding images with captions
To add an image in Markdown file, we need to use the markdown syntax for this: .
We have also added a small plugin to handle captions for each image:
The prefix “Figure 1.” is automatically added before its caption. This is done with the following Markdown syntax:

We can also cross-reference images inside our Markdown with an anchor. For example, we can link to the previous figure using [the display text](#figure-nb) (changing nb with the image’s number).
Guidelines on Alt vs Figcaption Text
While both the alt attribute and the figcaption element provide a way to
describe images, the way we write for them is different. alt descriptions
should be functional; figcaption descriptions should be editorial or
illustrative.

Field
Appropriate Contents
alt text
Image of cell membrance with an embedded protein with central pore. DNA is shown splitting and entering the pore, an electrical signal comes out reading A C T or G.
Mathematical expressions can be written in LaTeX, and are automatically rendered with MathJax.
Surround your math expression with two $ signs on each side (like in LaTeX math blocks):
inline expressions, e.g.$$ 5 + 5 $$ will be rendered as \(5 + 5\)
block expressions, e.g.$$ 5 + 5 $$ will be rendered in its own line block as
\[5 + 5\]
Note: if inline mode is not working correctly, you can force it by using the following delimiters instead of dollar signs: \\( 5 +5 \\)
Dollar signs are therefore reserved characters for instructing the templating system to open/close LaTeX math blocks. If you want to use a $ within your expression, you will need to escape it: $$ a + 3\$ = 5\$ $$ will be rendered as: \(a + 3\$ = 5\$\)
LaTeX code that uses the pipe symbol | in inline math statements may lead to a line being recognized as a table line by the templating system.
This can be avoided by using the \vert command instead of |
Tables and Matrices
Tables can be generated using markdown by using the | symbol to indicate column dividers, and -- for table headers:
Check that the metadata added previously are correctly filling the overview box
Question
What metadata hasn’t been added to this box?
The take-home messages are not added to this box but into the last box of the tutorial
Agenda box
In most tutorials, the second box is the agenda box, placed at the end of the introduction. It shows the table of contents for the tutorial
> <agenda-title></agenda-title>>> In this tutorial we will deal with:>> 1. TOC> {:toc}>
{: .agenda}
There is no need to fill out the list; this will be done automatically based off of your tutorial’s section titles. First and second level headings (lines starting with # and ## in markdown) will be shown in the agenda.
If a section is not important enough to be shown in the agenda, consider making it a third-level heading (###) instead.
The agenda will be rendered as follows:
Agenda
In this tutorial we will deal with:
TOC
Hands-on box
We find that having users walk through the tutorial, doing all of the steps is important for learning the concepts taught. We therefore emphasize this by regularly adding hands-on sections, where trainees are encouraged to do the analysis by themselves. We have designed some special boxes to make these sections easier to find.
> <hands-on-title>Spliced mapping</hands-on-title>>> 1. **RNA STAR** {% icon tool %}: Map your reads on the reference genome with> - *"Single-end or paired-end reads"*: `Paired-end (as individual datasets)`> - *"RNA-Seq FASTQ/FASTA file, forward reads"*: the generated `trimmed reads pair 1` files (multiple datasets)> - *"RNA-Seq FASTQ/FASTA file, reverse reads"*: the generated `trimmed reads pair 2` files (multiple datasets)> - *"Custom or built-in reference genome"*: `Use a built-in index`> - *"Reference genome with or without an annotation"*: `use genome reference without builtin gene-model`> - *"Select reference genome"*: `Drosophila Melanogaster (dm6)`> - *"Gene model (gff3,gtf) file for splice junctions"*: the imported `Drosophila_melanogaster.BDGP6.87.gtf`> - *"Length of the genomic sequence around annotated junctions"*: `36`>> This parameter should be length of reads - 1>> 2. {% tool [MultiQC](toolshed.g2.bx.psu.edu/repos/iuc/multiqc/multiqc/1.8+galaxy0) %}: Aggregate the STAR logs with> - *"Which tool was used generate logs?"*: `STAR`> - *"Type of FastQC output?"*: `Log`> - *"STAR log output"*: the generated `log` files (multiple datasets)
{: .hands_on}
For consistency please use:
{% icon hands_on %} icon to define that is an hands-on
Short imperative sentences to make it easy to identify the tasks
Name of the tool in bold followed by {% icon tool %} icon to make it easy to identify a Galaxy tool
Parameters for the tool as a sublist
This will be rendered like:
Hands On: Spliced mapping
RNA STARtool: Map your reads on the reference genome with
“Single-end or paired-end reads”: Paired-end (as individual datasets)
“Gene model (gff3,gtf) file for splice junctions”: the imported Drosophila_melanogaster.BDGP6.87.gtf
“Length of the genomic sequence around annotated junctions”: 36
This parameter should be length of reads - 1
MultiQC ( Galaxy version 1.8+galaxy0): Aggregate the STAR logs with
“Which tool was used generate logs?”: STAR
“Type of FastQC output?”: Log
“STAR log output”: the generated log files (multiple datasets)
There are also some predefined parameter icons available which can be used to indicate the type of parameter. These are optional,
but may be helpful in some cases (for example to distinguish between single file inputs and collection inputs).
param-files“My multiple file input or collection”: my collection
param-select“My select menu”: my choice
param-check“My check box”: yes
param-toggle“My toggle button”: Yes
param-repeatMy repeat parameter
“param1”: 42
Questions and Solutions boxes
Questions can be added to force trainees to think about what they are currently doing, and to put things in perspective.
They can also help the instructors by exposing and clarifying common scenarios, errors, or applications.
> <question-title></question-title>>> 1. Why are some tests filtered?> 2. Does it improve the *p*-value distribution?>> > <solution-title></solution-title>> >> > 1. Sol for the first question> > 2. Sol for the second question> >> {: .solution}
{: .question}
Which will be rendered as:
Question
Why are some tests filtered?
Does it improve the p-value distribution?
Sol for the first question
Sol for the second question
Questions should be quick to answer. You can directly ask a question and expect an answer, or you can provide some answers and create multiple choices questions (MCQs).
With well chosen wrong answers, MCQs can do much more than just measure how much someone knows, such as exposing common misconceptions and mistakes.
In the box below, initially hidden, we add the correct answer and possibly any additional explanation. Self-trainees can then check the solution and its explanation.
In the context of remote trainings, where a teacher isn’t synchronously available, ensuring that you have questions throughout your materials for students to check their understanding is incredibly key.
Additionally ensuring that solutions are provided, and are correct and up-to-date (or use a snippet explaining data variability along with with ways to check the results) is mandatory. Students will then use these questions to self-check their understanding against what you expected them to learn.
Tips box
Tips boxes are really just for ‘tips’, usually hints regarding Galaxy operations that users may or may not be familiar with. If you want to provide extended discussion or links to external materials then consider the comment and detail boxes instead.
> <tip-title>Importing data via links</tip-title>>> * Copy the link location> * Open the Galaxy Upload Manager> * Select **Paste/Fetch Data**> * Paste the link into the text field> * Press **Start**
{: .tip}
Rendered:
Copy the link location
Open the Galaxy Upload Manager
Select Paste/Fetch Data
Paste the link into the text field
Press Start
Comments boxes
> <comment-title></comment-title>> - Edit the "Database/Build" to select "dm3"> - Rename the datasets according to the samples
{: .comment}
Rendered:
Comment
Edit the “Database/Build” to select “dm3”
Rename the datasets according to the samples
Details box
The detail box is used to give more background explanation on the subject. By default the box is collapsed, trainees can expand it if they wish to know extra information about a topic.
> <details-title>More details on the ....</details-title>>> Add more details in Markdown...>
{: .details}
Rendered:
Add more details in Markdown…
Key points box
This last box of the tutorial is automatically created with the take-home messages defined in the topic’s metadata
To render the boxes correctly, the syntax needs to be correct. If it doesn’t work, have a look at similar tutorials and get inspiration.
Warning box
> <warning-title>Danger: You can lose data!</warning-title>> Something really bad can happen here!
{: .warning}
Rendered:
Warning: Danger: You can lose data!
Something really bad can happen here!
Nested boxes
Boxes can be nested, e.g. for having tips inside a hands-on:
> <hands-on-title>Defining the topic for the tutorial</hands-on-title>>> 1. Search for NCBI Blast+ on the [ToolShed](https://toolshed.g2.bx.psu.edu/)> 2. Check in which category it is>> > <question-title></question-title>> >> > In which topic will you put the tutorial?> >> > > <solution-title></solution-title>> > >> > > If we search for [NCBI Blast+ in the ToolShed](https://toolshed.g2.bx.psu.edu/view/devteam/ncbi_blast_plus/7538e2bfcd41), it is attributed to 2 categories (bottom): "Next Gen Mappers" and "Sequence Analysis".> > > We decided to put it in "Sequence analysis" because this is the most general one for this tutorial.> > {: .solution}> {: .question}
{: .hands_on}
Code box
We have added code in/out boxes to help you show commands, and their effects, when running command line commands.
Normally a single column, with the boxes above one another, it will automatically split side-by-side over a given width (1200px);
> If you don't know where you're going, you might not get there.
{: .quote cite="https://en.m.wikiquote.org/wiki/Yogi_Berra" author="Yogi Berra"}
Rendered:
If you don’t know where you’re going, you might not get there.
The citation and author parameters are both optional. If provided the cite key must be a URL.
If you don’t know where you’re going, you might not get there.
If you don’t know where you’re going, you might not get there.
Additional Features to Improve Learning
Here we cover additional features you can use throughout your tutorials to improve the learning experience.
Tool Links
With the new GTN in Galaxy Webhook, trainees can view training directly within Galaxy. As part of this, we enable those trainees to click on tools, and have those tools directly activated in Galaxy, enabling for a seamless training experience for trainees.
Figure 3: A gif showing how the GTN in Galaxy webhook works. A student clicks the learning hat icon in the masthead of a Galaxy server, and an overlay is activated showing the GTN website. Within the GTN they can browse around and their place in tutorials is saved. While following a tutorial the student reches a step which instructs them to run a specific tool. Instead of the normal experience searching for a tool (quite difficult on large servers), they click a blue button and the tool is activated in Galaxy, and the overlay is closed. The student can reactivate the overlay at any time and return to their place in the tutorial.
To enable these in your tutorial you can use the following syntax:
The easiest way is to use planemo to generate the training from a workflow. In recent versions of planemo, this is managed automatically.
The alternative is to figure out the ID for the tool you want to use:
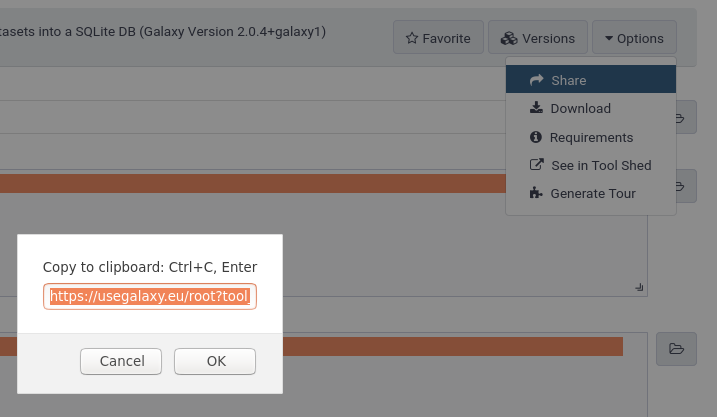
Find your tool in Galaxy, and click to access the tool form.
Click on Options at the top right
Click on Share
The URL shown will be something like https://usegalaxy.eu/root?tool_id=toolshed.g2.bx.psu.edu/repos/galaxyp/mz_to_sqlite/mz_to_sqlite/2.0.4+galaxy1
Keep only the part after the =, so toolshed.g2.bx.psu.edu/repos/galaxyp/mz_to_sqlite/mz_to_sqlite/2.0.4+galaxy1 in this example
Example Histories
If you have example input histories for your tutorial, perhaps for specific servers where trainees will often follow a tutorial but want to skip a slow input step, then you can provide example histories as part of your tutorial.
In some tutorials you aren’t as interested in teaching users the individual steps for analysing data, but rather want to focus on some downstream aspects of analysis, or to showcase the best practice workflows that are already available for a user to use! In those cases it can be useful to have a nicer way of inviting the user to execute those steps.
If you are accessing these in tutorial mode, they should function as button that, when clicked, launch the workflow directly. Outside of tutorial mode, they will link to our redirection service which will let you supply which Galaxy you plan to use.
Note that if for some reason the ‘fancy’ method doesn’t work, there are fallback tip boxes to help a user execute a similar procedure manually.
GTN Workflows
If you’ve included the workflow in the GTN but haven’t uploaded to a repository yet:
{% snippet faqs/galaxy/workflows_run_trs.md path="topics/assembly/tutorials/largegenome/workflows/Galaxy-Workflow-Data_QC.ga" title="Galaxy Workflow Data QC" %}
Click on galaxy-workflows-activityWorkflows in the Galaxy activity bar (on the left side of the screen, or in the top menu bar of older Galaxy instances). You will see a list of all your workflows
Click on galaxy-uploadImport at the top-right of the screen
Paste the following URL into the box labelled “Archived Workflow URL”: https://training.galaxyproject.org/training-material/topics/assembly/tutorials/largegenome/workflows/Galaxy-Workflow-Data_QC.ga
Click the Import workflow button
Below is a short video demonstrating how to import a workflow from GitHub using this procedure:
Video: Importing a workflow from URL
WorkflowHub
You can use a dedicated snippet to invite users to run a WorkflowHub workflow:
Click on galaxy-workflows-activityWorkflows in the Galaxy activity bar (on the left side of the screen, or in the top menu bar of older Galaxy instances). You will see a list of all your workflows
Click on galaxy-uploadImport at the top-right of the screen
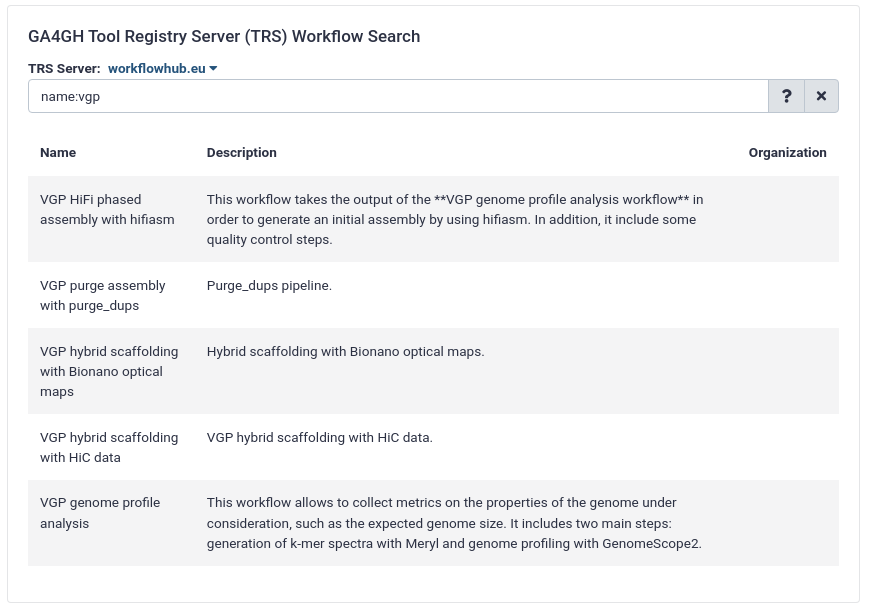
On the new page, select the GA4GH servers tab, and configure the GA4GH Tool Registry Server (TRS) Workflow Search interface as follows:
“TRS Server”: workflowhub.eu
“search query”: name:"mRNA-Seq BY-COVID Pipeline"
Expand the correct workflow by clicking on it
Select the version you would like to galaxy-upload import
The workflow will be imported to your list of workflows. Note that it will also carry a little blue-white shield icon next to its name, which indicates that this is an original workflow version imported from a TRS server. If you ever modify the workflow with Galaxy’s workflow editor, it will lose this indicator.
Below is a short video showing the entire uncomplicated procedure:
Video: Importing via search from WorkflowHub
Note that it links to a specific workflow, on any Galaxy server. When this tutorial is opened from within the Tutorial Mode, that link will change to one on the current server, removing the intermediate step.
Dockstore
Please note that the dockstore ID should be provided without the #workflow/ prefix, so starting from github.com.
Click on “Galaxy” dropdown within the “Launch with” panel located in the upper right corner.
Select a galaxy instance you want to launch this workflow with.
You will be redirected to Galaxy and presented with a list of workflow versions.
Click the version you want (usually the latest labelled as “main”)
You are done!
The following short video walks you through this uncomplicated procedure:
Video: Importing from Dockstore
This snippet has the same behaviour, it will use my.galaxy.training links to make them server independent, but in Tutorial Mode it will open on the current server.
FAQs (snippets)
Many common questions or instructions may be useful to share between different tutorials. For example instructions on how to start a new history or importing data. To make these types of snippets easier to re-use and avoid duplication, they are available in the form of snippets.
The use of snippets is extremely important for asynchronous, remote learning. In this situation as students do not have a teacher immediately on hand, and likely do not have friends or colleagues sitting working with them, they will rely on these boxes to refresh their knowledge and know what to do.
Please ensure you test your learning materials with a learner or colleague not familiar the material, and if possible, (silently) watch them go through your lesson. You’ll easily identify which portions need more explanations and details.
Finding snippets
These are available in folders named faqs, either at the project level, topic level, or tutorial level.
Project-level FAQs:faqs/
faqs/galaxy/ for general Galaxy questions
faqs/gtn/ for questions regarding the GTN website itself
for questions pertaining to that specific tutorial
if this is present, it is linked to from the tutorial overview box at the top, and from the end of the tutorial
Including FAQs/snippets in your tutorials
To include one of these snippets in your tutorial, you can use the following syntax:
{% snippet faqs/galaxy/histories_create_new.md %}
Which will be rendered as:
To create a new history simply click the new-history icon at the top of the history panel:
The advantage of this approach is that when the Galaxy interface updates, we only have to update the snippet, rather than every tutorial. Please try to use snippets whenever you can!
You could also specify the box type you want the snippet to be rendered in:
To create a new history simply click the new-history icon at the top of the history panel:
Creating new FAQs/snippets
Do you want to include something in your tutorial that you think might be useful in other tutorials as well? Or are you answering a frequently asked question? Consider creating a snippet for it
Each snippet (question) is a separate file, with some metadata, residing in one of the faqs folders:
---title:How do I run a workflow?area:workflows# FAQs will be grouped by these areas on the FAQ pagebox_type:tip# tip/comment/hands_on/question; optional, if you want the content to be in a boxlayout:faq# if you set this the snippet will get its own page and be included in the FAQs pagecontributors:[annefou,nomadscientist]# anybody who has contributed to the FAQ over time---Here you can write the snippet / answer to the FAQ in Markdown-Go to `Workflows` on the top menu bar-Click on ..-..
A dictionary/map
(Required) layout
Free Text
This must be set to faq
Possible Values:
faq
Example(s)
layout:"faq"
(Required) title
Free Text
Title of the FAQ
Example(s)
title:How does the GTN implement the 'Ten simple rules for collaborative lesson development'
title:How can I give feedback?
title:Ways to use Galaxy
(Required) box_type
Free Text
The type of box that should be used when rendering this FAQ. Use none if it should not be in a box, but just plain text.
Possible Values:
tip
hands_on
question
comment
warning
details
none
Example(s)
box_type:"tip"
box_type:"hands_on"
box_type:"question"
box_type:"comment"
box_type:"warning"
box_type:"details"
box_type:"none"
Free Text
A text key used for sorting related FAQs together in the visual interface for users.
Example(s)
area:contributors
area:learners
area:features
A dictionary/map
List of tutorial contributors. Here we break them down into several broad categories to help contributors identify how they contributed to a specific tutorial.
A list of parameters that are required to be set when invoking the FAQ, otherwise the FAQ will not render correctly (e.g. in the FAQ list!)
Example(s)
name:The name of the dataset
Free Text
When you are running a remote, asynchronous lesson, you’ll want to be sure you collect all student questions and add them back to your tutorial afterwards, as FAQs. This will help other learners as they progress through the materials, and can give you a very easy URL to point your learners to if they get stuck on a particular task.
FAQ pages
All FAQs will also be collected on their own page, this makes it easy for and teachers to prepare the session, and for participants to quickly find the answers to common questions.
To do this, create a file named index.md inside the faq folder:
---layout:faq-page---
If you would like to enforce an order of the faq areas, you can do so:
(just make sure you list all existing areas in the folder)
If a tutorial-level FAQ page exists (topics/<topic>/tutorials/<tutorial>/faqs/index.md) it will be automatically linked to from the overview box at the top of the tutorial, and at the end of the tutorial. Have a look at this tutorial to see it in action.
Footnotes
Code In: Markdown
Footnotes[^test] can be used to insert more content or explanation as reference material to your content. You can use the same footnote reference multiple time, and the footnote will include backlinks to return to the correct place in the text.[^test]
Code Out
Footnotes1 can be used to insert more content or explanation as reference material to your content. You can use the same footnote reference multiple time, and the footnote will include backlinks to return to the correct place in the text.1
Icons
To use these icons, take the name of the icon, ‘details’ in this example, and write something like this in your tutorial:
{% icon details %}
Some icons have multiple aliases, any may be used, but we’d suggest trying to choose the most semantically appropriate one in case Galaxy later decides to change the icon.
Oftentimes there are terms you’ll use over and over again where there is an acronym or abbreviation you’ll use consistently. However for learners new to the material, they might need to scroll up to the first definition every time to remember what it meant. It would be annoying as an author to have to re-define it every time, so we’ve implemented some very simple syntax to allow you to create a list of definitions and then use those in the text.
In your tutorial metadata you can add an abbreviations section like:
Sometimes you’re writing a large tutorial and at one small step there are multiple paths or multiple ways to get the data you want, and you’d like to showcase them all! You could write them all out in order, Option 1…2…etc, however maybe you want it to be a bit more interactive and focus only on one option at a time, so a user doesn’t get distracted by the other options.
Include this markdown where you want your user to choose between the multiple paths:
Code In: Markdown
{% include _includes/cyoa-choices.html option1="Ananas of course" option2="Avocados" default="Avocados"
       text="Here is why some people choose Ananas. Other times you want Avocados as they fit the menu better." %}
Hands-on: Choose Your Own Tutorial
This is a 'Choose Your Own Tutorial' (CYOT) section (also known as 'Choose Your Own Analysis' (CYOA)), where you can select between multiple paths. Click one of the buttons below to select how you want to follow the tutorial
Here is why some people choose Ananas. Other times you want Avocados as they fit the menu better.
And then they can wrap the relevant sections with a div block with the relevant class (if you have space in your option, use - in the class). You must set markdown="1" as well to have the inner contents rendered corretly.
NB: If you do not set a default, then on the very first page load, both options will be shown in their entirety. As soon as the user selects one of the options by clicking the relevant button, then the list is filtered. The user’s browser generally will remember which button was selected across navigation and page reloads.
CYOAs work by filtering the content based on the class name. Class names cannot contain spaces, so, we need to replace all whitespace with -.
The exact algorithm we use to create ‘safe’ IDs is:
Remove the following character ", ', /, ;, :, ,, ., !, @, #, $, %, ^, &, *, (, ) from the text.
Replace all whitespace with -
Replace multiple -s with a single -
This results in retaining capitalisation. Hence, Ananas of course becomes Ananas-of-course.
For a more complicated example (RNA) inhibitors would become RNA-inhibitors.
This can also be used inline: My favourite fruit is an 🍍🥑.
If you wish to have multiple CYOAs in a single tutorial, you are free to do that! However you must:
Ensure that all options are disjoint, there should not be any shared terms! (I.e if the both CYOAs need to use “STAR”, please find a different way to phrase it, or even use “STAR “, it just needs to be different.)
Provide a disambiguation term for them, passed as a parameter to all, or all but one, includes.
This disambiguation term will affect the URL parameter, which will become ?gtn-cyoa{term}={value}
E.g.:
{% include _includes/cyoa-choices.html option1="Oui" option2="Non" default="Oui" text="Vos données ESTAMP sont prêtes ?" %}
{% include _includes/cyoa-choices.html option1="Yes" option2="No" default="Yes" text="Do the thing?" disambiguation="english" %}
We, the GTN, don’t always know if you intend to have not used a specific branch. As such we recommend that if you have a branch that has no steps, you should include a div block with the class name of that branch, just so we know for sure you meant it to be empty.
E.g.
{% include _includes/cyoa-choices.html option1="Yes, they don't pass QC" option2="No" default="Yes, they don't pass QC" text="Do you think your samples need to be filtered?" %}

<div class="Yes-they-dont-pass-QC" markdown="1">
Some content here!
</div>

<div class="No" markdown="1">
<!-- intentionally empty. This comment itself isn't necessary, but we recommend adding the div. -->
</div>
URL Parameter
The branch can be selected via URL parameter e.g. for courses, to prevent users selecting the wrong path. Just supply ?gtn-cyoa=Ananas (or your preferred value) on the tutorial URL.
If you are running a remote training, and expect your users to follow a specific path, be certain to include the URL parameter to select the pathway to avoid student confusion. Please note that all tutorials using a CYOA should be tagged which will give you a heads up as a trainer.
Citations
If you would like to cite any articles, books or websites in your tutorial, you can do so by adding a file called tutorial.bib next to your tutorial.md file. In this file you may enter bibtex formatted citations. An example is given below:
@article{bebatut2018community,
  title={Community-driven data analysis training for biology},
  author={Batut, B{\'e}r{\'e}nice and Hiltemann, Saskia and Bagnacani, Andrea and Baker, Dannon and Bhardwaj, Vivek and Blank, Clemens and Bretaudeau, Anthony and Brillet-Gu{\'e}guen, Loraine and {\v{C}}ech, Martin and Chilton, John and others},
  journal={Cell systems},
  volume={6},
  number={6},
  pages={752--758},
  year={2018},
  publisher={Elsevier},
  doi={10.1016/j.cels.2018.05.012}
}

@misc{galaxy-training-materials,
  url = {https://training.galaxyproject.org},
  note = {Accessed 2019-04-08},
  title = {Galaxy Training materials website}
}

@online{Galaxy-P_Metaproteomics,
  author = {Galaxy-P Team},
  title = {Galaxy-P Metaproteomics instance},
  url = {https://proteomics.usegalaxy.eu/},
  urldate = {2020-10-13}
}
You can use this in your tutorial as follows:
For more information please look at this great article {% cite bebatut2018community %},
and the corresponding website {% cite galaxy-training-materials %}
A bibliography will automatically be appended to the end of your tutorial (scroll down to the end of this tutorial to see how it looks! or jump there directly)
If you have a DOI for a paper, you can easily obtain the bibtex citation using doi2bib.org.
Automatic Jupyter Notebooks & RMarkdown
If your tutorial is primarily focused on teaching students how to write code (Bash, Python, SQL, etc) you can take advantage of the GTN’s ability to automatically export notebooks from the tutorial content! In this system, you pick a single language for your tutorial, and then all code blocks tagged with that language become runnable. E.g.
Here is some explanation

```python
some_code += f"that students {should execute}"
```
However, it means we can run a lot of our Python training
directly in the GTN! And in the future, hopefully, we will
be able to embed individual cells of the notebook directly
in the Python training, so the user doesn’t even need to
switch pages.
Enabling this field will enable pyolite links for this notebook.
Free Text
If you have an alternative preamble for your notebook that students should know before following (e.g. they must load X datasets in their history), it can be listed here.
This text will be shown in the GTN tutorial, but it will not be included in the notebook, giving you a bit better control over mixing setup content which is relevant for Galaxy, with notebook content that can be easy to run for students.
Every cell that you wish to be executable, needs to be annotated with the language like above. Then if a compatible notebook can be produced, it will be.
Restrictions
To use this system, you need to take care of a few things:
Do not use hands-on boxes for segments that should be executed (code needs to be left aligned!)
Do not use snippets
Do not use icons {% icon galaxy-eye %}
Do not use a terminal or prompt character (that would be included in the execution.)
Avoid including output when you can, it doesn’t render nicely especially when the cells will become runnable.
And be aware that the output will look a little bit different than the GTN, e.g. solution boxes cannot be hidden by default, so in Jupyter notebook we format the text with a colour of white so it does not appear in the notebook and requires selection to view the answer.
However there are things that are possible! You can still use question/solution boxes, or otherwise nested boxes. Just not includes or snippets
Enabling the system
Add metadata to your tutorial.md header like:
notebook:
  language: python
Supported values are python, sql, r, and bash. The notebook will be generated automatically as part of the site build process.
However, it means we can run a lot of our Python training directly in the GTN! And in the future, hopefully, we will be able to embed individual cells of the notebook directly in the Python training, so the user doesn’t even need to switch pages.
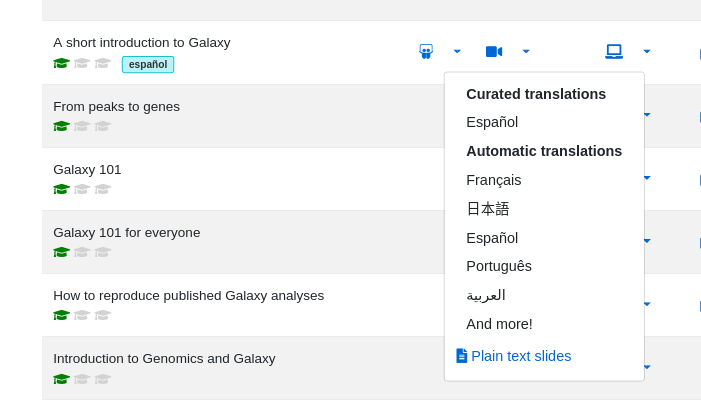
Add a new file with the translated material, next to the English version.
Add suffix _ES suffix
i.e. tutorial_ES.md or slides_ES.html
Add metadata to the English version (at the top of the file):
tags:-españoltranslations:-es
Add metadata to the translated version of the file:
lang:estranslations:-en
If all worked well, it should look something like this, with a dropdown menu on the slides and/or tutorial showing the presence of a curated tutorial:
Other Languages
Would you like to add a different language to the GTN? Please contact us first (e.g. on Gitter), to discuss a long-term sustainability plan!
Conclusion
If you have created a new tutorial, please also consider writing a GTN news post about it to let people know about it (and make it easy for us to tweet about)!
Footnotes (Rendered)
The wikipedia definition of a footnote is: “A note is a string of text placed at the bottom of a page in a book or document or at the end of a chapter, volume or the whole text. The note can provide an author’s comments on the main text or citations of a reference work in support of the text. Footnotes are notes at the foot of the page while endnotes are collected under a separate heading at the end of a chapter, volume, or entire work. Unlike footnotes, endnotes have the advantage of not affecting the layout of the main text, but may cause inconvenience to readers who have to move back and forth between the main text and the endnotes.” ↩↩2
Not entirely true, other kernels are supported, see their demo repo, but e.g. the SQLite kernel comes with severe restrictions like no downloading databases or connecting to ones online. ↩
You've Finished the Tutorial
Please also consider filling out the Feedback Form as well!
Key points
You can highlight questions, tools and hints with a special syntax
Self-learning can be done by questions and hidden answers
Frequently Asked Questions
Have questions about this tutorial? Have a look at the available FAQ pages and support channels
Batut, B., S. Hiltemann, A. Bagnacani, D. Baker, V. Bhardwaj et al., 2018 Community-driven data analysis training for biology. Cell systems 6: 752–758. 10.1016/j.cels.2018.05.012
Glossary
API
Application Programming Interface
JSON
JavaScript Object Notation
Feedback
Did you use this material as an instructor? Feel free to give us feedback on how it went.
Did you use this material as a learner or student? Click the form below to leave feedback.
Hiltemann, Saskia, Rasche, Helena et al., 2023 Galaxy Training: A Powerful Framework for Teaching! PLOS Computational Biology 10.1371/journal.pcbi.1010752
Batut et al., 2018 Community-Driven Data Analysis Training for Biology Cell Systems 10.1016/j.cels.2018.05.012
@misc{contributing-create-new-tutorial-content,
author = "Bérénice Batut and Helena Rasche",
	title = "Creating content in Markdown (Galaxy Training Materials)",
	year = "",
	month = "",
	day = "",
	url = "\url{https://training.galaxyproject.org/training-material/topics/contributing/tutorials/create-new-tutorial-content/tutorial.html}",
	note = "[Online; accessed TODAY]"
}
@article{Hiltemann_2023,
	doi = {10.1371/journal.pcbi.1010752},
	url = {https://doi.org/10.1371%2Fjournal.pcbi.1010752},
	year = 2023,
	month = {jan},
	publisher = {Public Library of Science ({PLoS})},
	volume = {19},
	number = {1},
	pages = {e1010752},
	author = {Saskia Hiltemann and Helena Rasche and Simon Gladman and Hans-Rudolf Hotz and Delphine Larivi{\`{e}}re and Daniel Blankenberg and Pratik D. Jagtap and Thomas Wollmann and Anthony Bretaudeau and Nadia Gou{\'{e}} and Timothy J. Griffin and Coline Royaux and Yvan Le Bras and Subina Mehta and Anna Syme and Frederik Coppens and Bert Droesbeke and Nicola Soranzo and Wendi Bacon and Fotis Psomopoulos and Crist{\'{o}}bal Gallardo-Alba and John Davis and Melanie Christine Föll and Matthias Fahrner and Maria A. Doyle and Beatriz Serrano-Solano and Anne Claire Fouilloux and Peter van Heusden and Wolfgang Maier and Dave Clements and Florian Heyl and Björn Grüning and B{\'{e}}r{\'{e}}nice Batut and},
	editor = {Francis Ouellette},
	title = {Galaxy Training: A powerful framework for teaching!},
	journal = {PLoS Comput Biol}
}
Funding
These individuals or organisations provided funding support for the development of this resource
Questions:
 Open image in new tab
 Open image in new tab
 Open image in new tab