Contributing to the Galaxy Training Network with GitHub
| Author(s) |
|
| Reviewers |
|
OverviewQuestions:
Objectives:
How can I contribute to an open-source project with GitHub?
What is the GitHub flow?
Fork a repository on GitHub
Clone a remote repository locally
Create a branch
Commit changes
Push changes to a remote repository
Create a pull request
Update a pull request
Time estimation: 30 minutesSupporting Materials:Published: Jun 12, 2018Last modification: Mar 14, 2025License: Tutorial Content is licensed under Creative Commons Attribution 4.0 International License. The GTN Framework is licensed under MITpurl PURL: https://gxy.io/GTN:T00483version Revision: 2
Most of the GTN content is written in GitHub Flavored Markdown with some metadata (or variables) found in YAML files. Everything is stored on a GitHub repository: https://github.com/galaxyproject/training-material.
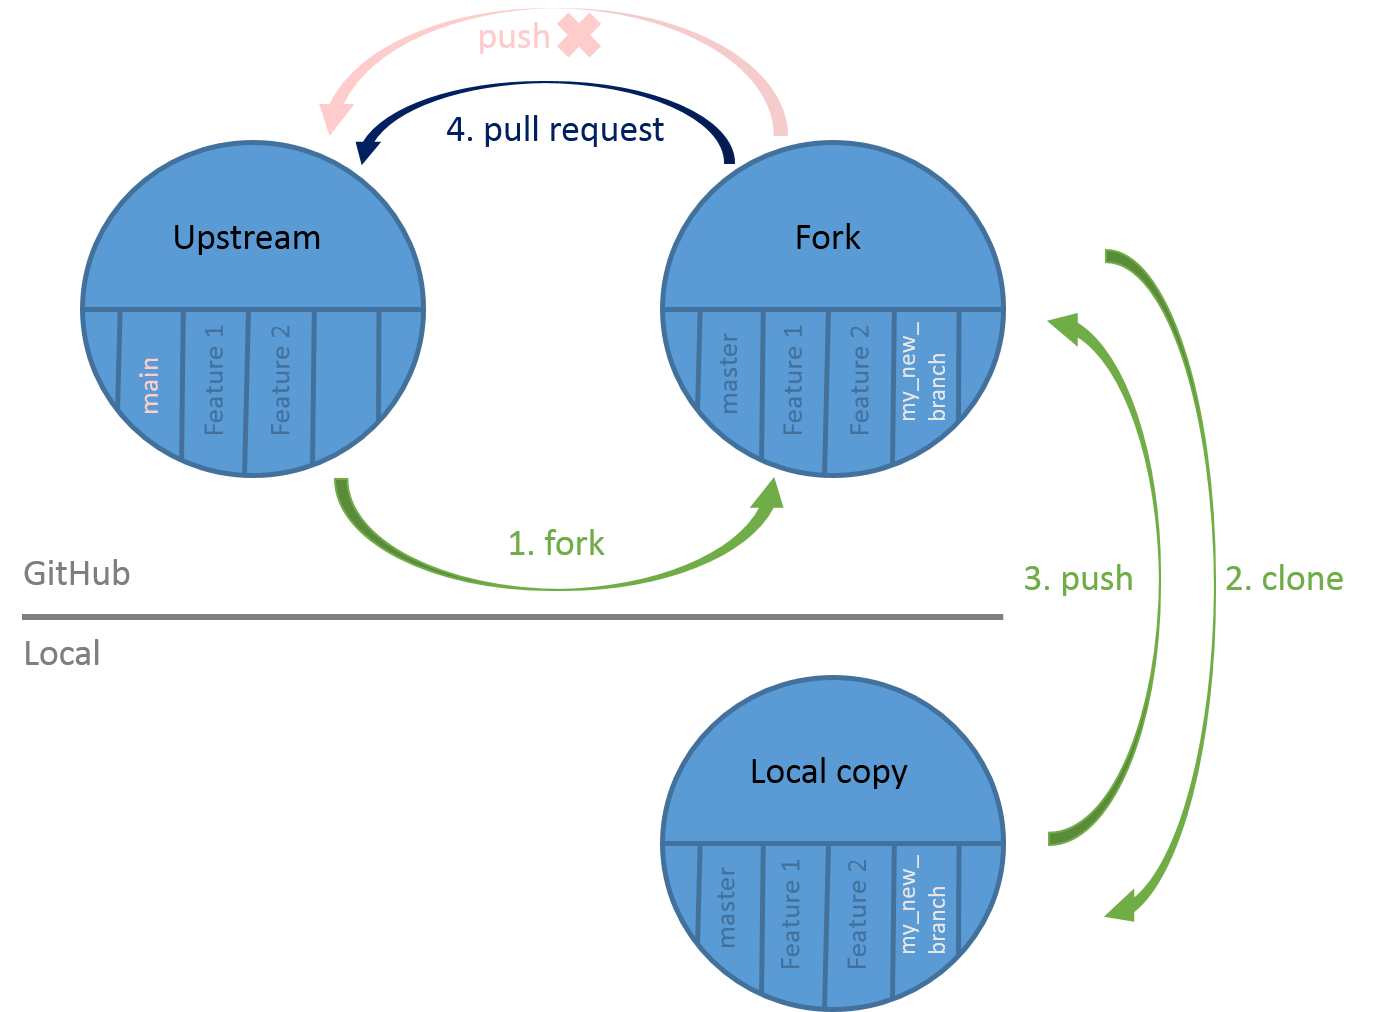
The process of development of new content is open and transparent, using git and following the GitHub flow, which we will walk you through:
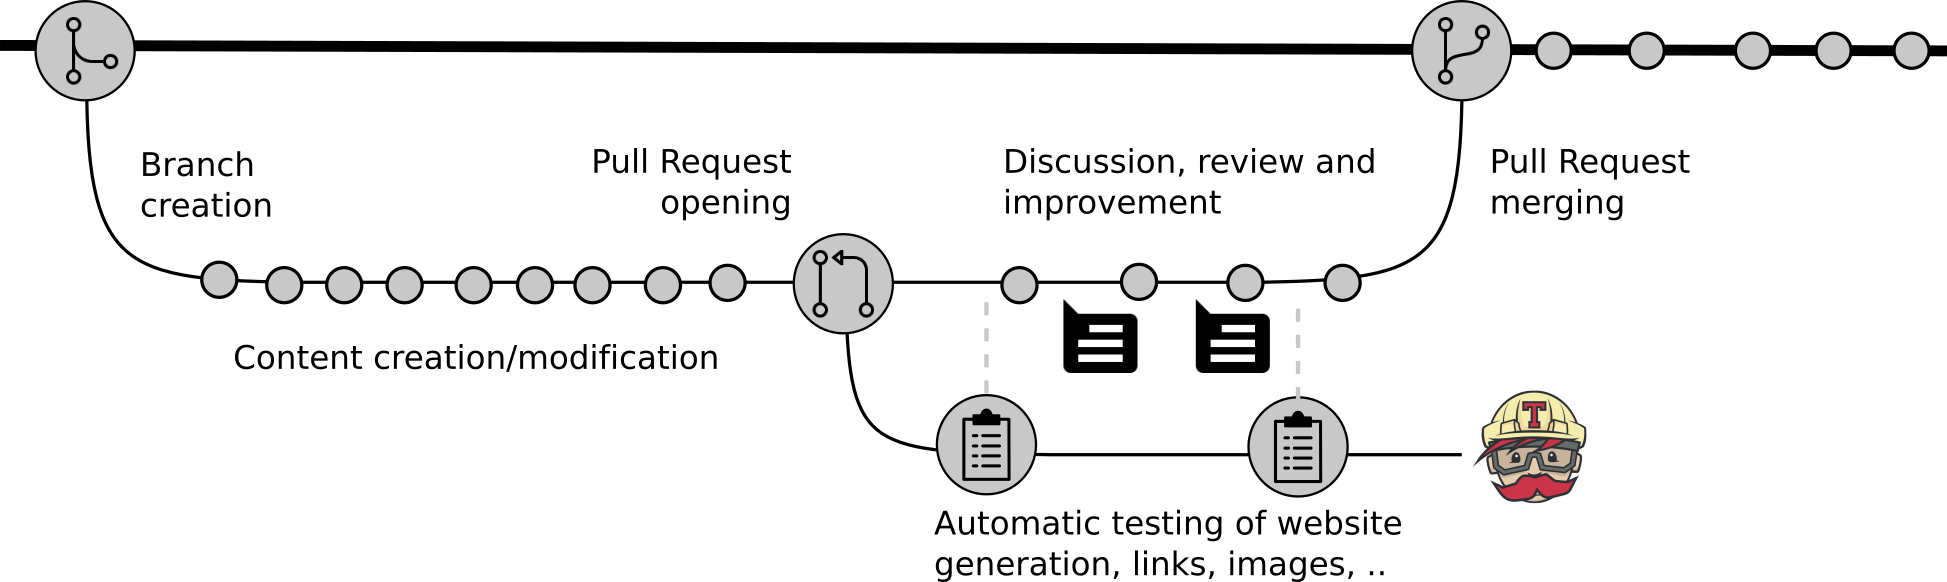 Open image in new tab
- Create a fork
- Clone your fork of this repository to create a local copy on your computer
- Create a new branch in your local copy for each significant change
- Commit the changes in that branch
- Push that branch to your fork on GitHub
- Submit a pull request from that branch to the original repository
- If you receive feedback, make changes in your local clone and push them to your branch on GitHub: the pull request will update automatically
- Pull requests will be merged by the training team members after at least one other person has reviewed the Pull request and approved it.
AgendaIn this tutorial, you will learn how to contribute to the GitHub repository:
- Create a GitHub account, if you have not already
- Create a fork of this repository on GitHub
- Clone the GitHub repository on your computer
- Create a new branch
- Make your changes on this branch
- Push your branch on your GitHub repository
- Open a pull request
- Make any requested changes
- Check the automatic tests
- Stay up to date
- Finishing the pull request
- Conclusion
Create a GitHub account, if you have not already
Hands On: Create a GitHub account
- Go to the GitHub website
- Create an account & follow the instructions. If anything is unclear, you can check their documentation on account creation.
Create a fork of this repository on GitHub
Hands-on: Choose Your Own TutorialThis is a 'Choose Your Own Tutorial' (CYOT) section (also known as 'Choose Your Own Analysis' (CYOA)), where you can select between multiple paths. Click one of the buttons below to select how you want to follow the tutorial
You can engage with GitHub via either an application on your computer, called GitHub Desktop, or through using the Command-line. If you’re not used to using the Command-line, or you just like a user interface, then use the GitHub Desktop.
Hands On: Download GitHub Desktop
- Go to the GitHub Desktop website
- Select the Download for (your kind of computer)
- Follow any instructions
A fork is a copy of a repository. Forking a repository allows you to freely experiment with changes without affecting the original project:
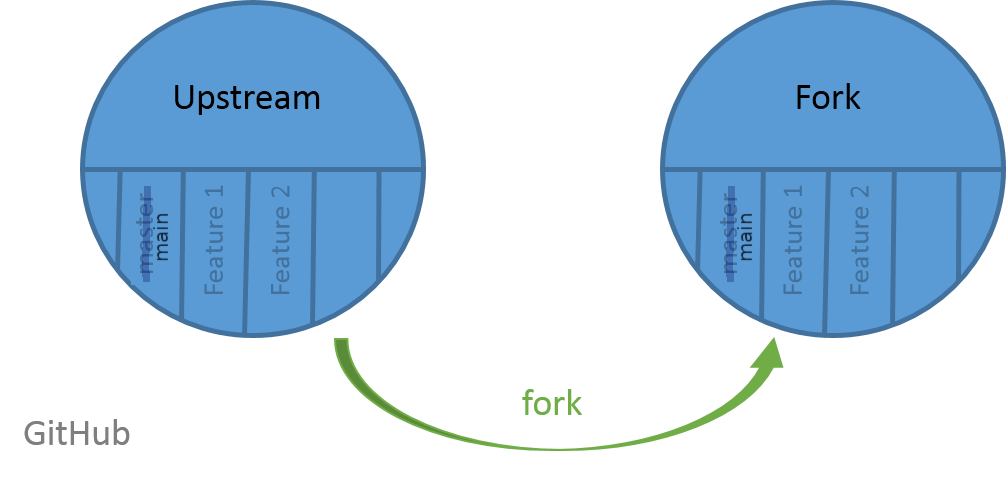 Open image in new tab
Forking a repository is a simple two-step process:
Hands On: Fork the repository
- Go on the GitHub repository: https://github.com/galaxyproject/training-material
Click on Fork (top-right corner of the page)
CommentWhen you click the Fork button GitHub will show you a list with your user account and any groups where you can create a fork of this repository (starting with
@). If you see yourself only below “You have existing forks of this repository:”, it means you already have a fork and you have nothing to do.

Clone the GitHub repository on your computer
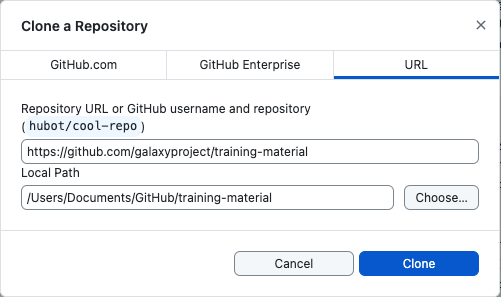
To modify the content of the repository, you need a copy of it on your computer. This step of importing a git repository is called “cloning”:
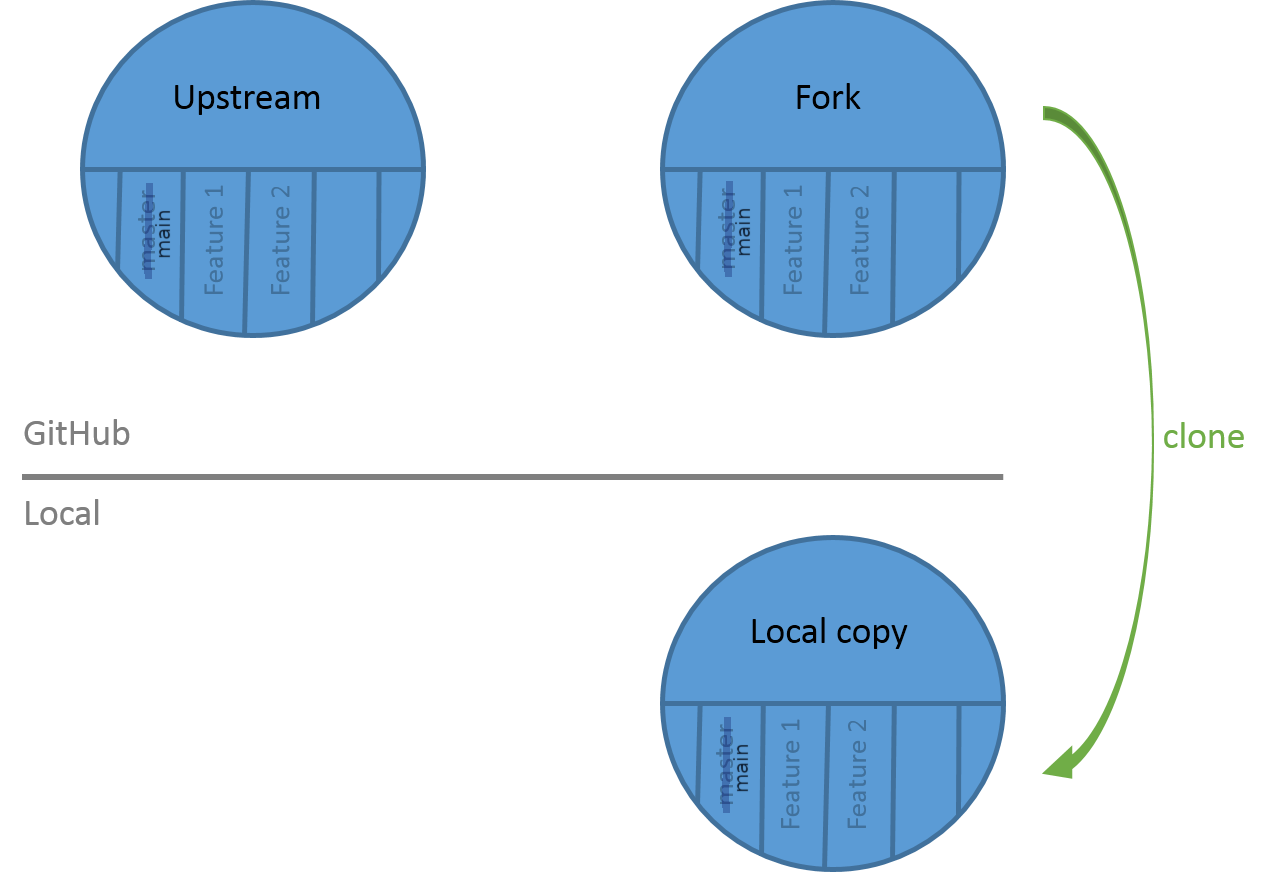 Open image in new tab
Hands On: Clone the GitHub repository
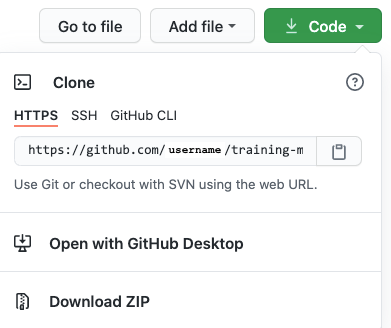
- Get the URL of your fork. You can find this on the main page of your fork under the green button:
Click on Code (right)
Select Open with GitHub Desktop
Your computer might ask if it’s ok to open the website Select Allow if so.
If you are happy with the location of the folder, select Clone This may take some time the first time (as the GTN repository is quite large!), but eventually the folder will be in your computer.
Hands On: Clone the GitHub repository
- Get the URL of your fork. You can find this on the main page of your fork under the green button:
Click on Code (right)
Copy the URL
It should be something like
https://github.com/< Your GitHub Username >/training-material.git- Open a terminal
- Navigate with
cdto the folder in which you will clone the repositoryClone the repository with the command:
$ git clone https://github.com/< Your GitHub Username >/training-material.gitNavigate to the repository
$ cd training-material
CommentIf you already have a local copy of the GitHub repository, you need to update it before doing any changes. To learn how to do that, please follow the last section.
Create a new branch
You have now your repository locally and you want to modify it. For this example tutorial, you will add yourself as contributor of the project to appear on the Hall of Fame.
In GitHub flow, there is a concept: one new feature or change = one branch.
When you’re working on a project, you’re going to have a bunch of different features or ideas in progress at any given time – some of which are ready to go, and others which are not. Branching exists to help you manage this workflow. You should develop different features on different branches to help keep the changes you make simple and easy to review.
 Open image in new tab
Here for this tutorial, you will create a branch called “my_new_branch” in which you will modify the CONTRIBUTORS.yaml file, the file used to generate the Hall of Fame.
Hands On: Create a branch
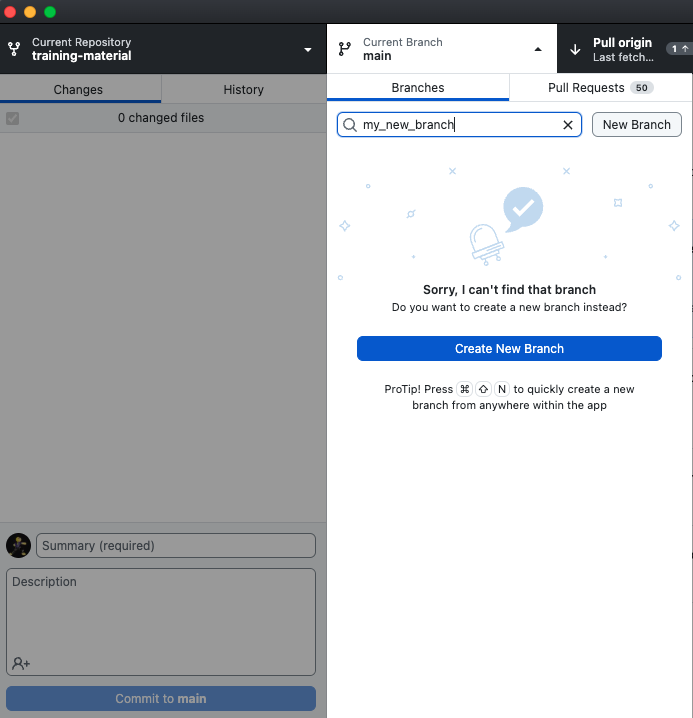
Go to Current Branch
- Either select an existing branch by searching, or (as in this case) type a name for a new branch:
my_new_branch
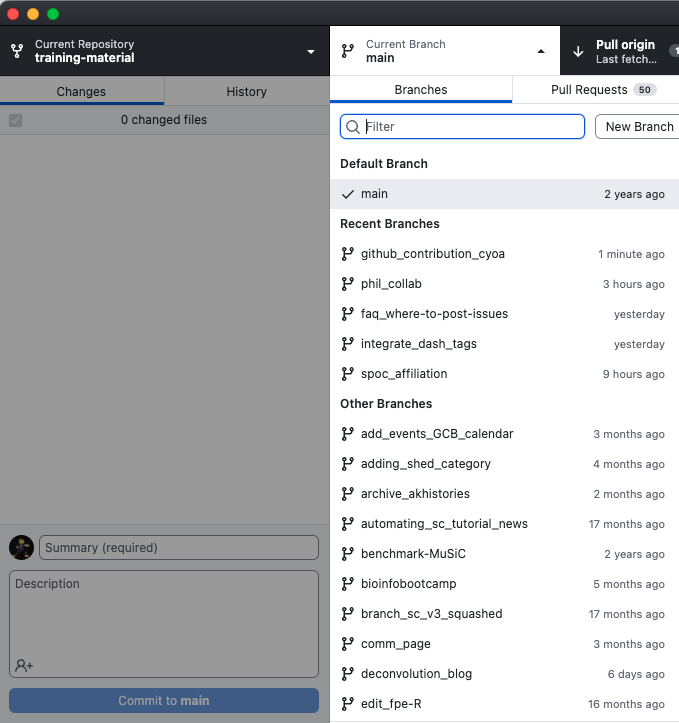
Select Create New Branch
- Select Create Branch

Hands On: Create a branch
List the existing branch
$ git branch
  * main
The branch on which you are is shown with the
*Create a new branch
$ git checkout -b my_new_branch
Switched to a new branch 'my_new_branch'
List the existing branch to check that the branch has been created and you are now on it
This branch is added to your local copy:
 Open image in new tab
Make your changes on this branch
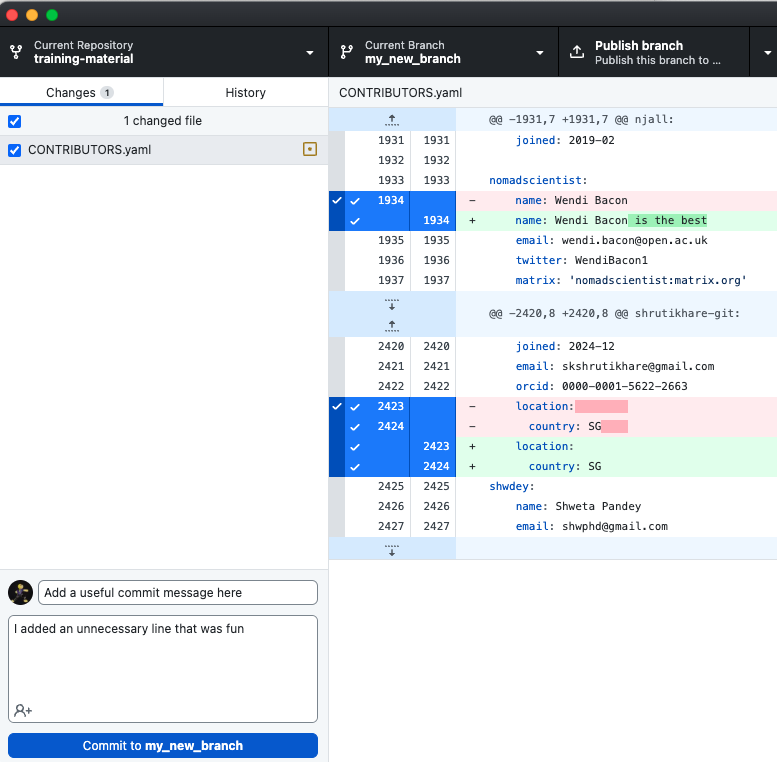
You have created your first branch! Now you want to make the change in the CONTRIBUTING.yaml file. By changing a file in this branch, it will diverge from the main branch. It will contain data that is only on this new branch:
 Open image in new tab
Hands On: Make changes in a branch
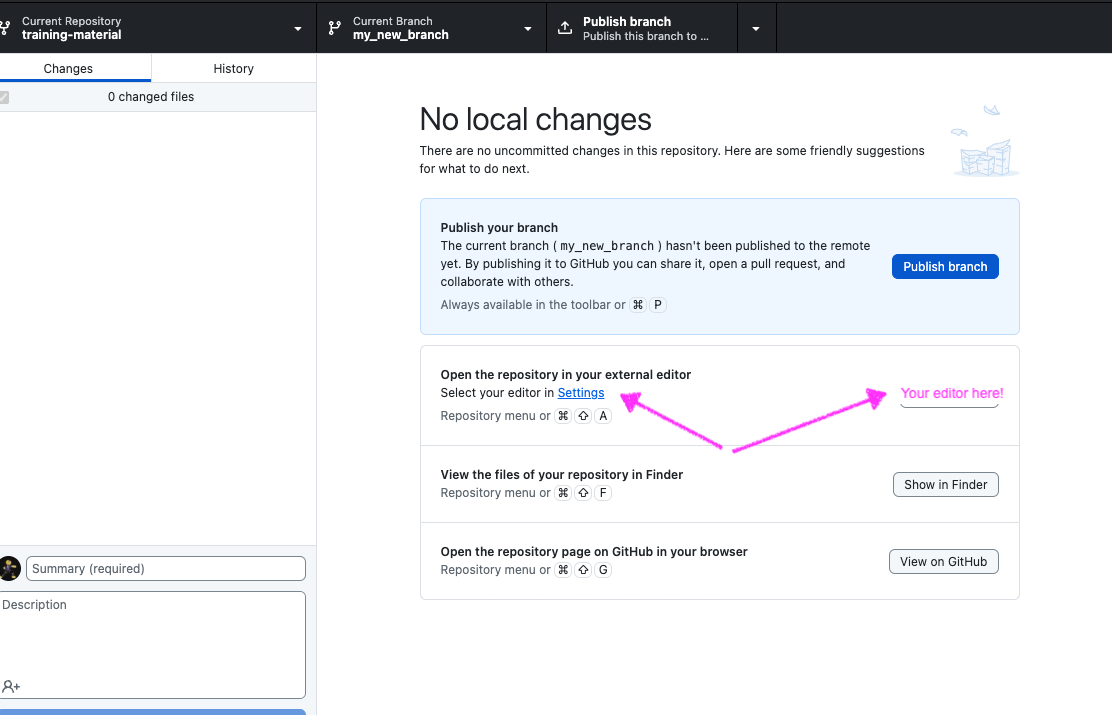
Select Open the repository in your external editor if you have one. Otherwise, you will need to find a text editor. You can consider using Visual Studio Code, for example. The text editors allow you to navigate through folders and type in code with automatically detected formatting, which is very helpful!
Scroll down to the
CONTRIBUTORS.yamlfile and follow the text in that file to add yourself.
Save the file
Go back to your GitHub Desktop, which should now show that file change. Add a useful commit message and a description saying what you did.
Select Commit to my_new_branch
Hands On: Make changes in a branch
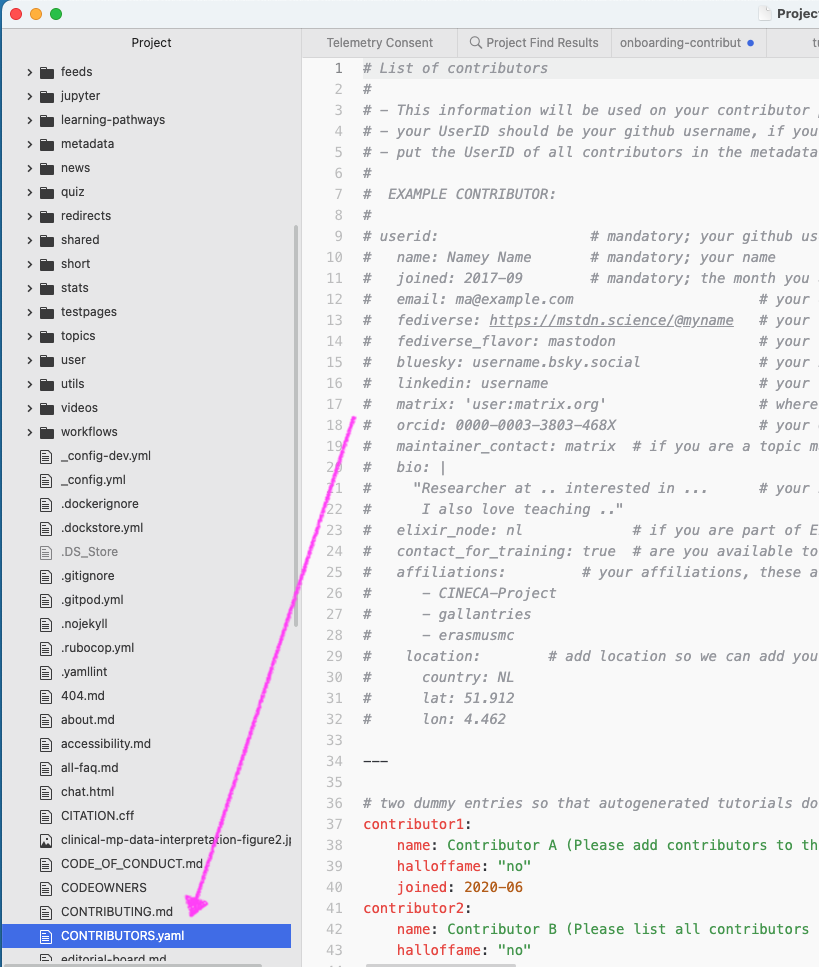
- Open with your favorite text editor the
CONTRIBUTORS.yamlfile that is on your computerAdd yourself in the
CONTRIBUTORS.yamlfileYou should use your GitHub username and add it followed by
:at the correct position given the alphabetical order- Save the file
Check the changes you made
$ git status
On branch my_new_branch
Changes not staged for commit:
  (use "git add/rm <file>..." to update what will be committed)
  (use "git checkout -- <file>..." to discard changes in working directory)

    modified:   CONTRIBUTORS.yaml

no changes added to commit (use "git add" and/or "git commit -a")
Add the file and commit the changes
$ git add CONTRIBUTORS.yaml $ git commit -m "Add ..."- Check that there are no more changes to commit with
git status
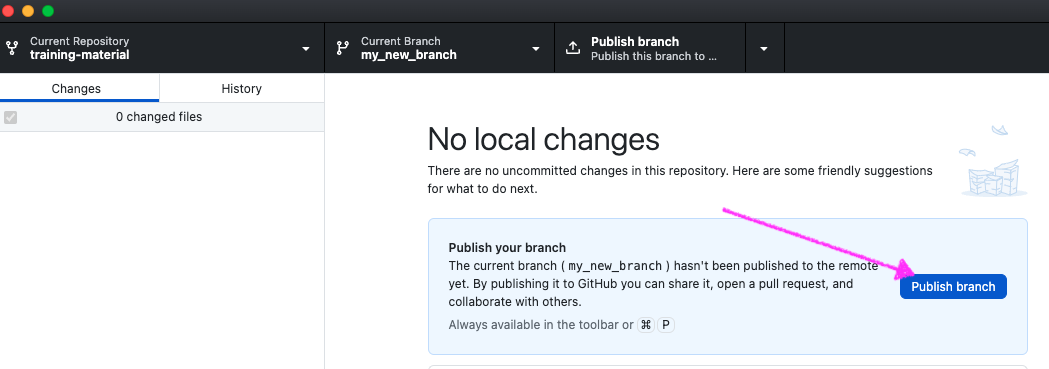
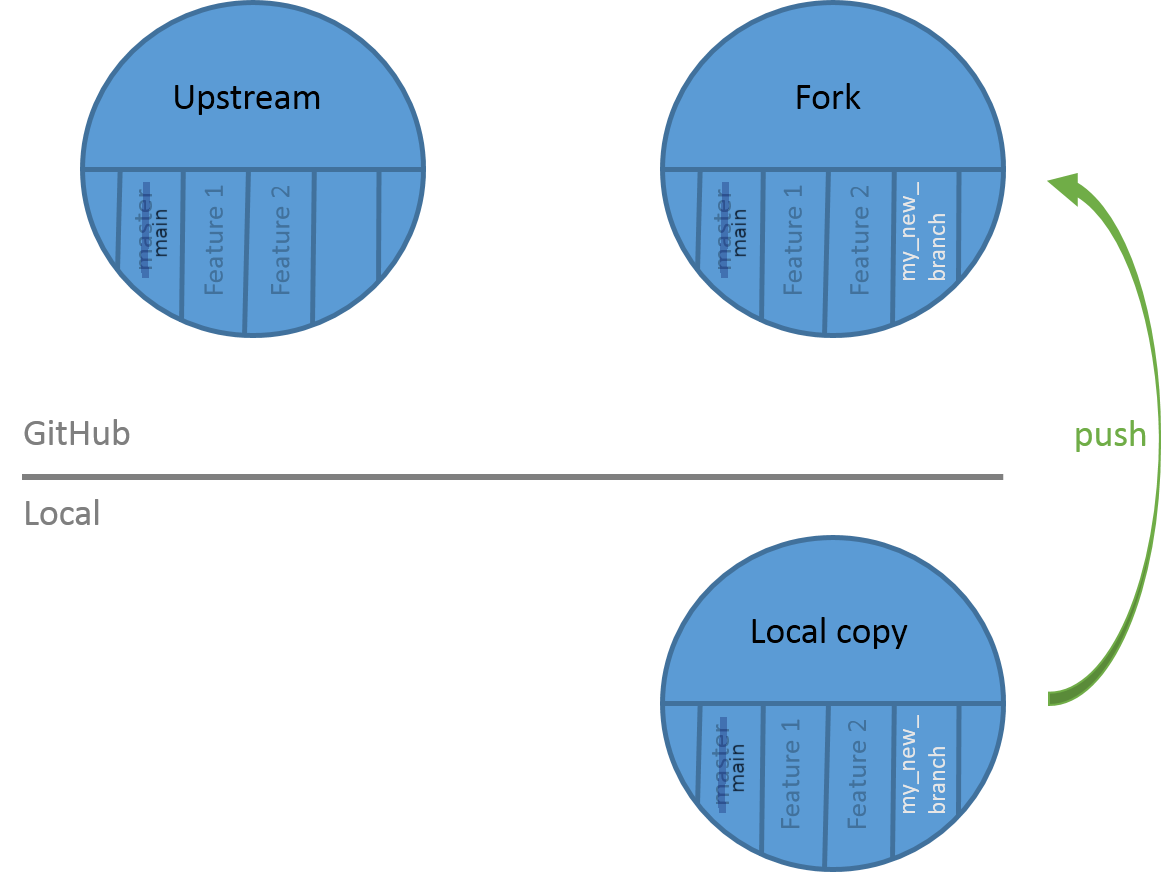
Push your branch on your GitHub repository
The changes you made on your branch are only on the local copy of the repository. To propagate them online, you need to push them on your fork on GitHub:
Hands On: Push the changes
- Select Publish branch
Hands On: Push the changes
Push the changes to the GitHub repository
$ git push origin my_new_branchWhen you
git pushed, you specifiedorigin. Git repositories can know that forks exist in multiple places. When you clone one, it creates a “remote” (a remote repository) which it namesorigin, set to the URL that you used when you cloned. By having multiple remotes, you can manage more complex workflows.
To check this has worked, you can go to your GitHub account.
Hands On: Push the changes
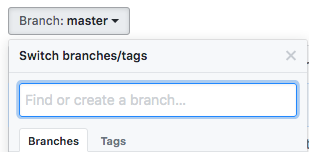
- Go to your GitHub repository on a web browser
- Change to the “my_new_branch” branch:
Click on Branch: main (left)
Select the branch “my_new_branch”
- Check that your name is in the
CONTRIBUTORS.yamlfile
 Open image in new tab
Open a pull request
You pushed your changes to GitHub, but currently they are only on your fork. You want to have these changes in the main GitHub repository in order to appear on our Hall of Fame online. You can’t add or push directly the main GitHub repository, so you need to create what we call a pull request:
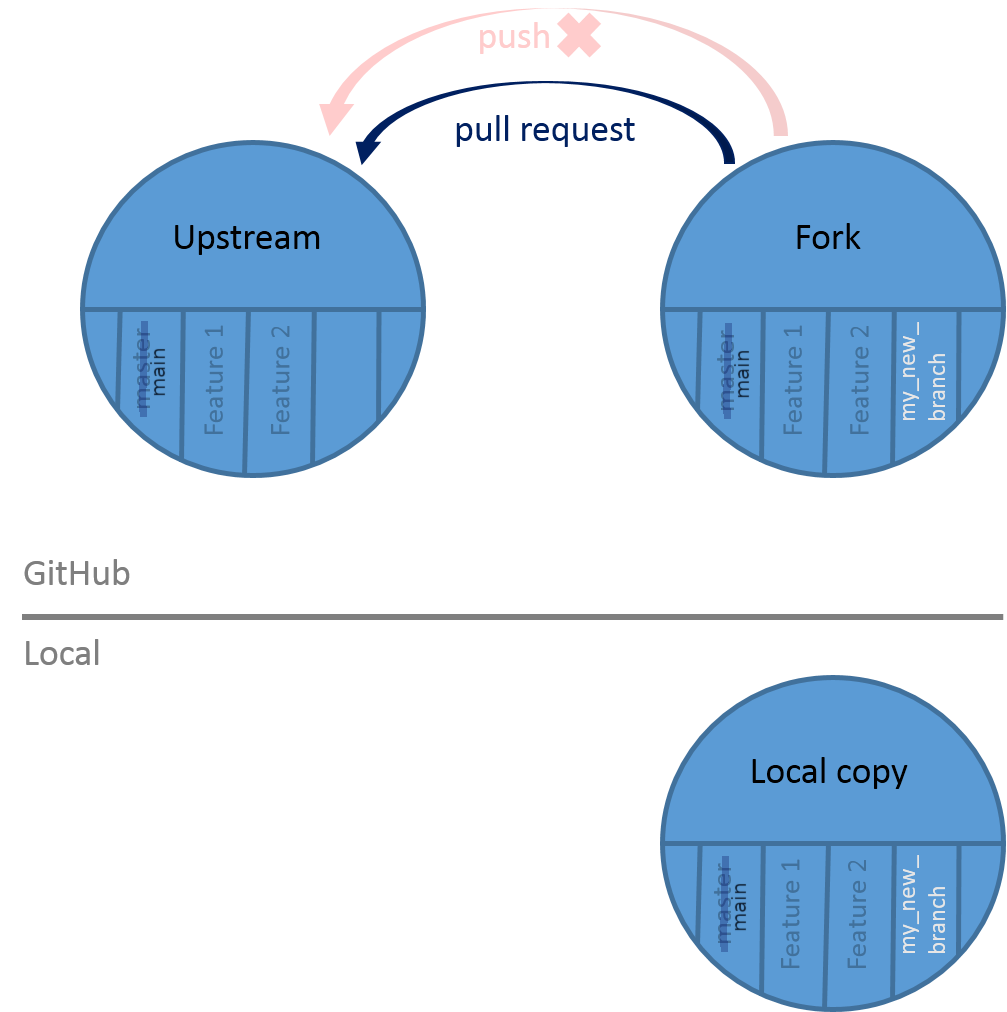 Open image in new tab
CommentYou will see that you can also make pull requests directly from GitHub Desktop. That also works great!
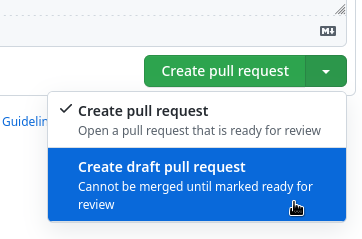
Hands On: Create a pull request
- Go to your GitHub repository
Click on Compare & pull request
Check that the selected branch are correct: main on the left and your branch name on the right
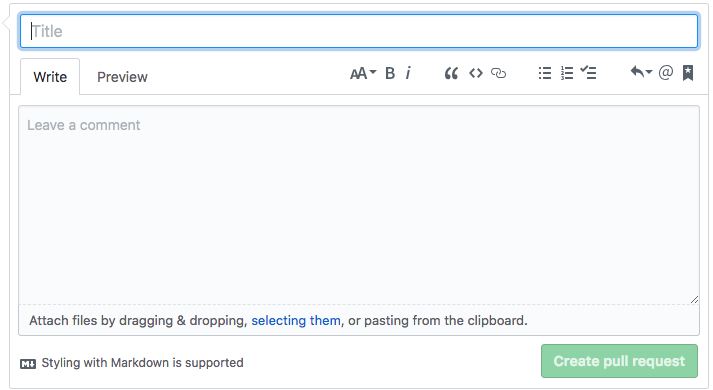
Fill in the pull request description
- Add a title for the Pull Request
- Add a message explaining the changes you made (Be kind )
Click on Create pull request or switch to Create draft pull request from the dropdown menu
Creating a pull request as a draft serves as an indication that you are still working on the content. Reviewers may comment on the current state and give general feedback, but they will know that they are not looking at the final version of your contribution.
In the Galaxy Training Material repository we have also disabled the computationally most expensive automated tests on draft pull requests, and we encourage you to use the draft stage as a small contribution to sustainable computing.
- Go to Pull requests to check if it is there


Once the pull is open, it will be reviewed. There are two possible outcomes:
- Your pull request is accepted. Congratulations! Your changes will be merged into the main branch of the original repository. The website will be re-built and you will be in the Hall of Fame
- Your pull request needs modifications: the reviewers will ask for some changes, possibly because the automatic tests are failing.
Make any requested changes
Three things can happen:
- A reviewer commits changes to your pull request (they fix something themselves)
- A reviewer suggests changes to your pull request (they think something will be helpful, but want you to check and decide)
- A reviewer posts comments, asking you to make some sort of change.
On larger pull requests, you can end up with all three! Here’s how to deal this.
1: A reviewer commits their own changes to your pull request
These changes currently only exist in your GitHub repository online, not on your local branch. In case you have to make any further changes, it’s important you fetch those changes onto your local branch. This is how you stay up to date.
Hands On: Fetch origin
- On your GitHub Desktop, select Fetch origin

You can then make further changes locally, keeping your local and online branch synched.
2: A reviewer suggests changes
Hands On: Commit suggested changes
On your Pull Request link where you see the suggested changes, commit them by clicking on the “Commit suggestion” button (or engage further, or edit them) on GitHub
Now that your branch is updated, you need to Fetch origin
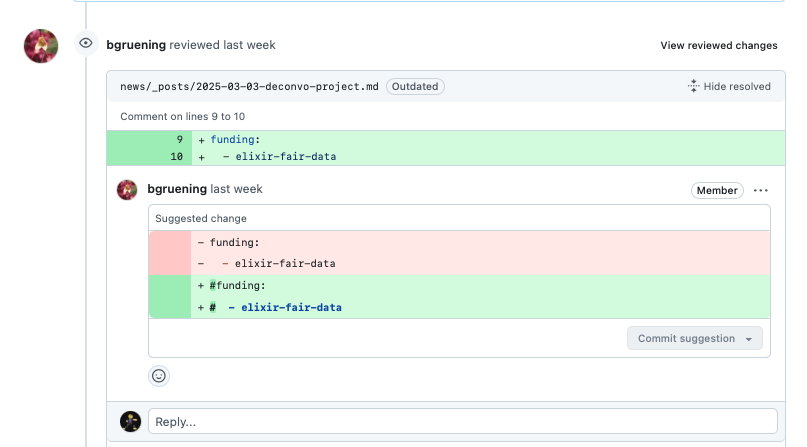
You can then make further changes locally, keeping your local and online branch synched (are you noticing a pattern?).
3: A reviewer posts comments to be addressed
For example, one of the reviewers of your pull request may have asked you to add your name after your GitHub username in the CONTRIBUTORS.yaml file, if you didn’t already.
Hands On: Make further changes
Just like when you made your initial branch and edited the file in your text editor, go to GitHub Desktop Current Branch (make sure it is the correct one!) Open the repository in your external editor Navigate to the
CONTRIBUTORS.yamlfile and make any suggested changesSave the file
Commit the changes to your branch (as before)
Select Push origin to push these changes from your local folder to your online GitHub branch (which is linked to your pull request)
The pull request should be automatically updated
- Check that the new changes are added to the pull request on GitHub

Hands On: Make further changes
Make any requested changes in the
CONTRIBUTORS.yamlfileIt should look like
bebatut:
     name: Bérénice Batut
Check the changes that you made
$ git status
On branch my_new_branch
Changes not staged for commit:
  (use "git add/rm <file>..." to update what will be committed)
  (use "git checkout -- <file>..." to discard changes in working directory)

    modified:   CONTRIBUTORS.yaml

no changes added to commit (use "git add" and/or "git commit -a")
Add the file and commit the changes
$ git add CONTRIBUTORS.yaml $ git commit -m "Add ..."- Check that there are no more changes to commit with
git statusPush the new changes to GitHub
$ git push origin my_new_branchThe pull request should be automatically updated
- Check that the new changes are added to the pull request on GitHub
Check the automatic tests
When a pull request is opened, some automated tests are automatically launched on Travis to be sure that the changes do not break the website, the URL are valid, etc.
On the bottom of your pull request, you can see the status of the tests:
-
Yellow (with circle)

The tests are still running
-
Red (with cross)

When it is red, you can investigate why by clicking on Details. You will be redirected on Travis where you can see the logs of the tests. Get in touch with us on Gitter if you need help to understand the issue.
-
Green (with tick)

The tests passed. Good job!
Even it is green, we recommend to check the result of the tests, as some of tests are allowed to fail (to avoid too much noise).
Stay up to date
You now want to work on a new tutorial or make some other new changes. However since you get a local copy, some changes have happened to the original GitHub repository. You need then to update your local copy of the repository before changing anything.
Hands On: Update the local copy
Move to the
mainbranch$ git checkout mainAdd a reference to the original GitHub repository
$ git remote add upstream https://github.com/galaxyproject/training-material.gitComment: Error "remote upstream already exists"If you have done step 2 before and try to
remote addagain, git will tell you that a “remote upstream already exists”. In this case you can safely continue to step 4.Update the local copy of the repository by “pulling” in the content of the original GitHub repository
$ git pull upstream main
You can now restart the GitHub flow to propose new changes: start by creating a new branch.
Finishing the pull request
Great! You now know how to make pull request on GitHub, and how to make changes after a review. Reviewers can now approve and merge your pull request, however, there’s no point adding you as a contributor if you don’t plan to contribute! So you have to make a choice - do you plan to contribute now, later, or never?
Hands-on: Choose Your Own TutorialThis is a 'Choose Your Own Tutorial' (CYOT) section (also known as 'Choose Your Own Analysis' (CYOA)), where you can select between multiple paths. Click one of the buttons below to select how you want to follow the tutorial
Your choice impacts how you will continue with your pull request.
If you do not intend to contribute to Galaxy, please close the pull request as per below.
Hands On: Close the Pull Request
- Go to the list of pull requests tab on the GitHub website
- Click on your pull request
- Scroll to the bottom of the page
- Click on “Close pull request” button
If you plan to contribute to Galaxy, but not anytime soon, we ask that you close your Pull Request. When you come back to contribute to Galaxy, you can add any changes to the branch that you are working on, and open a fresh pull request following the same instructions above!
Hands On: Close the Pull Request
- Go to the list of pull requests tab on the GitHub website
- Click on your pull request
- Scroll to the bottom of the page
- Click on “Close pull request” button
Thank you so much for being willing to contribute! The easiest way to start contributing is to look through training materials to find typos, poor figure legends or alt text - basically, a text-based issue that you can correct. If you’re feeling bold, you can also look at some of these ideas for ways to contribute.
- Find a typo/error
- Fix it locally, just the way you edited the
CONTRIBUTORS.yamlfile above. - Commit this change to your branch (the same one with yourself added to the
CONTRIBUTORS.yamlfile) - Push this change from your local machine to the Github site
- Check the change is reflected in your Pull Request
The steps are the same as your initial contribution to the CONTRIBUTORS.yaml file. You will then, as before, engage further with reviewers to finalise your Pull Request, and eventually (if all goes well!) your Pull Request will be approved and merged!
congratulations Congrats, you’ll have made your first contribution to the Galaxy Training Network!
Conclusion
With this tutorial, you have learned some basics git commands and principles:
 Open image in new tab
You also learned the GitHub flow and its cycle:
- Create a new branch in your local copy
- Commit the changes in that branch
- Push that branch to your fork on GitHub
- Submit a pull request from that branch to the main repository
- Wait for feedbacks and make requested changes
- Update your local copy
- Restart the cycle
You can now contribute and help us to improve our tutorials!
This tutorial was a quick introduction to explain the basics of contributing to the training material. We recommend that everyone follow a more detailed git tutorials:
- Software Carpentry tutorial which explains a bit more in detail some git commands and the concept of remote, local and stagging
- Learn Git Branching by GitHub to test the different git commands
You should also download, print and keep always with you the Git Cheat Sheet
You've Finished the Tutorial
Key points
Work on your fork
1 branch = 1 feature
1 pull request = 1 branch
Be careful of the branch you’re working on
Check the automated tests
Frequently Asked Questions
Have questions about this tutorial? Have a look at the available FAQ pages and support channelsFeedback
Did you use this material as an instructor? Feel free to give us feedback on how it went.
Did you use this material as a learner or student? Click the form below to leave feedback.

Citing this Tutorial
- Cyril Monjeaud, Bérénice Batut, Wendi Bacon, Contributing to the Galaxy Training Network with GitHub (Galaxy Training Materials). https://training.galaxyproject.org/training-material/topics/contributing/tutorials/github-contribution/tutorial.html Online; accessed TODAY
- Hiltemann, Saskia, Rasche, Helena et al., 2023 Galaxy Training: A Powerful Framework for Teaching! PLOS Computational Biology 10.1371/journal.pcbi.1010752
- Batut et al., 2018 Community-Driven Data Analysis Training for Biology Cell Systems 10.1016/j.cels.2018.05.012
Congratulations on successfully completing this tutorial!@misc{contributing-github-contribution, author = "Cyril Monjeaud and Bérénice Batut and Wendi Bacon", title = "Contributing to the Galaxy Training Network with GitHub (Galaxy Training Materials)", year = "", month = "", day = "", url = "\url{https://training.galaxyproject.org/training-material/topics/contributing/tutorials/github-contribution/tutorial.html}", note = "[Online; accessed TODAY]" } @article{Hiltemann_2023, doi = {10.1371/journal.pcbi.1010752}, url = {https://doi.org/10.1371%2Fjournal.pcbi.1010752}, year = 2023, month = {jan}, publisher = {Public Library of Science ({PLoS})}, volume = {19}, number = {1}, pages = {e1010752}, author = {Saskia Hiltemann and Helena Rasche and Simon Gladman and Hans-Rudolf Hotz and Delphine Larivi{\`{e}}re and Daniel Blankenberg and Pratik D. Jagtap and Thomas Wollmann and Anthony Bretaudeau and Nadia Gou{\'{e}} and Timothy J. Griffin and Coline Royaux and Yvan Le Bras and Subina Mehta and Anna Syme and Frederik Coppens and Bert Droesbeke and Nicola Soranzo and Wendi Bacon and Fotis Psomopoulos and Crist{\'{o}}bal Gallardo-Alba and John Davis and Melanie Christine Föll and Matthias Fahrner and Maria A. Doyle and Beatriz Serrano-Solano and Anne Claire Fouilloux and Peter van Heusden and Wolfgang Maier and Dave Clements and Florian Heyl and Björn Grüning and B{\'{e}}r{\'{e}}nice Batut and}, editor = {Francis Ouellette}, title = {Galaxy Training: A powerful framework for teaching!}, journal = {PLoS Comput Biol} }
Developing GTN training materialThis tutorial is part of a series to develop GTN training material, feel free to also look at:
- Overview of the Galaxy Training Material
- Contributing to the Galaxy Training Network with GitHub
- Contributing with GitHub via its interface
- GTN Metadata
- Design and plan session, course, materials
- Preview the GTN website as you edit your training material
- Updating diffs in admin training
- Adding auto-generated video to your slides
- Generating PDF artefacts of the website
- Teaching Python
- Tools, Data, and Workflows for tutorials
- Creating Interactive Galaxy Tours
- Adding Quizzes to your Tutorial
- Principles of learning and how they apply to training and teaching
- Including a new topic
- Creating a new tutorial
- Single Cell Publication - Data Analysis
- Single Cell Publication - Data Plotting
- FAIR Galaxy Training Material
- Creating content in Markdown
- Creating Slides
- Updating tool versions in a tutorial