Frequently Asked Questions
Introduction
Ways to use Galaxy
All ways to use Galaxy are included in the Galaxy Directory listing.
Having one account at several public Galaxy servers expands your access to distinct data storage and computational resources, plus common and domain-specific analysis tools.
When running your own private Galaxy server for routine analysis, publishing results at a public Galaxy server allows for worldwide access by others when you share your data: Histories, Workflows, and related assets.
Tips:
- Teaching with Galaxy We strongly recommend using Galaxy’s Training Infrastructure as a Service (TIaaS) for synchronous class work.
- Public Galaxy servers are appropriate for many analysis projects or for when sharing data or results publicly is a goal. These are also a great choice when learning on your own with GTN tutorials.
- Private Galaxy servers are more appropriate when working with very large data, time sensitive projects, and ongoing research projects that require more resources than the public Galaxy servers can support. These two options are scientist friendly as they require very little to no server administration.
- GVL Cloudman is a single or multi-user choice and AWS offers grants.
- AnVIL is a single-user choice sponsored by NHGRI and is a pay-for-use Google Cloud platform.
What is Galaxy?
Galaxy is an open data integration and analysis platform for the life sciences, and it is particularly well-suited for data analysis training in life science research.
How can I load data?
- Load by “browsing” for a local file. Some servers will support load data that is 2 GB or larger. If you are having problems with this method, try FTP.
- Load using an HTTP URL or FTP URL.
- Load a few lines of plain text.
- Load using FTP. Either line command or with a desktop client.
What is this website?
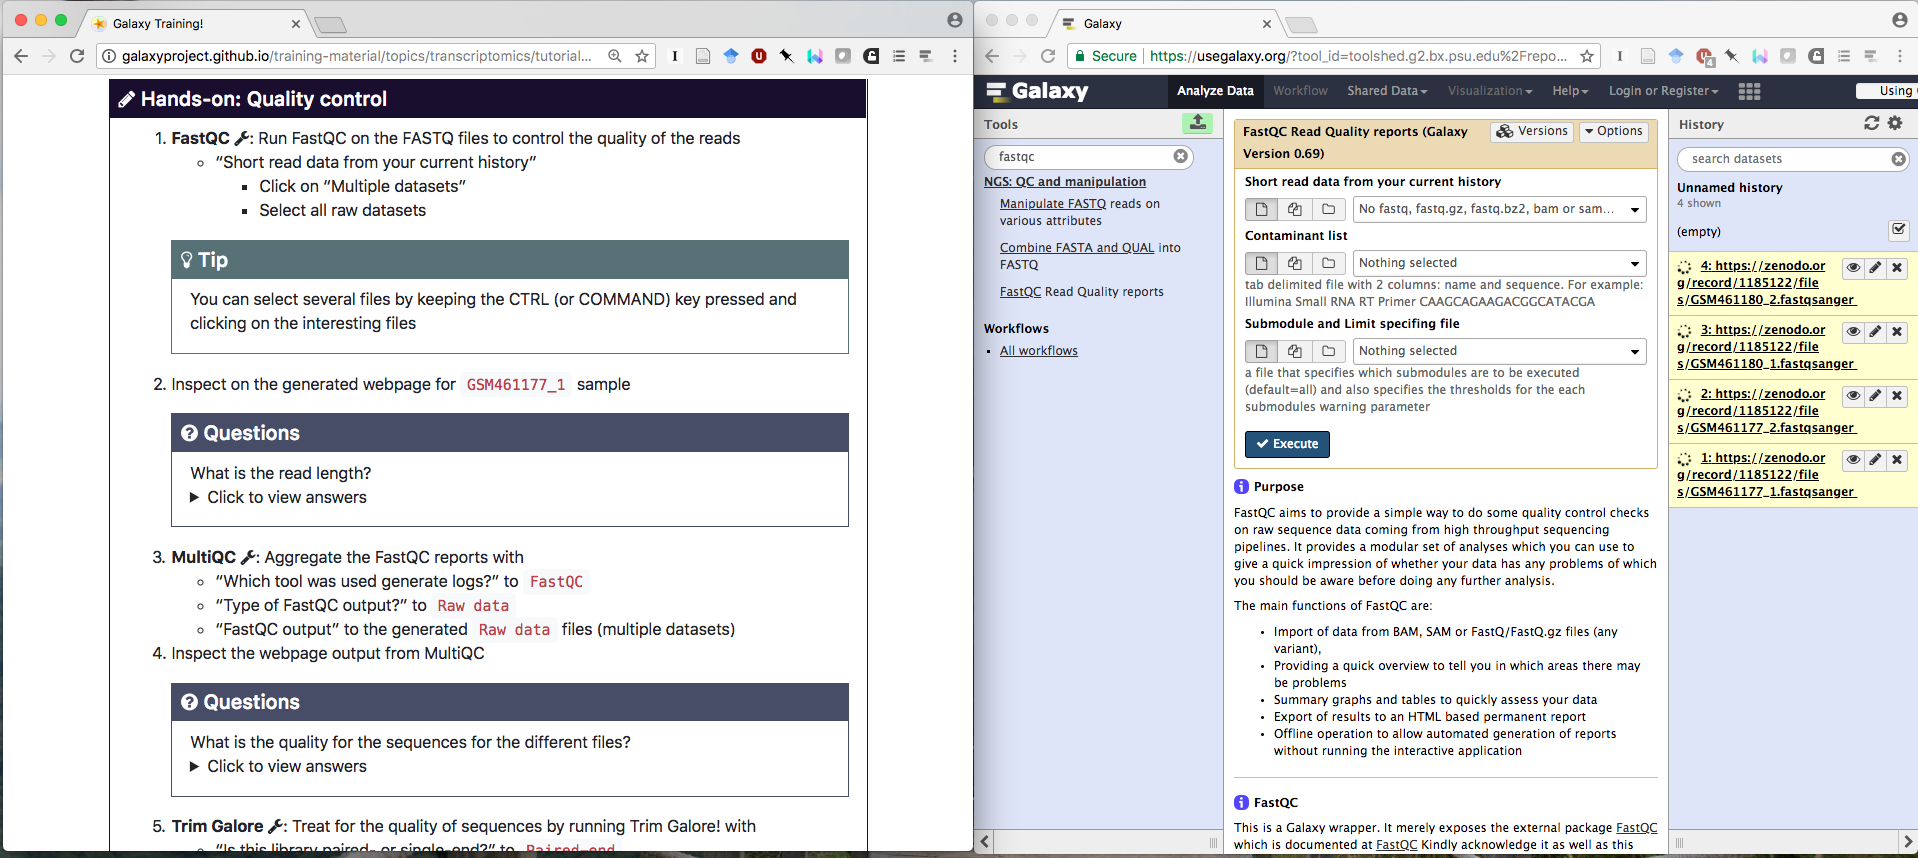
This website is a collection of hands-on tutorials that are designed to be interactive and are built around Galaxy:
This material is developed and maintained by the worldwide Galaxy community. You can learn more about this effort by reading our first and second articles
How can I advertise the training materials on my posters?
We provide some QR codes and logos in the images folder.
What audiences are the tutorials for?
There are two distinct audiences for these materials.
- Self-paced individual learners. These tutorials provide everything you need to learn a topic, from explanations of concepts to detailed hands-on exercises.
- Instructors. They are also designed to be used by instructors in teaching/training settings. Slides, and detailed tutorials are provided. Most tutorials also include computational support with the needed tools, data as well as Docker images that can be used to scale the lessons up to many participants.
How can I cite the GTN?
We wrote two articles about our efforts:
- Batut, Bérénice, et al. “Community-driven data analysis training for biology.” Cell systems 6.6 (2018): 752-758
- Hiltemann, Saskia, Rasche, Helena et al. “Galaxy Training: A Powerful Framework for Teaching!.” PLOS Computational Biology (2023) 19(1): e1010752
To cite individual tutorials, please find citation information at the end of the tutorial.
Here is the BibTeX formatted version of those citations:
@article{Hiltemann_2023,
	title        = {Galaxy Training: A powerful framework for teaching!},
	author       = {Hiltemann, Saskia and Rasche, Helena and Gladman, Simon and Hotz, Hans-Rudolf and Larivi\`{e}re, Delphine and Blankenberg, Daniel and Jagtap, Pratik D. and Wollmann, Thomas and Bretaudeau, Anthony and Gou\'{e}, Nadia and Griffin, Timothy J. and Royaux, Coline and Le Bras, Yvan and Mehta, Subina and Syme, Anna and Coppens, Frederik and Droesbeke, Bert and Soranzo, Nicola and Bacon, Wendi and Psomopoulos, Fotis and Gallardo-Alba, Crist\'{o}bal and Davis, John and F\"{o}ll, Melanie Christine and Fahrner, Matthias and Doyle, Maria A. and Serrano-Solano, Beatriz and Fouilloux, Anne Claire and van Heusden, Peter and Maier, Wolfgang and Clements, Dave and Heyl, Florian and Gr\"{u}ning, Bj\"{o}rn and Batut, B\'{e}r\'{e}nice},
	year         = 2023,
	month        = jan,
	journal      = {PLOS Computational Biology},
	publisher    = {Public Library of Science (PLoS)},
	volume       = 19,
	number       = 1,
	pages        = {e1010752},
	doi          = {10.1371/journal.pcbi.1010752},
	issn         = {1553-7358},
	url          = {http://dx.doi.org/10.1371/journal.pcbi.1010752},
	editor       = {Ouellette, Francis},
}
@article{Batut_2018,
	title        = {Community-Driven Data Analysis Training for Biology},
	author       = {Batut, B\'{e}r\'{e}nice and Hiltemann, Saskia and Bagnacani, Andrea and Baker, Dannon and Bhardwaj, Vivek and Blank, Clemens and Bretaudeau, Anthony and Brillet-Gu\'{e}guen, Loraine and \v{C}ech, Martin and Chilton, John and Clements, Dave and Doppelt-Azeroual, Olivia and Erxleben, Anika and Freeberg, Mallory Ann and Gladman, Simon and Hoogstrate, Youri and Hotz, Hans-Rudolf and Houwaart, Torsten and Jagtap, Pratik and Larivi\`{e}re, Delphine and Le Corguill\'{e}, Gildas and Manke, Thomas and Mareuil, Fabien and Ram\'{\i}rez, Fidel and Ryan, Devon and Sigloch, Florian Christoph and Soranzo, Nicola and Wolff, Joachim and Videm, Pavankumar and Wolfien, Markus and Wubuli, Aisanjiang and Yusuf, Dilmurat and Taylor, James and Backofen, Rolf and Nekrutenko, Anton and Gr\"{u}ning, Bj\"{o}rn},
	year         = 2018,
	month        = jun,
	journal      = {Cell Systems},
	publisher    = {Elsevier BV},
	volume       = 6,
	number       = 6,
	pages        = {752--758.e1},
	doi          = {10.1016/j.cels.2018.05.012},
	issn         = {2405-4712},
	url          = {http://dx.doi.org/10.1016/j.cels.2018.05.012},
}
Using Answer Key Histories
If you get stuck, you can first check your history against an galaxy-history-answer Answer Key history found in the header of (some) tutorials.
First, import the target history.
- Open the link to the shared history
- Click on the Import this history button on the top left
- Enter a title for the new history
- Click on Copy History
Next, compare the answer key history with your own history.
You can view multiple Galaxy histories at once. This allows to better understand your analyses and also makes it possible to drag datasets between histories. This is called “History multiview”. The multiview can be enabled either view History menu or via the Activity Bar:
Enabling Multiview via History menu is done by first clicking on the galaxy-history-options “History options” drop-down and selecting galaxy-multihistory “Show Histories Side-by-Side option”:
Clicking the galaxy-multihistory “History Multiview” button within the Activity Bar:
You can compare there, or if you’re really stuck, you can also click and drag a given dataset to your history to continue the tutorial from there.
There 3 ways to copy datasets between histories
From the original history
- Click on the galaxy-gear icon which is on the top of the list of datasets in the history panel
- Click on Copy Datasets
Select the desired files
Give a relevant name to the “New history”
- Validate by ‘Copy History Items’
- Click on the new history name in the green box that have just appear to switch to this history
Using the galaxy-columns Show Histories Side-by-Side
- Click on the galaxy-dropdown dropdown arrow top right of the history panel (History options)
- Click on galaxy-columns Show Histories Side-by-Side
- If your target history is not present
- Click on ‘Select histories’
- Click on your target history
- Validate by ‘Change Selected’
- Drag the dataset to copy from its original history
- Drop it in the target history
From the target history
- Click on User in the top bar
- Click on Datasets
- Search for the dataset to copy
- Click on its name
- Click on Copy to current History
You can also use our handy troubleshooting guide.
When something goes wrong in Galaxy, there are a number of things you can do to find out what it was. Error messages can help you figure out whether it was a problem with one of the settings of the tool, or with the input data, or maybe there is a bug in the tool itself and the problem should be reported. Below are the steps you can follow to troubleshoot your Galaxy errors.
- Expand the red history dataset by clicking on it.
- Sometimes you can already see an error message here
View the error message by clicking on the bug icon galaxy-bug
- Check the logs. Output (stdout) and error logs (stderr) of the tool are available:
- Expand the history item
- Click on the details icon
- Scroll down to the Job Information section to view the 2 logs:
- Tool Standard Output
- Tool Standard Error
- For more information about specific tool errors, please see the Troubleshooting section
- Submit a bug report! If you are still unsure what the problem is.
- Click on the bug icon galaxy-bug
- Write down any information you think might help solve the problem
- See this FAQ on how to write good bug reports
- Click galaxy-bug Report button
- Ask for help!
- Where?
- In the GTN Matrix Channel
- In the Galaxy Matrix Channel
- Browse the Galaxy Help Forum to see if others have encountered the same problem before (or post your question).
- When asking for help, it is useful to share a link to your history
How is the content licensed?
The content of this website is licensed under the Creative Commons Attribution 4.0 License.
What licenses are used in the GTN?
We provide a listing of all licenses for code and things displayed to you in the GTN in the licenses page
What are the tutorials for?
These tutorials can be used for learning and teaching how to use Galaxy for general data analysis, and for learning/teaching specific domains such as assembly and differential gene expression analysis with RNA-Seq data.
What is my.galaxy.training
The
my.galaxy.trainingis part of the GTN. We found that often need to direct our learners to specific pages within Galaxy, but which Galaxy? Should we add three links, one for each of the current bigger UseGalaxy.* servers? That would be really annoying for users who aren’t using one of those servers.E.g. how do we link to /user, the user preferences page which is available on every Galaxy Instance? This service handles that in a private and user-friendly manner.
(Learners) How to Use It
When you access a my.galaxy.training page you’ll be prompted to select a server, simply select one and you’re good to go!
If you want to enter a private Galaxy instance, perhaps, behind a firewall, that’s also an option! Just select the ‘other’ option and provide your domain. Since the redirection happens in your browser with no servers involved, as long as you can access the server, you’ll get redirected to the right location.
(Tutorial Authors) How to use it
If you want to link to a specific page within Galaxy, simple construct the URL:
https://my.galaxy.training/?path=/userwhere everything after?pathis the location they should be redirected to on Galaxy. That example link will eventually redirect the learner to something likehttps://usegalaxy.eu/user.Technical Background
So we took inspiration from Home Assistant which had the same problem, how to redirect users to pages on their own servers. The
my.galaxy.trainingservice is a very simple static page which looks in the user’slocalStoragefor their preferred server. If it’s not set, the user can click one of the common domains, and be redirected. When they access another link, they’ll be prompted to use a button that remembers which server they chose.Data Privacy
Any domain selected is not tracked nor communicated to any third party. Your preferred server is stored in your browser, and never transmitted to the GTN. That’s why we use localStorage instead of cookies.
What is a Learning Pathway?
Comment: What is a Learning Pathway? We recommend you follow the tutorials in the order presented on this page. They have been selected to fit together and build up your knowledge step by step. If a lesson has both slides and a tutorial, we recommend you start with the slides, then proceed with the tutorial.
Why host your materials with the GTN?
The short version is we’re a popular, FAIR training materials platform, and we want to be a home for your training materials.
Your content in front of the world
As of June 2023 the GTN sees around 60k visitors per month. Please see our public page view monitoring for more details.
FAIR
We go to great lengths to make sure our training platform is completely FAIR. See this FAQ for the details on how we achieve that.. All of our materials have extensive BioSchemas markup ensuring they’re easily accessible to search engines. Our materials are automatically indexed by TeSS, and we are working on a WorkflowHub integration.
Accessible
We regularly test our pages with a thorough suite of accessibility tools, as well as via screen reader.
Not Just Galaxy
Our name can be a bit misleading! While a lot of our tutorials are focused on Galaxy, we have multiple growing topics which are unrelated to Galaxy.
All of these topics are using the GTN as a platform to disseminate their materials far and wide.
Features
Do you need
- Choose your own adventure tutorials
- Automatic videos from your slides
Then choose the GTN.
Learners
How can I get help?
If you have questions about this training material, you can reach us using the Gitter chat. You’ll need a GitHub or Twitter account to post questions. If you have questions about Galaxy outside the context of training, see the Galaxy Support page.
Where do I start?
If you are new to Galaxy then start with one of the introductory topics. These introduce you to concepts that are useful in Galaxy, no matter what domain you are doing analysis in.
If you are already familiar with Galaxy basics and want to learn how to use it in a particular domain (for example, ChIP-Seq), then start with one of those topics.
If you are already well informed about bioinformatics data analysis and you just want to get a feel for how it works in Galaxy, then many tutorials include Instructions for the impatient sections.
Where can I run the hands-on tutorials?
To run the hands-on tutorials you need a Galaxy server to run them on.
Each tutorial is annotated with information about which public Galaxy servers it can be run on. These servers are available to anyone on the world wide web and some may have all the tools that are needed by a specific tutorial.
If your organization/consortia/community has its own Galaxy server, then you may want to run tutorials on that. You will need to confirm that all necessary tools and reference genomes are available on your server and possible install missing tools and data. To learn how to do that, you can follow our dedicated tutorial.
Some topics have a Docker image that can be installed and run on participants’ laptops. These Docker images contain Galaxy instances that include all tools and datasets used in a tutorial, as well as saved analyses and repeatable workflows that are relevant. You will need to install Docker.
Finally, you can also run your tutorials on cloud-based infrastructures. Galaxy is available on many national research infrastructures such as Jetstream (United States), GenAP (Canada), GVL (Australia), CLIMB (United Kingdom), and more. These instances are typically easy to launch, and easy to shut down when you are done.
If you are already familiar with, and have an account on Amazon Web Services then you can also launch a Galaxy server there using CloudLaunch.
How do I use this material?
Many topics include slide decks and if the topic you are interested in has slides then start there. These will introduce the topic and important concepts.
Most of your learning will happen in the next step - the hands-on tutorials. This is where you’ll become familiar with using the Galaxy interface and experiment with different ways to use Galaxy and the tools in Galaxy.
Instructors
What are the best practices for teaching with Galaxy?
We started to collect some best practices for instructors inside our Good practices slides
What Galaxy instance should I use for my training?
To teach the hands-on tutorials you need a Galaxy server to run the examples on.
Each tutorial is annotated with the information on which public Galaxy servers it can be run. These servers are available to anyone on the world wide web and some may have all the tools that are needed by a specific tutorial. If you choose this option then you should work with that server’s admins to confirm that the server can handle the workload for a workshop. For example, the usegalaxy.eu
If your organization/consortia/community has its own Galaxy server, then you may want to run tutorials on that. This can be ideal because then the instance you are teaching on is the same as your participants will be using after the training. They’ll also be able to revisit any analysis they did during the training. If you pursue this option you’ll need to work with your organization’s Galaxy Admins to confirm that
- the server can support a room full of people all doing the same analysis at the same time.
- all tools and reference datasets needed in the tutorial are locally installed. To learn how to setup a Galaxy instance for a tutorial, you can follow our dedicated tutorial.
- all participants will be able to create/use accounts on the system.
Some training topics have a Docker image that can be installed and run on all participants’ laptops. These images contain Galaxy instances that include all tools and datasets used in a tutorial, as well as saved analyses and repeatable workflows that are relevant.
Finally, you can also run your tutorials on cloud-based infrastructures. Galaxy is available on many national research infrastructures such as Jetstream (United States), GenAP (Canada), GVL (Australia), CLIMB (United Kingdom), and more.
How do I get help?
The support channel for instructors is the same as for individual learners. We suggest you start by posting a question to the Galaxy Training Network Gitter chat. Anyone can view the discussion, but you’ll need to login (using your GitHub or Twitter account) to add to the discussion.
If you have questions about Galaxy in general (that are not training-centric) then there are several support options.
Where do I start?
Spend some time exploring the different tutorials and the different resources that are available. Become familiar with the structure of the tutorials and think about how you might use them in your teaching.
Finding a material's PURL or Short URL
Every material in the GTN is automatically assigned two short URLs:
- a PURL which will always point to the material, and looks like
https://gxy.io/GTN:T00001- a tutorial ID based short URL like
https://gxy.io/GTN:admin/ansible-galaxy, which will redirect to topics/admin/tutorials/ansible-galaxy/tutorial.mdThe PURLs, when available, are listed in the Metadata box of a given material, or on the first slide of a slide deck. Additionally any page with a PURL lists it in the footer of the page. PURLs are generated every monday, so it can take up to a week for your PURL to be available. If you need it sooner, please let us know.
The second short URL is not currently displayed anywhere but can be constructed manually based on the URL of the page.
Contributors
How does the GTN ensure accessibility?
We are committed to an accessible training experience regardless of disability. Please see our accessibility page for more information.
How does the GTN implement the "Ten simple rules for collaborative lesson development"
The GTN framework is inherently collaborative and community-driven, and comprises a growing number of contributors with expertise in a wide range of scientific and technical domains. Given this highly collaborative nature of a community with very different skill sets, the GTN framework has evolved over the years to facilitate the contribution and maintenance of the tutorials. We aim to adhere to best-practice guidelines for collaborative lesson development described in Devenyi et al. 2018. The structure of the tutorials and repository has been made modular with unified syntax and use of snippets enabling easy access for authors to add common tips and tricks new users might need to know. This system allows for easy updating of all tutorials, if there is a change in tools or interface. More generally, we continually strive to lower contribution barriers for content creators by providing a framework that is easy to use for training developers regardless of their level of knowledge of the underlying technical framework.
Implementation of the “Ten simple rules for collaborative lesson development” (Devenyi et al. 2018) in the training material:
Rules Implementation in the GTN framework Clarify audience Tutorial metadata includes level indicators (introductory, intermediate, advanced) and a list of prerequisite tutorials as recommended prior knowledge. This information is rendered at the top of each tutorial. Make lessons modular Development of small tutorials linked together via learning paths Teach best practice lesson development We maintain the topic Contributing to the Galaxy Training Material including numerous tutorials describing how to create new content. Furthermore, quarterly online collaboration fest (CoFests) are organized, where contributors can get direct support. Development of a Train the Trainer program and a mentoring program for instructors, in which lesson development is taught Encourage and empower contributors Involve them in reviews. Mentor them. Encourage them to become maintainers. Build community around lessons Quarterly online collaboration fest (CoFests) and Community calls. Chat on our Gitter/Matrix channel. Publish periodically and recognize contributions Author listed on tutorials. Hall of fame listing all contributors. Full tutorial citation at the end of the tutorial. Tweet about new or updated tutorials. List of new or updated tutorials in Galaxy Community newsletter. Soon: publication of tutorials via article Evaluate lessons at several scales Tutorial change (Pull Request) review. Embedded feedback form in tutorials for trainee feedback. Instructor feedback. Automatic workflow testing Reduce, re-use, recycle Sharing content between tutorials, specially using snippets. Development of small modular tutorials linked by learning paths Link to other resources Links to original paper, documentation, external tutorials and other material You can’t please everyone but we can try (several different Galaxy introduction tutorials for different audience). Aim to clearly state what the tutorial does and does not cover, at the start.
Thanks!
First off, thanks for your interest in contributing to the Galaxy training materials!
Individual learners and instructors can make these training more effective by contributing back to them. You can report mistakes and errors, create more content, etc. Whatever is your background, there is a way to contribute: via the GitHub website, via command-line or even without dealing with GitHub.
We will address your issues and/or assess your change proposal as promptly as we can, and help you become a member of our community. You can also check our tutorials for more details.
How can I get started with contributing?
If you would like to get involved in the project but are unsure where to start, there are some easy ways to contribute which will also help you familiarize yourself with the project!
A great way to help out the project is to test/edit existing tutorials. Pick a tutorial and check the contents. Does everything work as expected? Are there things that could be improved?
Below is a checklist of things to look out for to help you get started. If you feel confident in making changes yourself, please open a pull request, otherwise please file an issue with any problems you run into or suggestions for improvements.
Basic:
- Test the tutorial on a running Galaxy instance
- For example UseGalaxy.org.au, UseGalaxy.fr, UseGalaxy.org, UseGalaxy.eu
- Report any issues you run into
- Language editing
- Fix spelling and grammar mistakes
- Simplify the English (to make it more accessible)
Intermediate:
- Metadata
- Are the objectives, keypoints and time estimate filled in?
- Do they fit with the contents of the tutorial?
- Content
- Is there enough background information provided in the introduction section and throughout the tutorial?
- Question boxes
- Add questions or question boxes where you think they might be useful (make people think about results they got, test their understanding, etc)
- Check that answers are still up-to-date
- Screenshots and Videos
- Make sure there is also a textual description of the image/video contents
- Does the screenshot add value to the tutorial or can it be removed?
Advanced:
- Workflows
- Add a workflow definition file
.gaif none is present- Check that the existing workflow is up-to-date with the tutorial contents
- Enable workflow testing
- Tours
- Add a tour if none exists
- Run the existing tour and check that it is up-to-date with the tutorial contents
- Datasets
- Check that all datasets used in the tutorial are present in Zenodo
- Add a data-library.yaml file if none exists
Another great way to help out the project is by reviewing open pull requests. You can use the above checklist as a guide for your review. Some documentation about how to add your review in the GitHub interface can be found in GitHub’s PR Reviewing Documentation
How can I contribute in "advanced" mode?
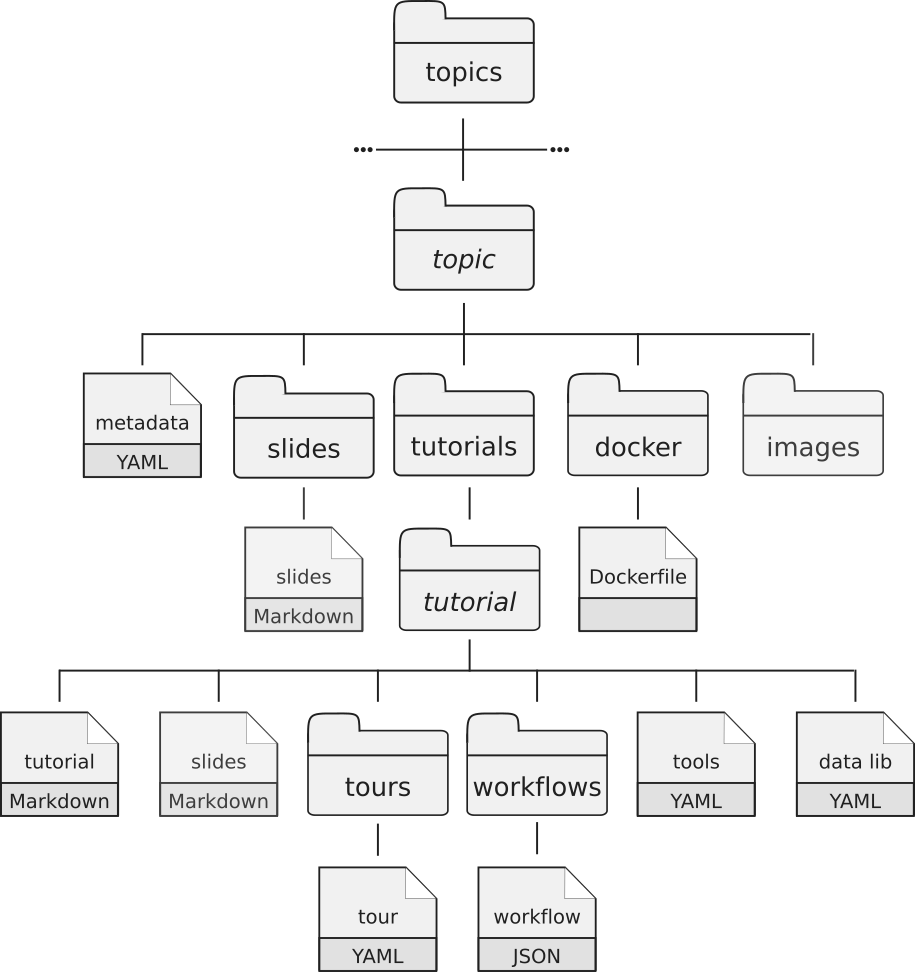
Most of the content is written in GitHub Flavored Markdown with some metadata (or variables) found in YAML files. Everything is stored on our GitHub repository. Each training material is related to a topic. All training materials (slides, tutorials, etc) related to a topic are found in a dedicated directory (e.g.
transcriptomicsdirectory contains the material related to transcriptomic analysis). Each topic has the following structure:
- a metadata file in YAML format
- a directory with the topic introduction slide deck in Markdown with introductions to the topic
a directory with the tutorials:
Inside the tutorials directory, each tutorial related to the topic has its own subdirectory with several files:
- a tutorial file written in Markdown with hands-on
- an optional slides file in Markdown with slides to support the tutorial
- a directory with Galaxy Interactive Tours to reproduce the tutorial
- a directory with workflows extracted from the tutorial
- a YAML file with the links to the input data needed for the tutorial
- a YAML file with the description of needed tools to run the tutorial
- a directory with the Dockerfile describing the details to build a container for the topic (self-study environments).
To manage changes, we use GitHub flow based on Pull Requests (check our tutorial):
- Create a fork of this repository on GitHub
- Clone your fork of this repository to create a local copy on your computer and initialize the required submodules (
git submodule initandgit submodule update)- Create a new branch in your local copy for each significant change
- Commit the changes in that branch
- Push that branch to your fork on GitHub
- Submit a pull request from that branch to the original repository
- If you receive feedback, make changes in your local clone and push them to your branch on GitHub: the pull request will update automatically
- Pull requests will be merged by the training team members after at least one other person has reviewed the Pull request and approved it.
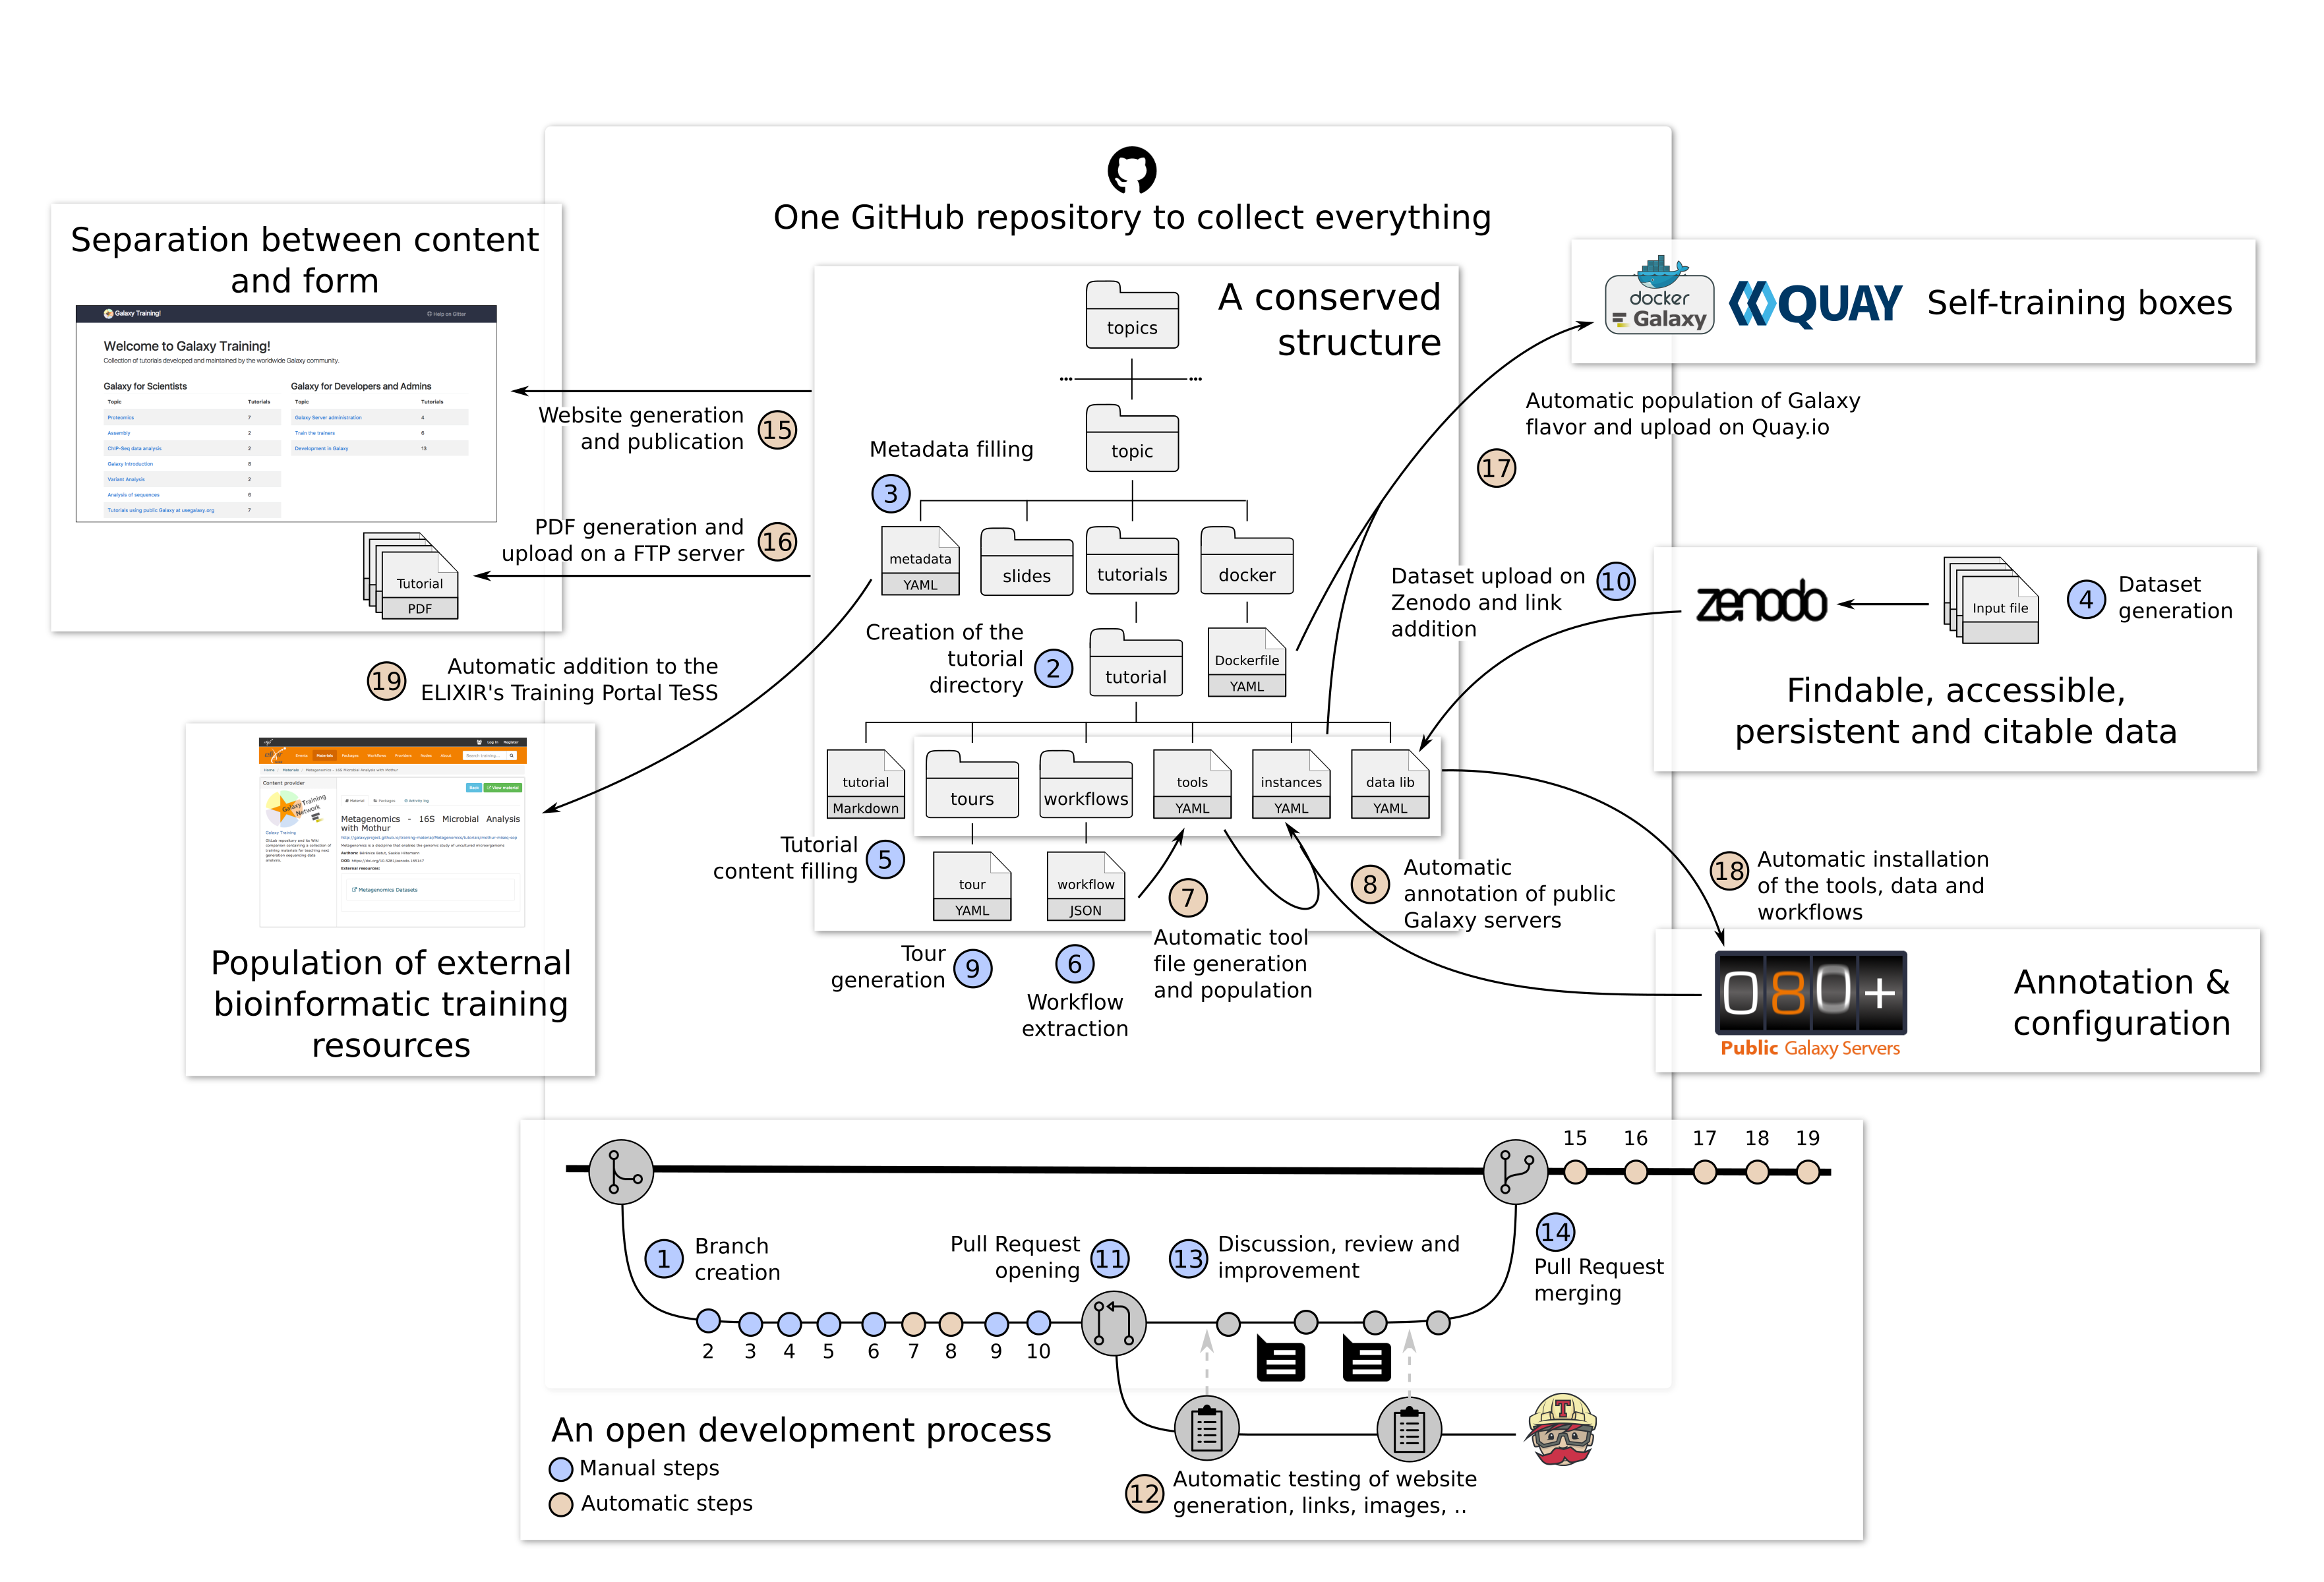
Globally, the process of development of new content is open and transparent:
- Creation of a branch derived from the main branch of the GitHub repository
- Initialization of a new directory for the tutorial
- Filling of the metadata with title, questions, learning objectives, etc
- Generation of the input dataset for the tutorial
- Filling of the tutorial content
- Extraction of the workflows of the tutorial
- Automatic extraction of the required tools to populate the tool file
- Automatic annotation of the public Galaxy servers
- Generation of an interactive tour for the tutorial with the Tourbuilder web-browser extension
- Upload of the datasets to Zenodo and addition of the links in the data library file.
- Once ready, opening a Pull Request
- Automatic checks of the changes are automatically checked for the right format and working links using continuous integration testing on Travis CI
- Review of the content by several other instructors via discussions
- After the review process, merge of the content into the main branch, starting a series of automatic steps triggered by Travis CI
- Regeneration of the website and publication on https://training.galaxyproject.org/training-material/
- Generation of PDF artifacts of the tutorials and slides and upload on the FTP server
- Population of TeSS, the ELIXIR’s Training Portal, via the metadata
To learn how to add new content, check out our series of tutorials on creating new content:
- Contributing to the Galaxy Training Network with GitHub
- Overview of the Galaxy Training Material
- Adding auto-generated video to your slides
- GTN Metadata
- Teaching Python
- Generating PDF artefacts of the website
- FAIR-by-Design methodology
- Contributing with GitHub via its interface
- Including a new topic
- Creating Interactive Galaxy Tours
- Design and plan session, course, materials
- Adding Quizzes to your Tutorial
- Preview the GTN website as you edit your training material
- Updating diffs in admin training
- Principles of learning and how they apply to training and teaching
- Tools, Data, and Workflows for tutorials
- Creating a new tutorial
- Single Cell Publication - Data Plotting
- Single Cell Publication - Data Analysis
- FAIR Galaxy Training Material
- Creating content in Markdown
- Creating Slides
- Updating tool versions in a tutorial
We also strongly recommend you read and follow The Carpentries recommendations on lesson design and lesson writing if you plan to add or change some training materials, and also to check the structure of the training material above.
How can I give feedback?
At the end of each tutorial, there is a link to a feedback form. We use this information to improve our tutorials.
For global feedbacks, you can open an issue on GitHub, write us on Gitter or send us an email.
What can I do to help the project?
In issues, you will find lists of issues to fix and features to implement (with the “newcomer-friendly” label for example). Feel free to work on them!
How can I report mistakes or errors?
The easiest way to start contributing is to file an issue to tell us about a problem such as a typo, spelling mistake, or a factual error. You can then introduce yourself and meet some of our community members.
How can I test an Interactive Tour?
Perhaps you’ve been asked to review an interactive tour, or maybe you just want to try one out. The easiest way to run an interactive tour is to use the Tour builder browser extension.
- Install the Tour Builder extension to your browser (Chrome Web Store, Firefox add-on).
- Navigate to a Galaxy instance supporting the tutorial. To find which Galaxy instances support each tutorial, please see the dropdown menu next to the tutorial on the training website. Using one of the usegalaxy.* instances (UseGalaxy.fr, UseGalaxy.org, UseGalaxy.eu, UseGalaxy.org.au) ) is usually a good bet.
- Start the Tour Builder plugin by clicking on the icon in your browser menu bar
- Copy the contents of the
tour.yamlfile into the Tour builder editor window- Click
Saveand thenRun
How can I create new content without dealing with git?
If you feel uncomfortable with using the git and the GitHub flow, you can write a new tutorial with any text editor and then contact us (via Gitter or email). We will work together to integrate the new content.
How does the GTN ensure our training materials are FAIR?
This infrastructure has been developed in accordance with the FAIR (Findable, Accessible, Interoperable, Reusable) principles for training materials Garcia et al. 2020. Following these principles enables trainers and trainees to find, reuse, adapt, and improve the available tutorials.
The GTN receives a 100% score on the FAIR Checker, as noted in our recent news post
10 Simple Rules Implementation in GTN framework Plan to share your training materials online Online training material portfolio, managed via a public GitHub repository Improve findability of your training materials by properly describing them Rich metadata associated with each tutorial that are visible and accessible via schema.org on each tutorial webpage. Give your training materials a unique identity URL persistency with redirection in case of renaming of tutorials. Data used for tutorials stored on Zenodo and associated with a Digital Object Identifiers (DOI) Register your training materials online Tutorials automatically registered on TeSS, the ELIXIR’s Training e-Support System If appropriate, define access rules for your training materials Online and free to use without registration Use an interoperable format for your training materials Content of the tutorials and slides written in Markdown. Metadata associated with tutorials stored in YAML, and workflows in JSON. All of this metadata is available from the GTN’s API Make your training materials (re-)usable for trainers Online. Rich metadata associated with each tutorial: title, contributor details, license, description, learning outcomes, audience, requirements, tags/keywords, duration, date of last revision. Strong technical support for each tutorial: workflow, data on Zenodo and also available as data libraries on UseGalaxy.*, tools installable via the Galaxy Tool Shed, list of possible Galaxy instances with the needed tools. Make your training materials (re-)usable for trainees Online and easy to follow hands-on tutorials. Rich metadata with “Specific, Measurable, Attainable, Realistic and Time bound” (SMART) learning outcomes following Bloom’s taxonomy. Requirements and follow-up tutorials to build learning path. List of Galaxy instances offering needed tools, data on Zenodo and also available as data libraries on UseGalaxy.*. Support chat embedded in tutorial pages. Make your training materials contribution friendly and citable Open and collaborative infrastructure with contribution guidelines, a CONTRIBUTING file and a chat. Details to cite tutorials and give credit to contributors available at the end of each tutorial. Keep your training materials up-to-date Open, collaborative and transparent peer-review and curation process. Short time between updates.
Creating a GTN Event
To add your event to the GTN, you will need to supply your course information (dates, location, program, etc). You will then get an event page like this which you can use during your training. This page includes a course overview, course handbook (full program with links to tutorials) and setup instructions for participants.
Your event will also be shown on the GTN event horizon and on the homepage. We are also happy to advertise your event on social media and Matrix channels.
Already have your own event page? No problem! You can add your event as an external event (see below) and we will simply link to your page!
To add your event to the GTN:
- Create a page in the
events/folder of the GTN repository- Have a look at example event definitions in this folder:
- 2024-04-01-example-event.md
- or 2024-04-01-example-event-external.md if you already have an event page elsewhere
- Adapt one of these example pages to fit your event
- Create a pull request on the GTN
We are also happy to help you to add your event, please contact us on Matrix to discuss the details of your course with us.
For a full list of metadata fields for events, please have a look at our schema documentation page
Please also feel free to contact us with ideas for improvements! We know that training comes in many different forms, so if something in your event is not yet supported, let us know and we are happy to add it!
External events
Already have a course webpage? Great! In this case, you only have to provide the most basic information about your course (title, desciption, dates, location).
The easiest method is to fill in our Google Form:
Or you can create the event file manually. See also 2024-04-01-example-event-external.md for an example definition.
---
layout: event-external
title: My External Training Event Title

external: "https://galaxyproject.org/events/"
description:

date_start:
date_end:  # optional, for multi-day events

location:
  name:
  city:
  country:

contributions:
  organisers:
    - name1
    - name2
Creating a GTN FAQ
If you have a snippet of knowledge that is reusable, we recommend you to share with the GTN community, and we encourage you to create an FAQ for it!If you have a snippet of knowledge that is reusable, we recommend you to share with the GTN community, and we encourage you to create an FAQ for it!
Creating the FAQ: The Easy Way
Fill out this Google Form. Every day our bot will import the FAQs submitted via this Google Form, and we will process them, perhaps requesting small changes, so we recommend that you have a GitHub account already.
For Advanced Users
Have a look at the existing FAQs in the
faqs/galaxy/folder of the GTN repository for some examples.A news post is a markdown file that looks as follows:
---
title: Finding Datasets
area: datasets
box_type: tip
layout: faq
contributors: [jennaj, Melkeb]
---


- To review all active Datasets in your account, go to **User > Datasets**.

Notes:
- Logging out of Galaxy while the Upload tool is still loading data can cause uploads to abort. This is most likely to occur when a dataset is loaded by browsing local files.
- If you have more than one browser window open, each with a different Galaxy History loaded, the Upload tool will load data into the most recently used history.
- Click on refresh icon {% icon galaxy-refresh %} at the top of the History panel to display the current active History with the datasets.
Making a minor correction to any training material
If you find a minor mistake in any GTN training material, we encourage you to propose a correction. For small changes such as typos, this can be done from the browser. If you can implement the corrections yourself, in the context of where they happen, this saves a lot of time for the editors. When you submit your suggestion, it will be carefully checked by an expert, so do not worry about breaking anything!
Outline of the steps:
- Start from the page with the minor mistake.
- Open the page in the GitHub editor.
- Make the correction.
- Save the changes with a description of what you did.
- Send the proposal to the GTN team to check, then apply the change.
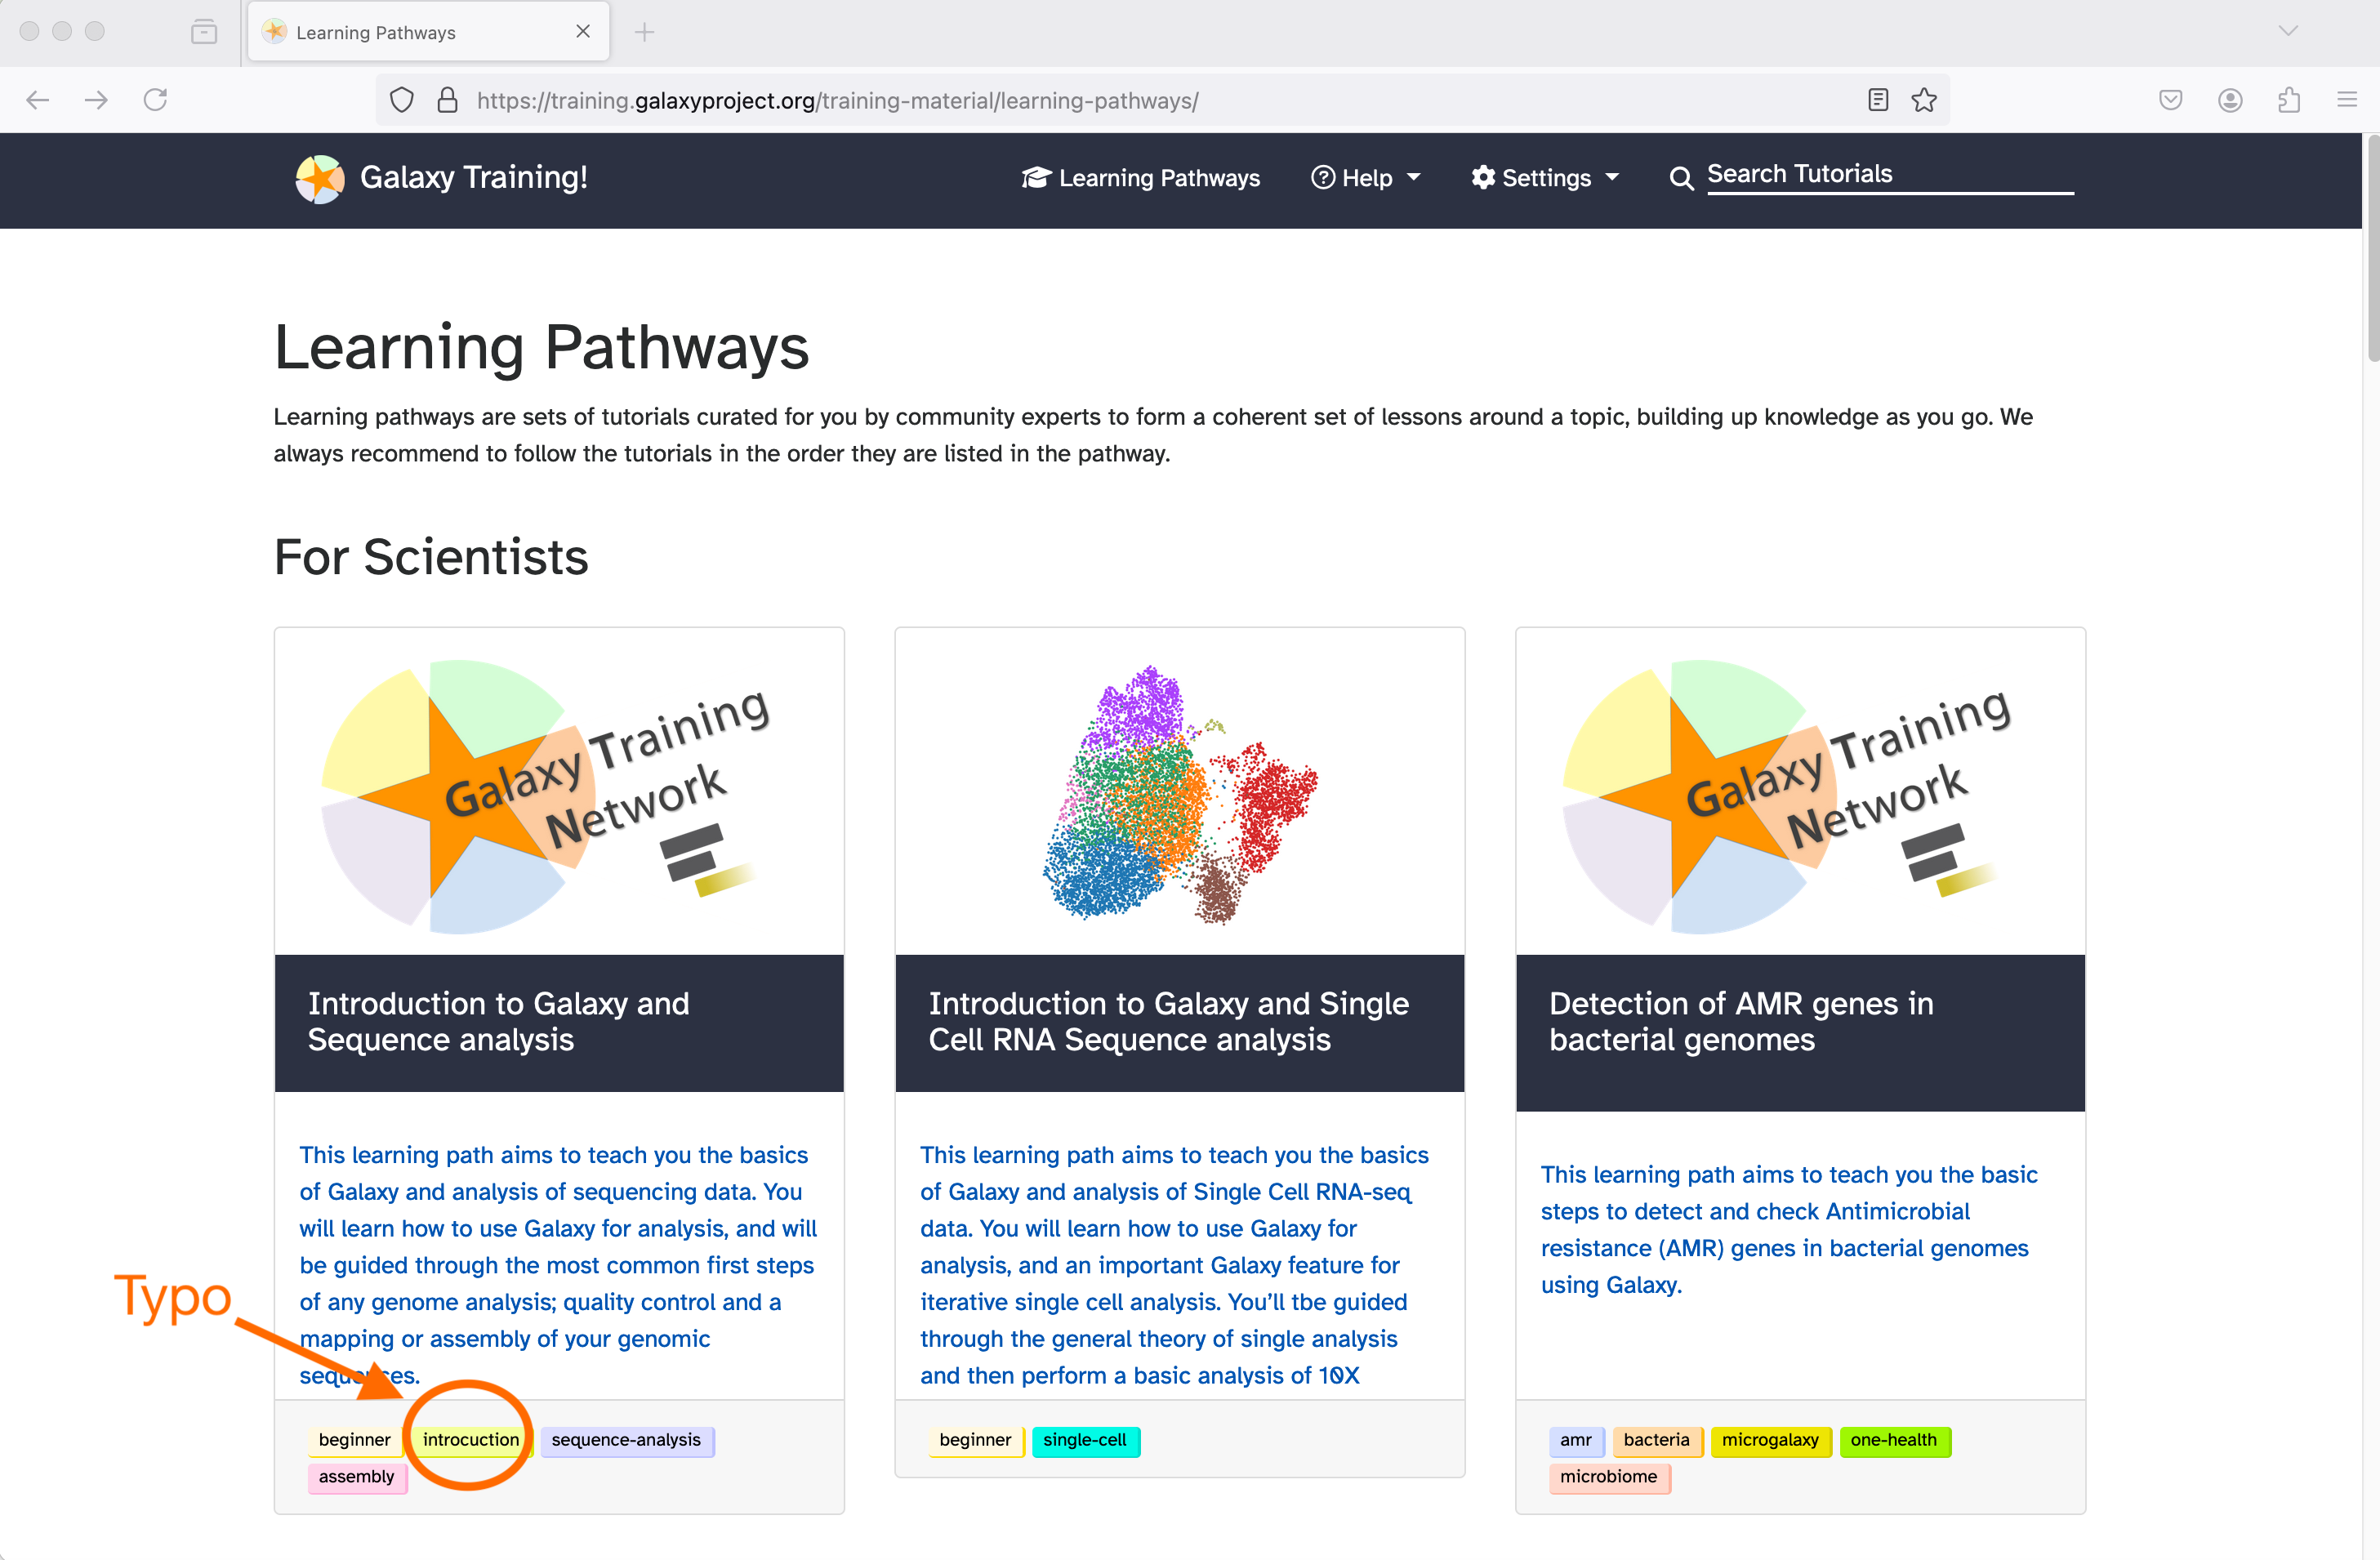
In this example, we will show how to correct a typo in the metadata of a learning pathway. Note, this specific typo has now been corrected.
1. Start from the page with the minor mistake
- From the learning pathways page, you can see the tags below each pathway. Here, one of the pathways has a tag ‘introcuction’, which should be ‘introduction’.
- Click to open the page.
- At the top-right of the page, click Settings then Propose a change or correction. This will open the page in edit mode. The training material is stored in GitHub, an external site, but we will walk you through how to navigate it.
2. Open the page in the GitHub editor
- You may be asked to sign into GitHub. If you have never used GitHub before, please register for a free GitHub account.
- You may be asked to create a fork of the GTN training materials repository. A fork is a linked copy of the training materials in your personal GitHub account. Click Fork this repository.
3. Make the correction
- You will see the text that makes up the training material (it uses a language called Markdown).
- In this example, we need to correct a line of the metadata at the top of the file (this is called the frontmatter). Type your correction.
4. Save the changes with a description of what you did
- When you have finished making corrections, click the Commit changes… button.
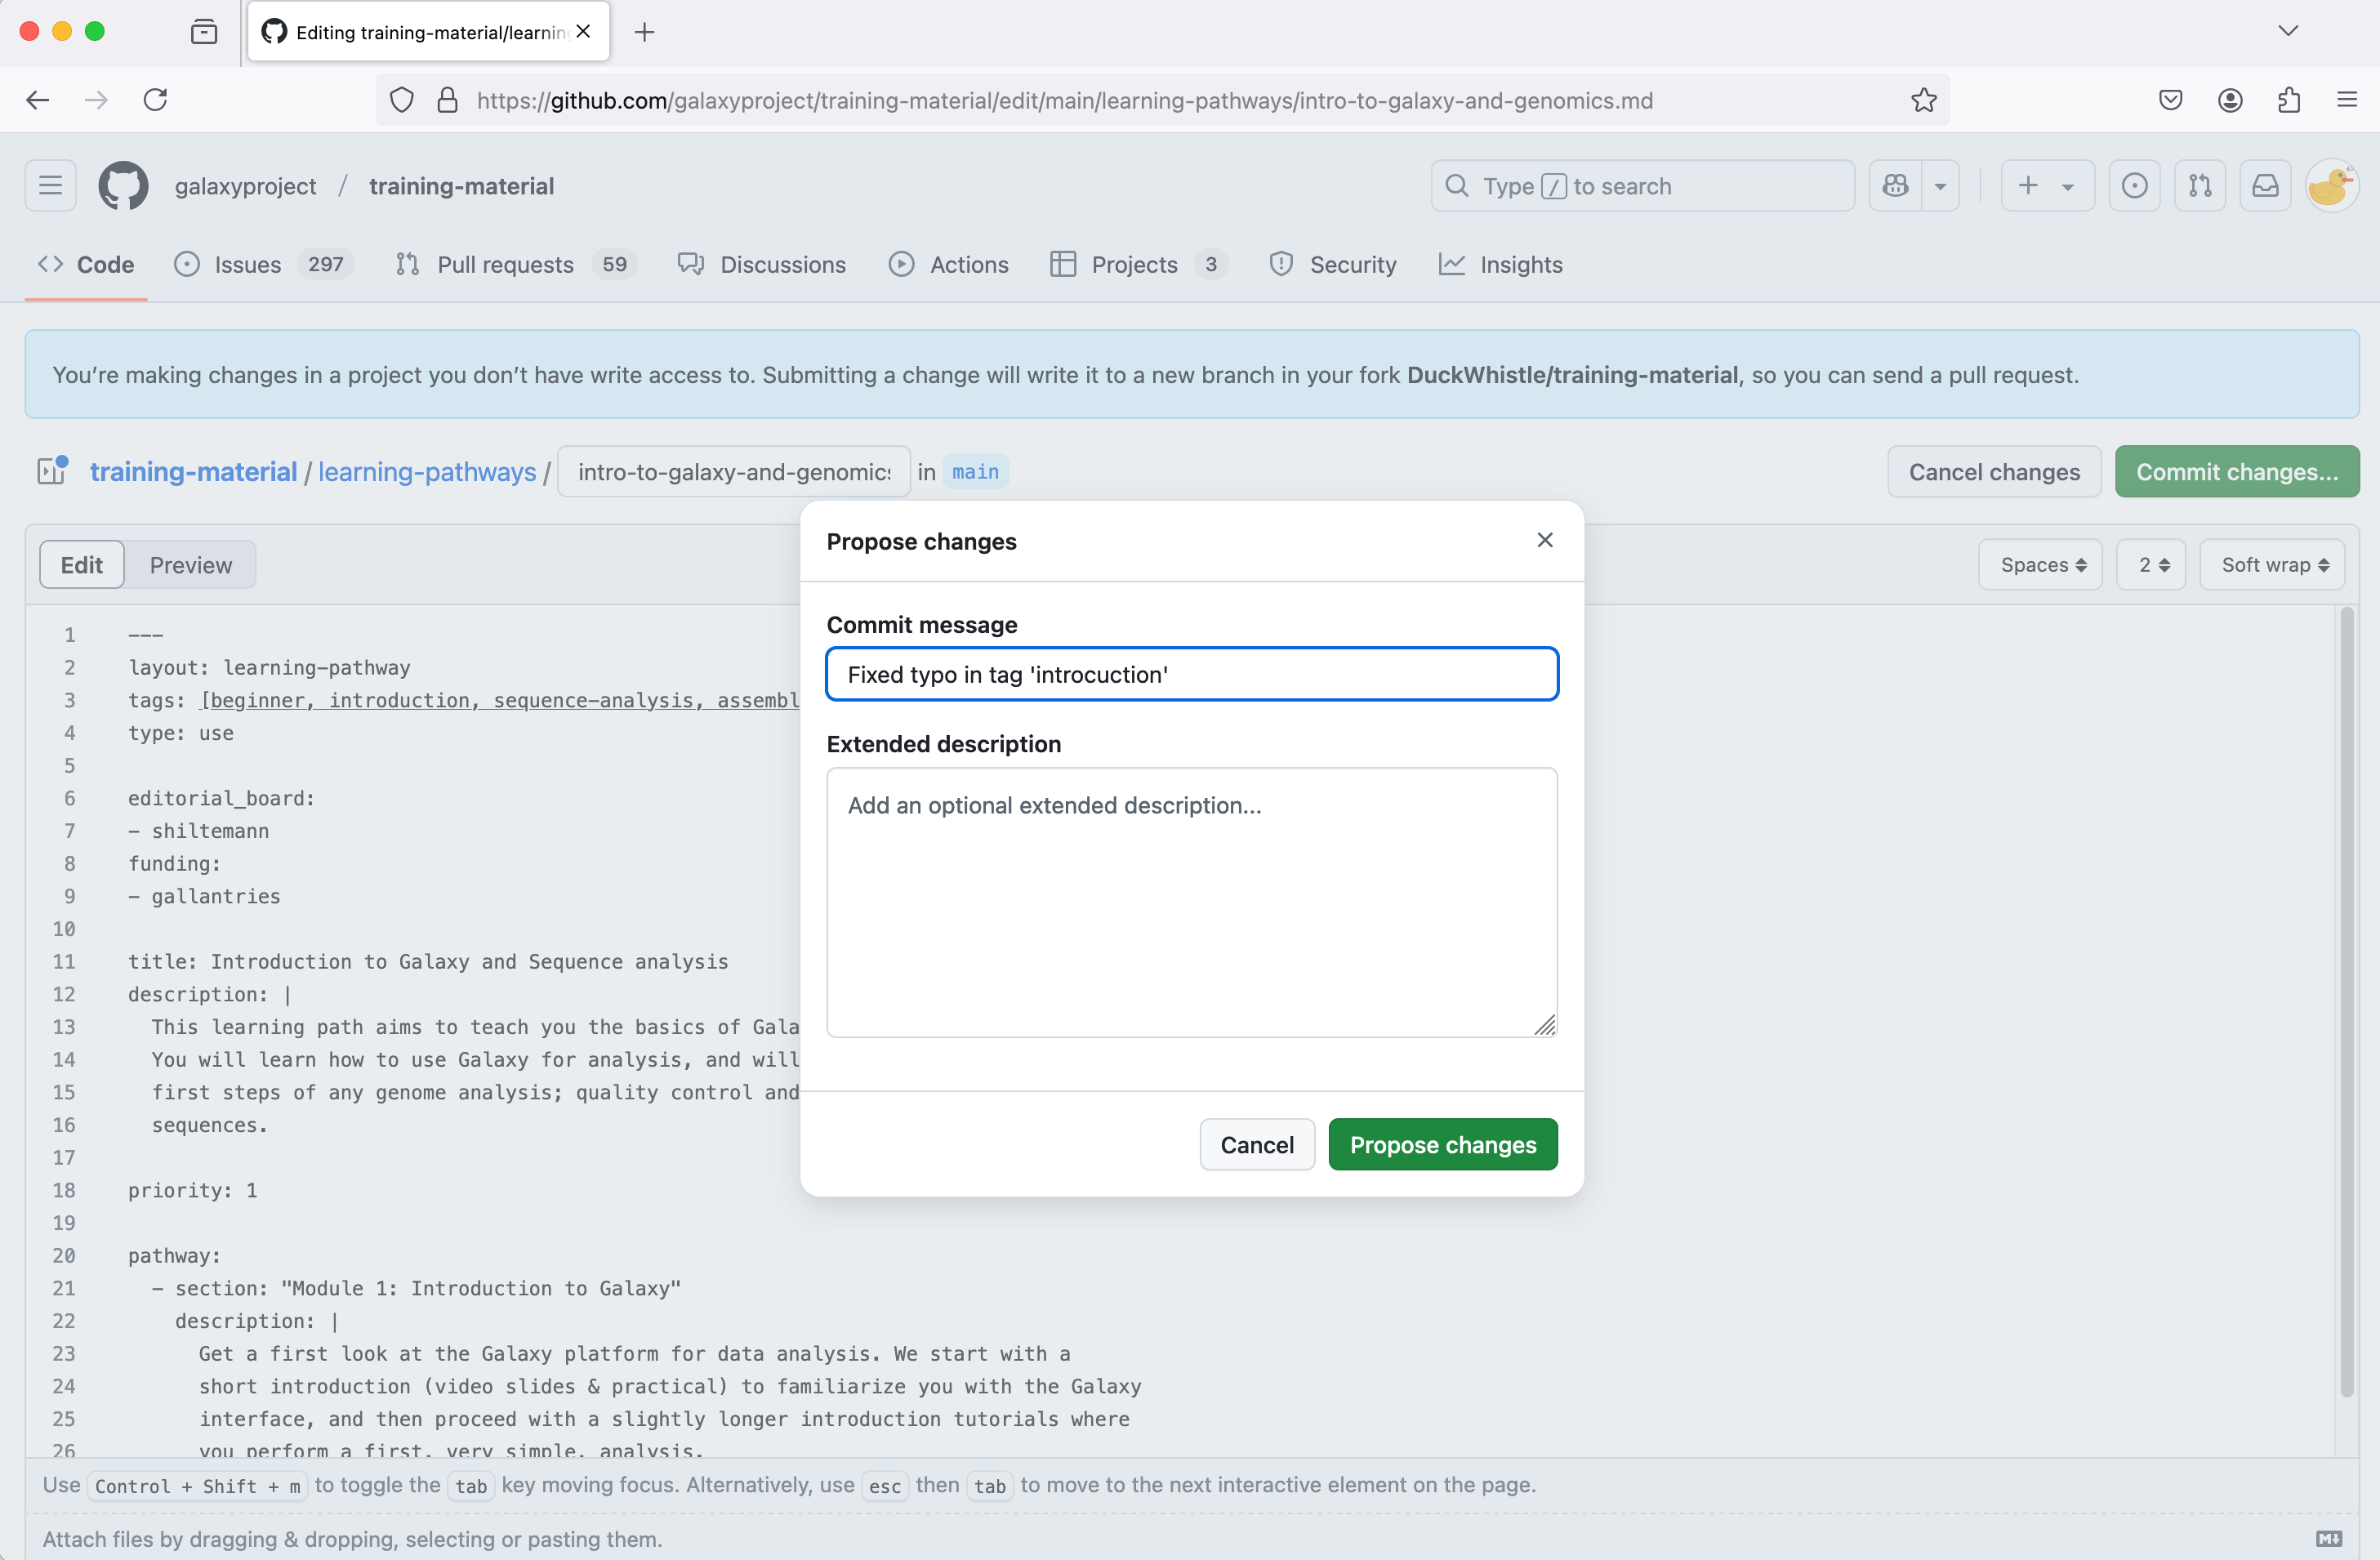
- You will be asked to provide a brief summary of the changes you have made. In the box labeled Commit message, type a summary.
- You do not need to give an extended description here.
- Click the Propose changes button.
5. Send the proposal to the GTN team to check, then apply the change
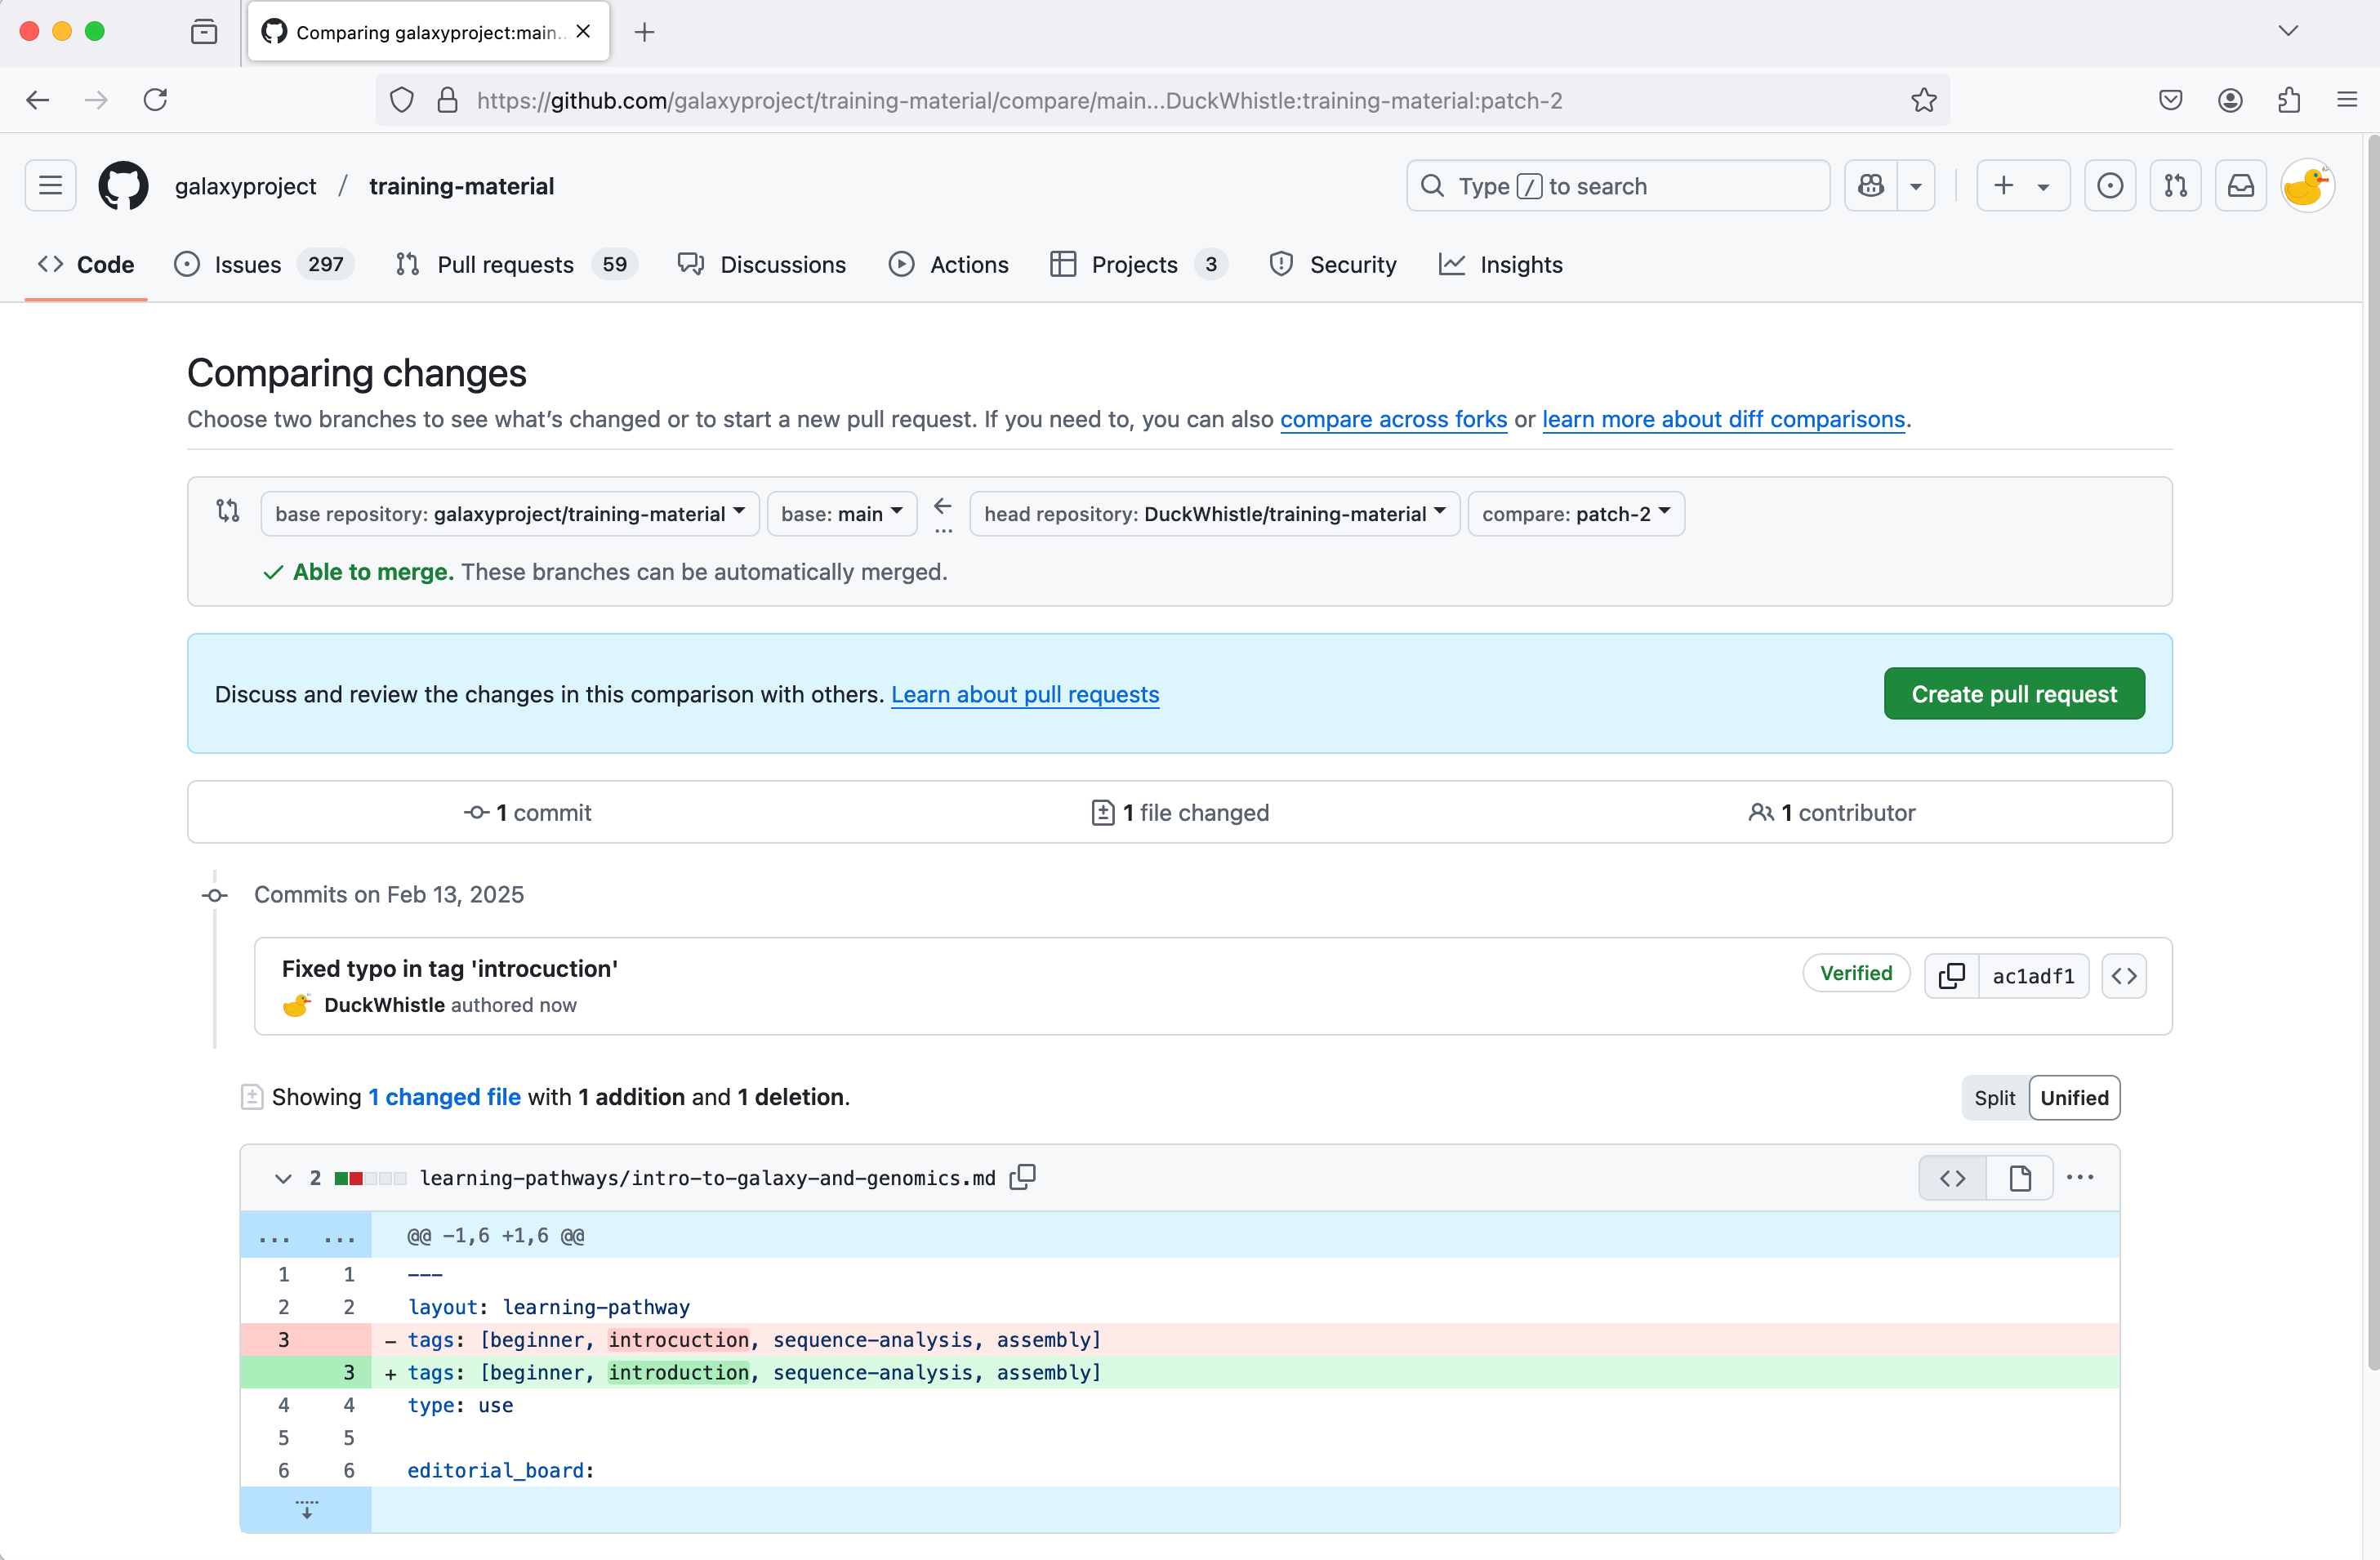
- You are taken to a page titled Comparing changes. You will see a list of the changes you have made. This appears as lines removed (beginning with a minus sign, in red) and lines added (beginning with a plus sign, in green).
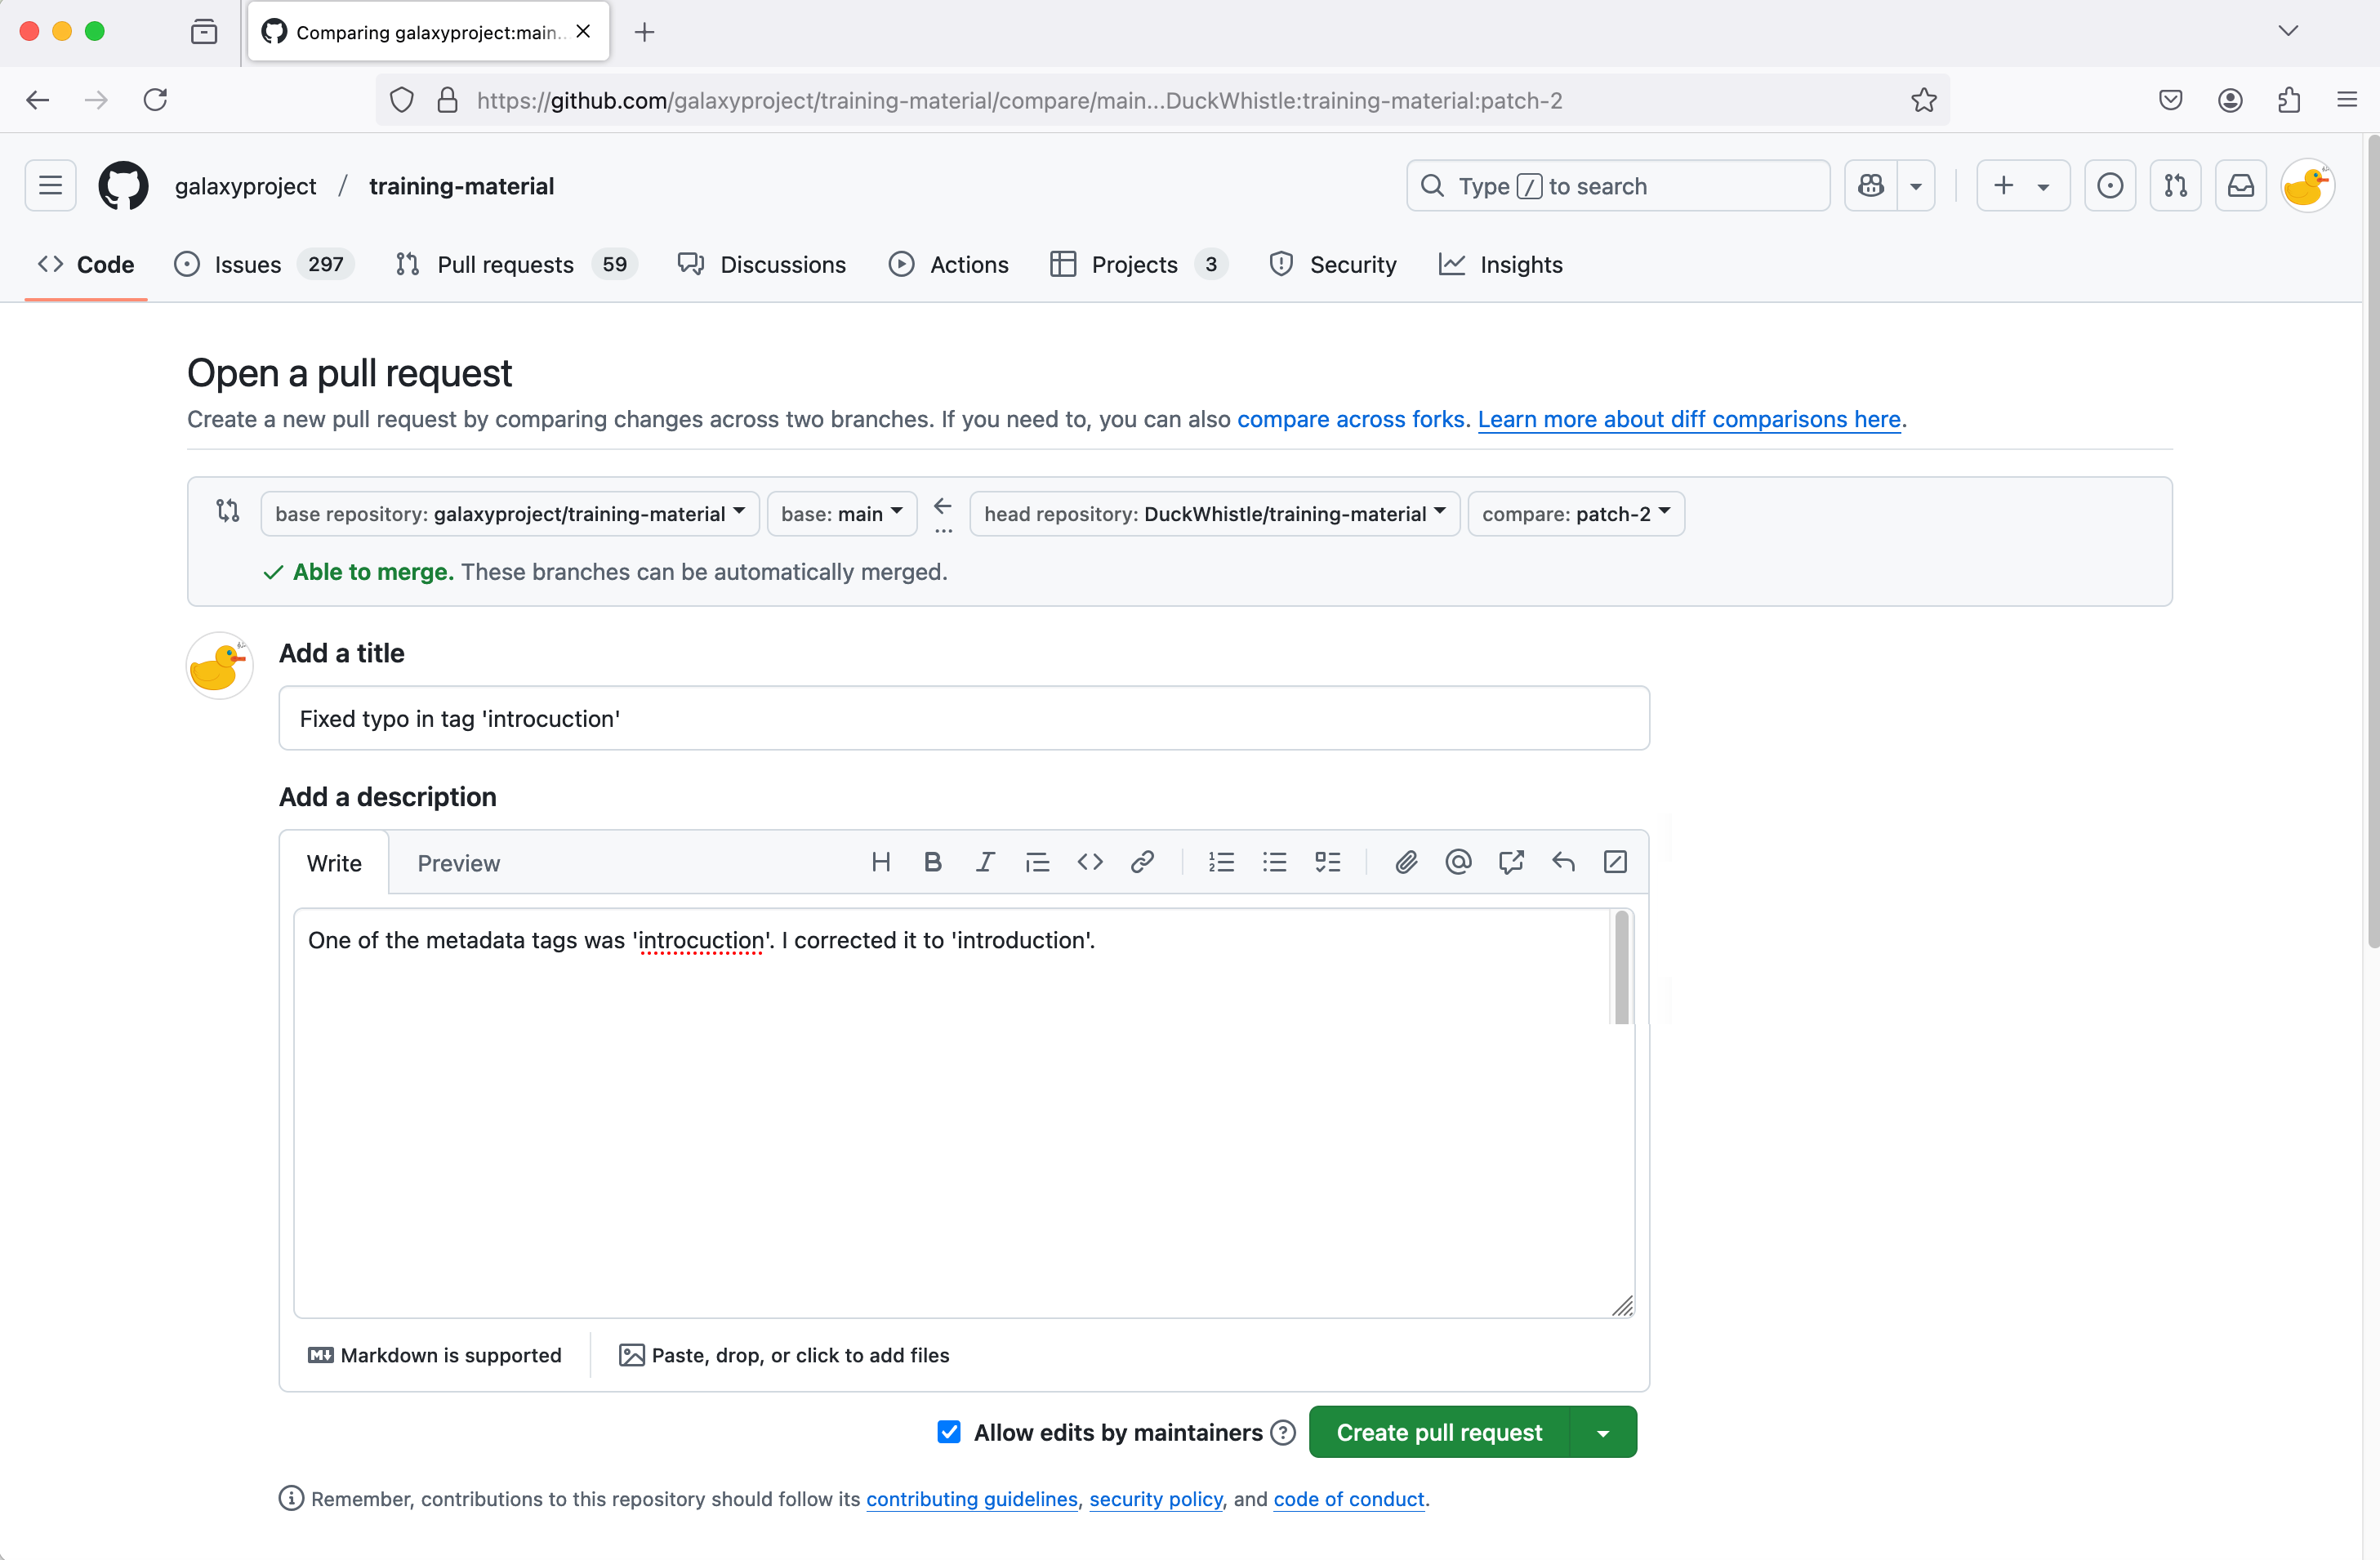
- Click the Create pull request button. This will open a pull request; this is a submission of your proposal that contains all the essential information for the editors and the platform to implement and apply the correction.
- The title will be the same as the commit message you typed earlier.
- Add a description which describes your changes. You can include links as required.
- Click the Create pull request button. Your change has now been submitted, or, in GitHub terms, you have now opened a pull request.
- The pull request will need to be reviewed by a human. There are also some automated checks that will be run. After all this is completed, if your request is approved, it will be applied (or ‘merged’ in GitHub terms).
congratulations Thank you for helping improve our training materials.
Creating a GTN News post
If you have created a new tutorial, running an event, published a paper around training, or have anything else interesting to share with the GTN community, we encourage you to write a News item about it!
News items will show up on the GTN homepage and in the GTN news feed.
Creating the news post: The Easy Way
Fill out this Google Form. Every day our bot will import the news posts submitted via this Google Form, and we will process them, perhaps requesting small changes, so we recommend that you have a GitHub account already.
For Advanced Users
Have a look at the existing news items in the
news/_posts/folder of the GTN repository for some examples.A news post is a markdown file that looks as follows:
---
layout: news

title: "New Tutorial: My tutorial title"
tags:
  - new tutorial
  - transcriptomics
contributors:
  - shiltemann
  - hexylena

tutorial: "topics/introduction/tutorials/data-manipulation-olympics/tutorial.html"
cover: "path/to/cover-image.jpg"  # usually an image from your tutorial
coveralt: "description of the cover image"

---

A bit of text containing your news, this is all markdown formatted,
so you can do **bold** and *italic* text like this, and links look
like [this](https://example.com) etc.

Describe everything you want to convey here, can be as long as you
need.
Make sure the filename is structured as follows:
year-month-day-title.md, so for example:2022-10-28-my-new-tutorial.md
Supporting Tutorial Mode (GTN-in-Galaxy) in a tutorial
GTN tutorials can be viewed directly within Galaxy, we call this Tutorial mode (read news post)
In this mode, tool names in hands-on boxes become clickable, directly opening the tool in Galaxy, at the right version.
To enable this feature, a bit of metadata needs to be added to the tool names in hands-on boxes as follows:
{% tool [Name](Toolshed ID) %}For example:
{% tool [bedtools intersect intervals](toolshed.g2.bx.psu.edu/repos/iuc/bedtools/bedtools_intersectbed/2.30.0+galaxy1) %}To find the toolshed ID of a tool:
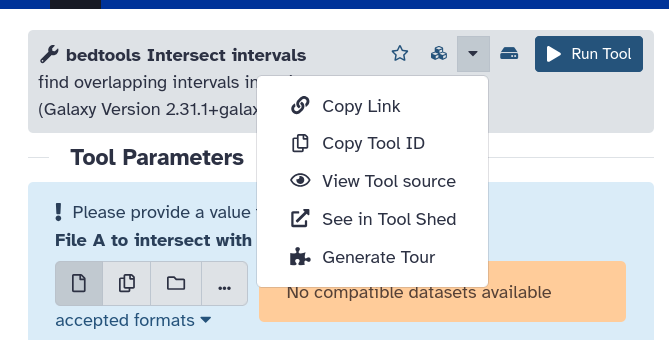
- Open the tool in Galaxy
- Click on the dropdown options menu (dropdown icon)
- Select Copy Tool ID
Example of a hands-on box using this feature:
> <hands-on-title> Counting SNPs </hands-on-title>
>
> 1. {% tool [Datamash](toolshed.g2.bx.psu.edu/repos/iuc/datamash_ops/datamash_ops/1.8+galaxy0) %} (operations on tabular data):
>
>    - *"Input tabular dataset"*: select the output dataset from **bedtools intersect intervals** {% icon tool %}
>    - *"Group by fields"*: `Column: 4` (the column with the exon IDs)
>
{: .hands_on}
Adding workflow tests with Planemo
Ensuring a Tutorial has a Workflow
Find a tutorial that you’re interested in, that doesn’t currently have tests.
This tutorial has a workflow (
.ga) and a test, notice the-tests.ymlthat has the same name as the workflow.gafile.machinelearning/workflows/machine_learning.ga
machinelearning/workflows/machine_learning-tests.ymlYou want to find tutorials without the
-tests.ymlfile. The workflow file might also be missing.- Check if it has a workflow (if it does, skip to step 5.)
- Follow the tutorial
- Extract a workflow from the history
- Run that workflow in a new history to test
Extract Tests (Online Version)
If you are on UseGalaxy.org or another server running 24.2 or later, you can use PWDK, a version of planemo running online to generate the workflow tests.
However if you are on an older version of Galaxy, or a private Galaxy server, then you’ll need to do the following:
Extract Tests (Manual Version)
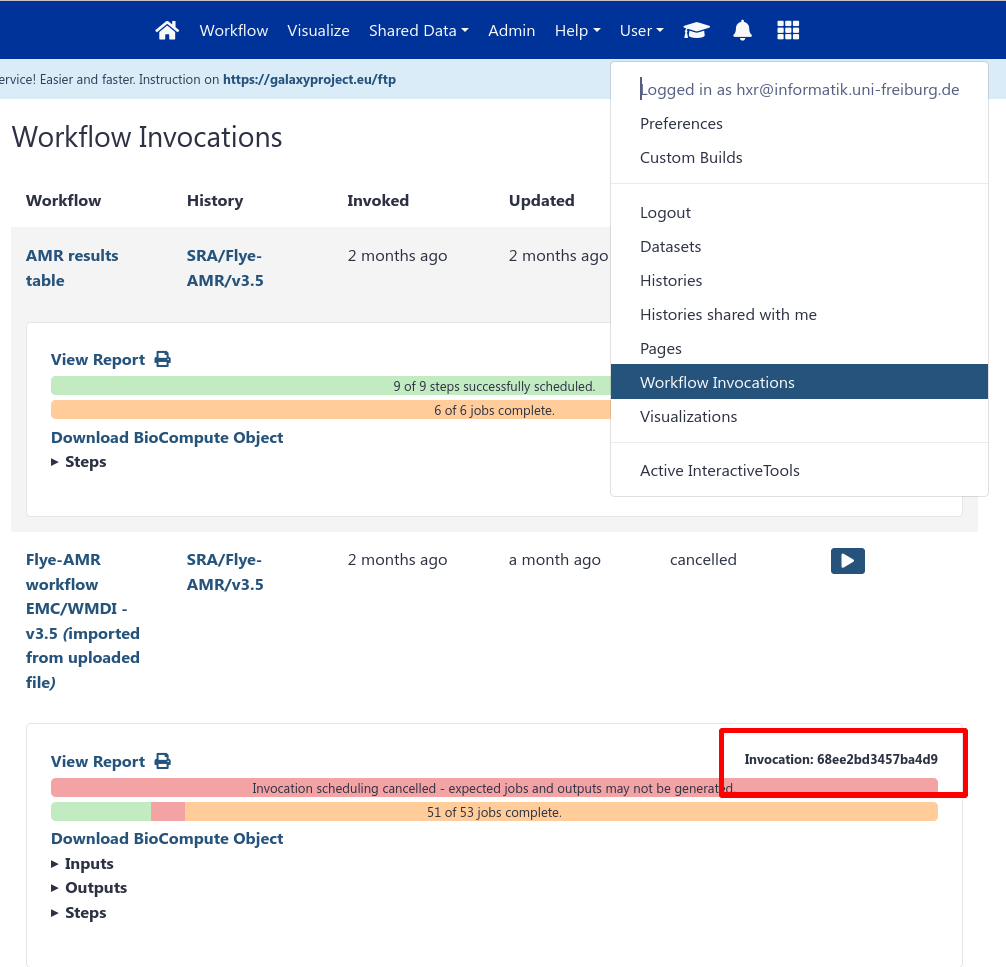
Obtain the workflow invocation ID, and your API key (User → Preferences → Manage API Key)
Install the latest version of
planemo# In a virtualenv
pip install planemoRun the command to initialise a workflow test from the
workflows/subdirectory - if it doesn’t exist, you might need to create it first.planemo workflow_test_init --from_invocation <INVOCATION ID> --galaxy_url <GALAXY SERVER URL> --galaxy_user_key <GALAXY API KEY>This will produce a folder of files, for example from a testing workflow:
$ tree
.
├── test-data
│   ├── input dataset(s).shapefile.shp
│   └── shapefile.shp
├── testing-openlayer.ga
└── testing-openlayer-tests.yml
Adding Your Tests to the GTN
You will need to check the
-tests.ymlfile, it has some automatically generated comparisons. Namely it tests that output data matches the test-data exactly, however, you might want to replace that with assertions that check for e.g. correct file size, or specific text content you expect to see.If the files in test-data are already uploaded to Zenodo, to save disk space, you should delete them from the
test-datadir and use their URL in the-tests.ymlfile, as in this example:- doc: Test the M. Tuberculosis Variant Analysis workflow
job:
'Read 1':
location: https://zenodo.org/record/3960260/files/004-2_1.fastq.gz
class: File
filetype: fastqsanger.gzAdd tests on the outputs! Check the planemo reference if you need more detail.
- doc: Test the M. Tuberculosis Variant Analysis workflow
  job:
     # Simple explicit Inputs
     'Read 1':
        location: https://zenodo.org/record/3960260/files/004-2_1.fastq.gz
        class: File
        filetype: fastqsanger.gz
  outputs:
    jbrowse_html:
      asserts:
        has_text:
          text: "JBrowseDefaultMainPage"
    snippy_fasta:
      asserts:
        has_line:
          line: '>Wildtype Staphylococcus aureus strain WT.'
    snippy_tabular:
      asserts:
        has_n_columns:
          n: 2
Contribute all of those files to the GTN in a PR, adding them to the
workflows/folder of your tutorial.
Adding your recording to a tutorial or slide deck
We welcome anybody to submit their recordings! Your videos can be used in (online) training events, or for self-study by learners on the GTN.
For some tips and tricks about recording the video itself, please ensure your recording conforms to our recommendations:
Recording Tips & Tricks Submit a Recording
Submission process
The process of adding recordings to the GTN is as follows:
- Instructor: Record video (tips & tricks)
- Instructor: Submit your video using this Google Form
- GTN: A GTN GitHub pull request (PR) will be made by our bot based on the form.
- GTN:: We will upload your video to the GalaxyProject YouTube channel
- GTN:: We will put the auto-generated captions from YouTube into a Google Doc
- Instructor:: Check and fix the auto-generated captions
- GTN: Upload the fixed captions to YouTube
- GTN: Merge the Pull Request on GitHub
- Done! Your recording will now show up on the tutorial for anybody to use and re-use
Note: If you are submitting a video to use in an event, please submit your recording 2 weeks before the start of your course to allow ample time to complete the submission process.
Recordings Metadata
Our bot will add some metadata about your recording to the tutorial or slide deck in question, and looks as follows:
recordings:
  - speakers:       # speakers must be defined in the CONTRIBUTORS.yaml file
    - shiltemann
    - hexylena
    captioners:     # captioners must also be present in the CONTRIBUTORS.yaml file
    - bebatut
    type:           # optional, will default to Tutorial or Lecture, but if you do something different, set it here (e.g. Demo, Lecture & Tutorial, Background, Webinar)
    date: '2024-06-12'         # date on which you recorded the video
    galaxy_version: '24.0'     # version of Galaxy you used during the recording, can be found under 'Help->About' in Galaxy
    length: 1H17M              # length of your video, in format: 17M or 2H34M  etc
    youtube_id: "dQw4w9WgXcQ"  # the bit of the YouTube URL after youtube.com/watch?v=

  - speakers:
    - shiltemann
    captioners:
    - hexylena
    - bebatut
    date: '2020-06-12'
    galaxy_version: '20.05'
    length: 51M
    youtube_id: "oAVjF_7ensg"
Misc
Note: If your videos are already uploaded to YouTube, for example as part of a different project’s account, you can add this metadata to the tutorial or slides manually, without using our submission form. Note that we do require all videos to have good-quality English captions, and we will not be able to help you configure these on other YouTube accounts.
Recording a video tutorial
This FAQ describes some general guidelines for recording your video
Anybody is welcome to record one of the GTN tutorials, even if another recording already exists! Both the GTN tutorial and Galaxy itself change significantly over time, and having regular and/or multiple recordings of tutorials is great!
Done with your recording? Check out the instructions for adding it to the GTN:
Submitting Recordings to the GTN
Video content
- Start of video
- Introduce yourself
- Discuss the questions and learning objectives of the tutorial
- Give a basic introducion about the topic, many participants will be novices
- Guide the learners through the tutorial step by step
- Explain the scientific background of the analysis
- Explain where you are clicking in Galaxy
- Explain what tool parameters mean
- Explain what the tool does
- Discuss the output files
- Discuss how to interpret the results
- Discuss question boxes from the tutorial
- Speak slowly and clearly
- Take your time, we are not in a hurry
- It is often a lot of new information for participants, give them a chance to process all of it
- Speaking slowly and clearly will improve the quality of the auto-generated captions, and will be less work for you to fix captions.
- If things go wrong that is OK!
- It’s a great teaching moment!
- Explain the steps you are taking to determine what went wrong, and how you are fixing it.
- It makes participants feel less bad if things go wrong for them
- If your tutorial is long
- Indicate good places for people to take a break
- e.g. when a tool takes a while to run
- End of video
- Go over some of the take-home messages (key-points) of the tutorial
- Remind viewers about the feedback form embedded at the end of the tutorial
- Share your recommendations for follow-up tutorials
- Share any other tips for where to learn more about the topic
- Share how to connect with the community (e.g. Matrix, Help Forum, social media, etc)
- If you are doing both a lecture and a hands-on training, please create 2 separate videos
Technical Guidelines
- Start a Zoom call with yourself, record that.
- For Mac users, QuickTime Player is also a nice option.
- Have another preference like OBS? Totally OK too!
- We recommend zoom to folks new to video production as it is the easiest to get started and produces quite small file sizes.
- Do a short test recording first
- Is the audio quality good enough?
- Wearing a headset often improves the audio quality.
- Screen sharing: is your screen readable?
- Make sure you zoom in enough for it to be clearly visible what you are doing in Galaxy.
- Test watching the video in a non-maximised window. Is it still legible?
- If the participant is using 50% of their screen for the video, 50% for Galaxy, will it be legible?
- Need to edit your video after recording?
- For example to merge multiple videos together?
- Software like KDEnlive can help here.
- Feel free to ask us for help if you need!
Standards
Zoom in, in every interface you’re covering! Many people will be watching the video while they’re doing the activity, and won’t have significant monitor space. Which video below would you rather be trying to follow?
Bad Good 😍
Bad Good 🤩 (Especially for introductory videos!) Clearly call out what you’re doing, especially on the first occurrence
Bad Good “Re-run the job” “We need to re-run the job which we can do by first clicking to expand the dataset, and then using the re-run job button which looks like a refresh icon.”
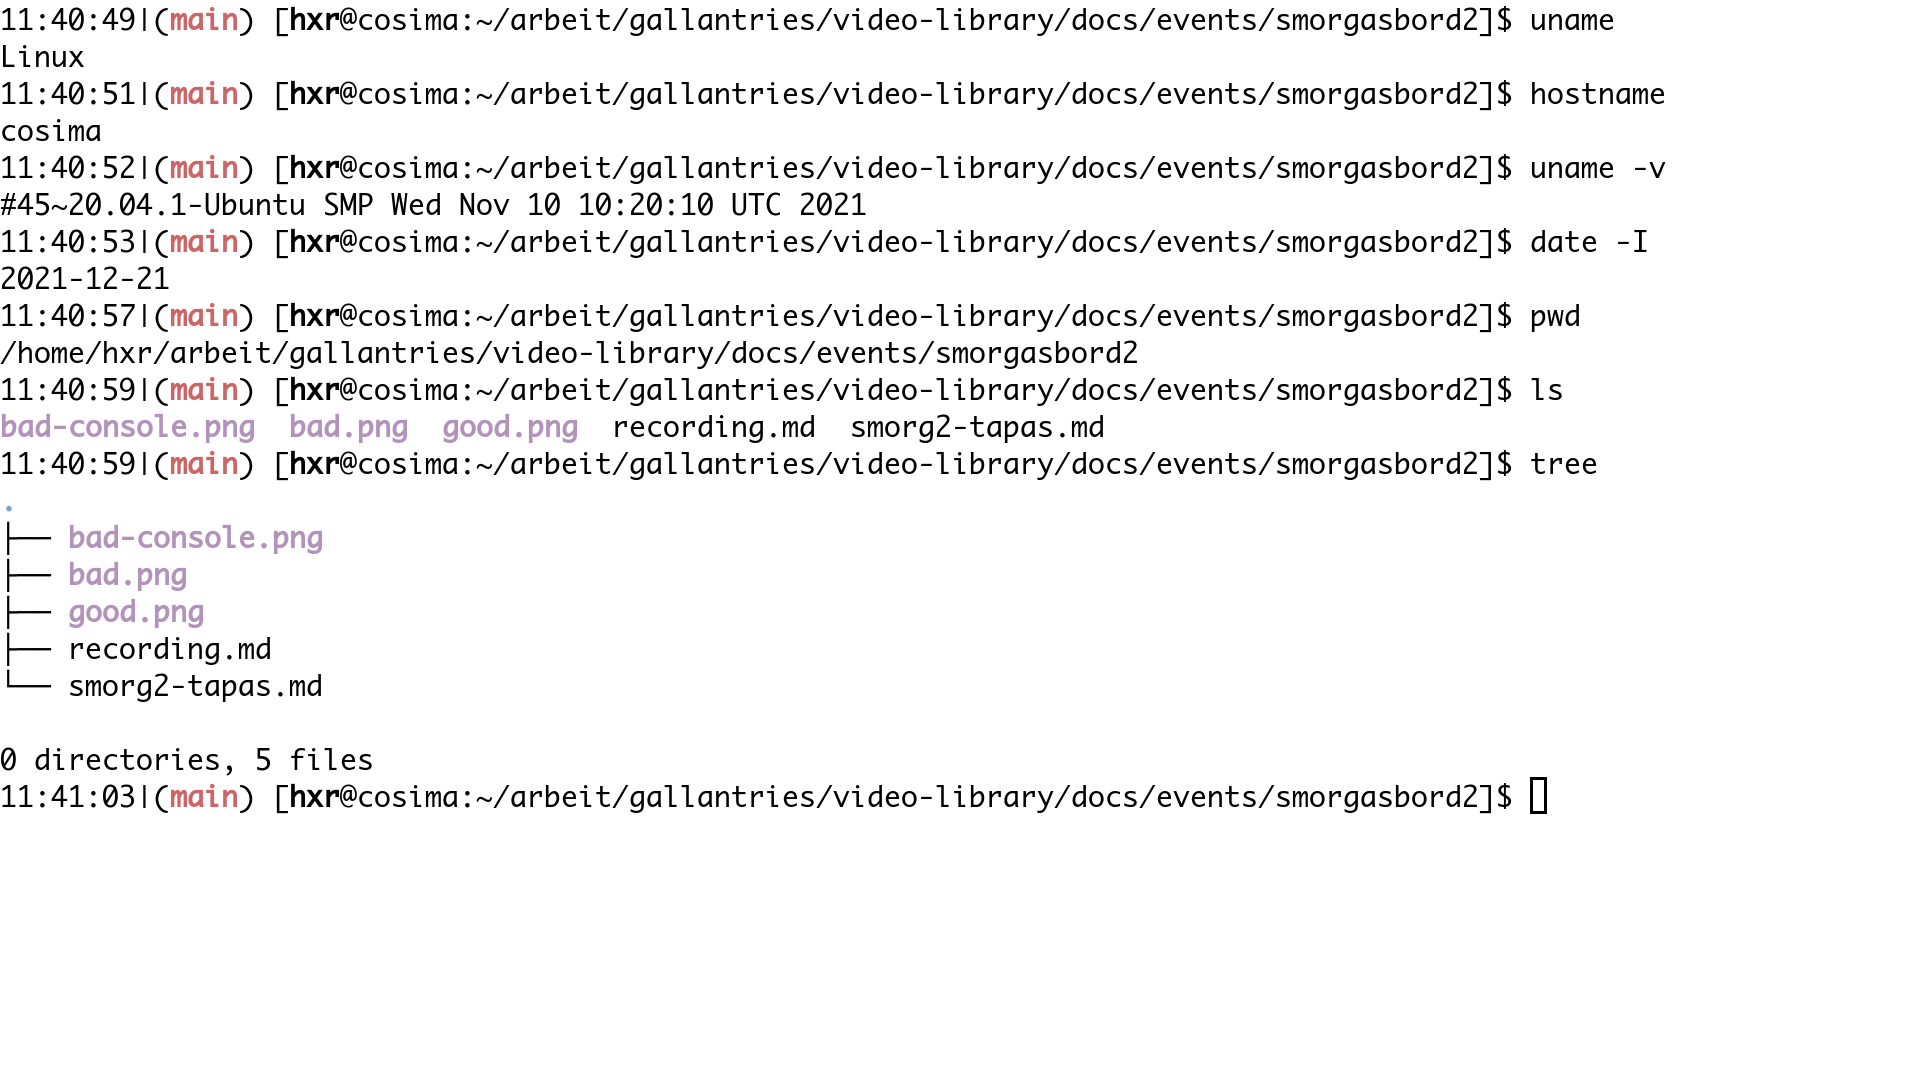
Bad Good “As you can see here the report says X” “I’m going to view the output of this tool, click on the eyeball icon, and as you can see the report says X.” But the same goes for terminal aliases, please disable all of your favourite terminal aliases and quick shortcuts that you’re used to using, disable your bashrc, etc. These are all things students will try and type, and will fail in doing so. We need to be very clear and explicit because people will type exactly what is on the screen, and their environment should at minimum match yours.
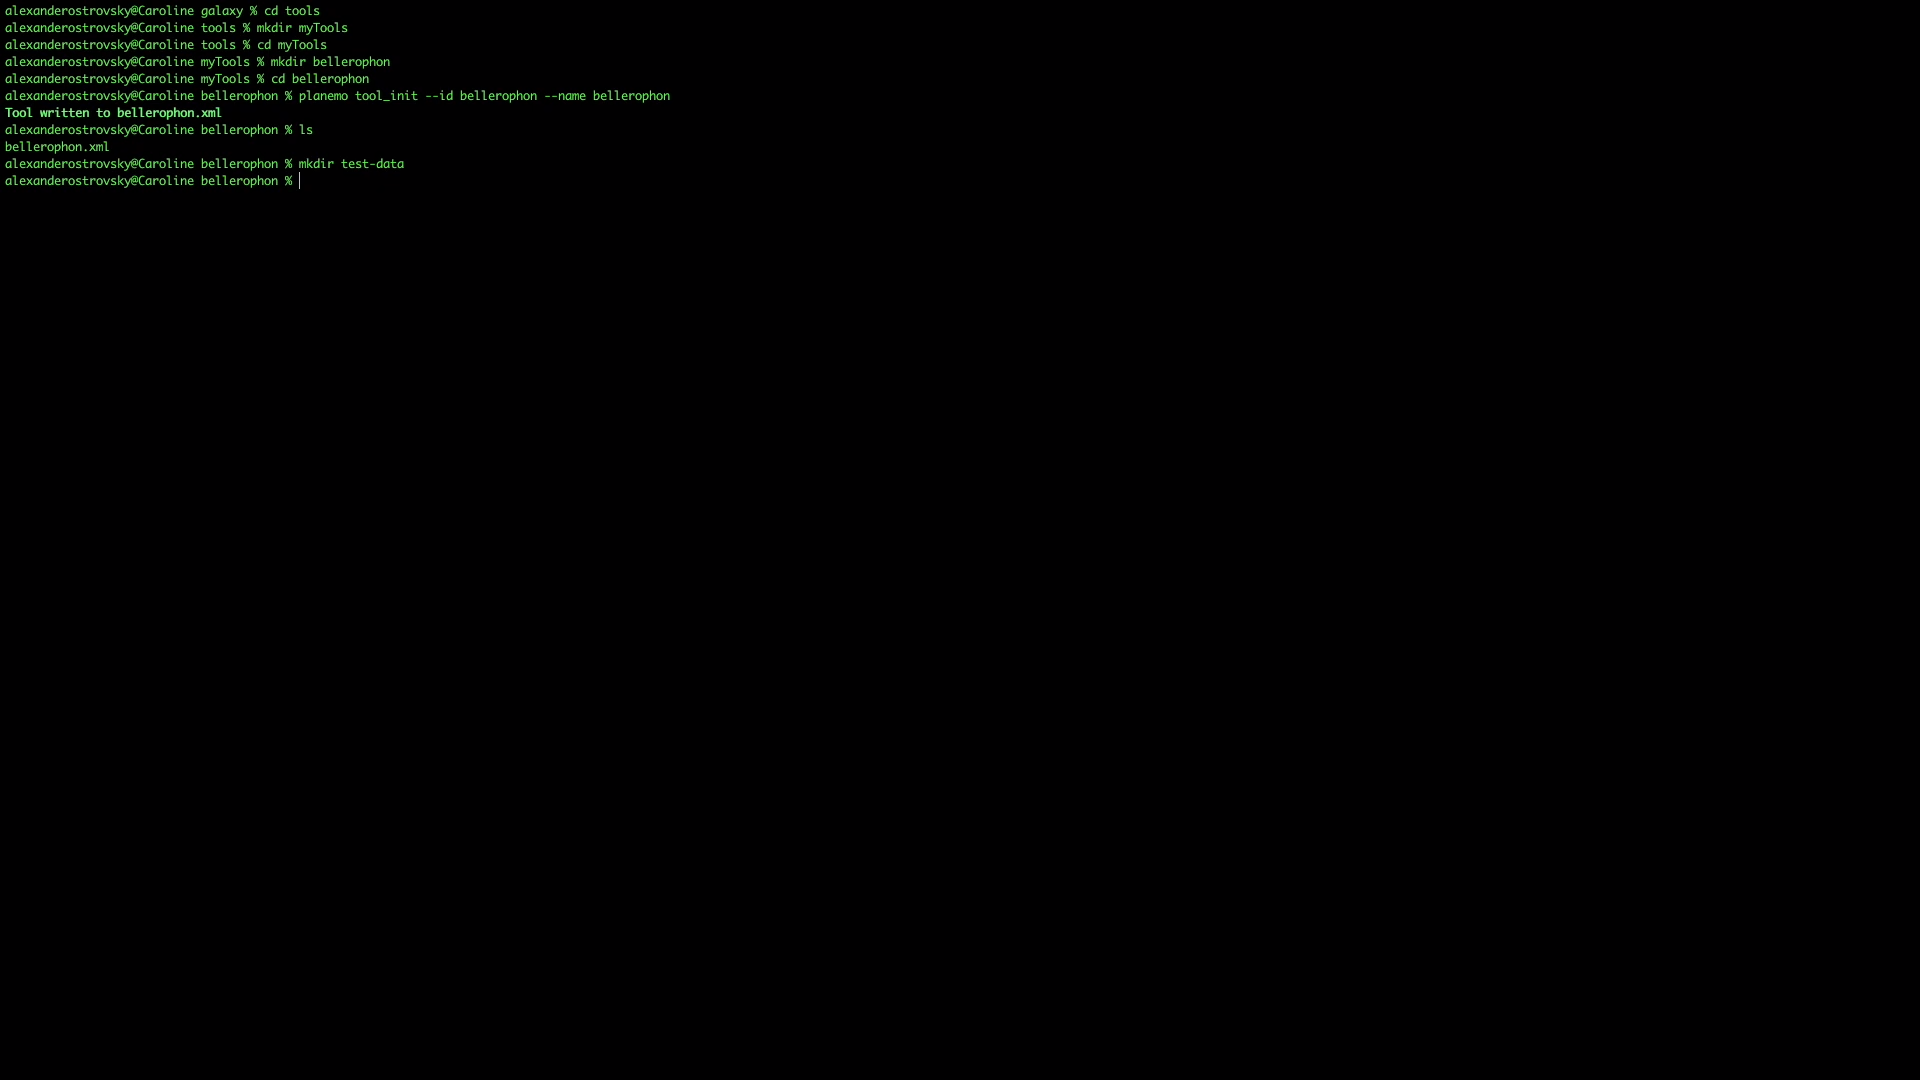
Bad Good lg filels -al | grep filez galaxycd path/to/the/galaxyConsider using a pointer that is more visually highlighted.
There are themes available for your mouse pointer that you can temporarily use while recording that can make it easier for watchers to see what you’re doing.
Other
Are there any upcoming events focused on Galaxy Training?
Yes, always! Have a look at the Galaxy Community Events Calendar for what coming up right now.
Compatible Versions of Galaxy
Warning: Compatible Versions of GalaxyThis tutorial may not be updated for the latest version of Galaxy.
- Galaxy’s Interface may be different to the Galaxy where you are following this tutorial.
- ✅ All tutorial steps will still be able to be followed (potentially with minor differences for moved buttons or changed icons.)
- ✅ Tools will all still work
GTN Stats
Statistics over the GTNSustainability of the training-material and metadata
This repository is hosted on GitHub using git as a DVCS. Therefore the community is hosting backups of this repository in a decentralised way. The repository is self-contained and contains all needed content and all metadata. In addition we mirror snapshops of this repo on Zenodo.
Translations within the GTN
The GTN currently supports two forms of translation:
- Manual (
tutorial_ES.mdandslides_ES.htmlfor example)- Automated (via linking through to Google Translate)
We accept manual translations if and only if there is a team that is able to commit to their maintenance. We need to ensure the trainings are kept up to date and high quality, but that requires native speakers of that language to maintain those translations.
Please contact us if you have any questions regarding translations.
References
- Devenyi, G. A., R. Emonet, R. M. Harris, K. L. Hertweck, D. Irving et al., 2018 Ten simple rules for collaborative lesson development (S. Markel, Ed.). PLOS Computational Biology 14: e1005963. 10.1371/journal.pcbi.1005963
- Garcia, L., B. Batut, M. L. Burke, M. Kuzak, F. Psomopoulos et al., 2020 Ten simple rules for making training materials FAIR (S. Markel, Ed.). PLOS Computational Biology 16: e1007854. 10.1371/journal.pcbi.1007854
