Tools wrappers allow any command line runnable code or programs to be run inside a galaxy environment.
Although Galaxy has thousands of tools readily available, new software and packages will always be useful.
This tutorial is designed to allow anyone to create, run, and deploy new tools in a Galaxy environment.
This tutorial is intended to instruct the reader in the full process of integrating a tool into Galaxy.
In three parts, it will cover the creation of a bioconda recipe for a new tool, writing a Galaxy tool
wrapper, and finally the testing and deployment of this tool into both a local and public Galaxy environment.
Although this will include specific tools, the training is generalizable.
Galaxy tools run within a conda environment, and are able to run any tool capable of running inside
that type of environment. The wrapper includes a set of conda packages available from either bioconda
or conda forge, and retrieves them on tool installation. Sometimes this may be a single package, as
with many command line tools, other times, there may be several. The first part of this tutorial discusses
the creation and deployment of these packages, making them available for Galaxy to retrieve.
Writing a Bioconda Recipe
Bioconda is a repository of conda packages for software and tools relevant to the life sciences. Using conda
packages ensures better reproducibility, since each conda package is usually immutable, an exception being
if it is later discovered that the software in the package had always been non-functional and should be replaced.
Recipes should always define the following 6 sections in the meta.yaml file:
package
source
build
requirements
test
about
Let’s write a Bioconda recipe for the tool we want to package: bellerophon
Warning: Naming collision
As this tool is already packaged in Bioconda, to prevent any naming collision, we will slightly modify its name from bellerophon to bellerophon_bis in the recipe.
This should never be done in real life, we only do it for this exercise!
Next we determine the SHA-256 checksum of the source tarball.
Code In: Bash
wget -O bellerophon.tar.gz https://github.com/davebx/bellerophon/archive/1.0.tar.gz
sha256sum bellerophon.tar.gz # Copy the 64-character hexadecimal number that this outputs.
Using the above information, we create the meta.yaml file where we’ll then define the
parameters that tell conda-build how to build this package, starting with variables for the name, version, and checksum.
With these definitions, Bioconda’s automatic version updater should recognize when a new version has been released and
create a pull request to update the Bioconda package.
Code In: Bash
vim recipes/bellerophon_bis/meta.yaml # vim can of course be replaced with any other editor.
and set the following content:
{%set name = "bellerophon_bis" %}{%set version = "1.0" %}{%set sha256 = "036c5e23f53ed5b612525d3a32095acca073a9c8d2bf73883deb852c89f40dcf" %}
Now we define the conda package metadata. This will be shown as bellerophon_bis-1.0 in anaconda and conda search. We
plug in the relevant variables from the top of the file, lowering the name since conda package names should always be
lowercase.
package:name:{{name|lower}}version:{{version}}
Of course conda-build needs to know where to get the source code for bellerophon. Since the recipe we are creating is on
github, updates can be automated with the variables we defined in the second step, while the SHA-256 checksum ensures
that conda-build is getting the right source code every time.
source:url:https://github.com/davebx/bellerophon/archive/{{ version }}.tar.gzsha256:{{sha256}}
Next, we move on to the build metadata. Since this is the first version of the conda recipe, the build number is 0.
We use the externally defined {{ PYTHON }} variable, which defines which python conda-build is using, to install it
to the build prefix. The –no-deps and –ignore-installed flags are needed to ensure that conda-build only packages
bellerophon itself. In this section, if necessary, we can also define patches that should be applied to the source code,
with the patches: token under build:, and specify that the package should not be built for a given architecture with
the skip: directive.
build:noarch:pythonnumber:0script:{{PYTHON}}-m pip install . --no-deps --ignore-installed -vv#patches: /dev/null # Not used in this tutorial#skip: True [osx] # Not used in this tutorial
After the build metadata has been defined, we need to specify dependencies for at least building and running, with
build-time dependencies specified in the host: section, and runtime dependencies in the run: section. With
bellerophon, we know that it’s a python package that uses pysam to operate on SAM/BAM files, so the only runtime
dependencies we need are python and pysam.
requirements:host:-python-piprun:-python-pysam
No recipe is complete without tests, and this recipe is no exception. Normally, it’s sufficient to confirm that the
program actually runs, e.g. with a --version command. Some software also has a self-test flag or parameter, though
bellerophon is not among them, and we could even define a test script that uses test data either from the recipe or from
the source archive.
test:commands:-bellerophon --version
Finally, we add information about the software, such as code’s is license type, the program’s
homepage, and optionally the github username of the person responsible for maintaining the recipe.
Putting all these parts together, we end up with a complete conda recipe for version 1.0 of bellerophon.
Question
What does your final file look like?
{%set name = "bellerophon_bis" %}{%set version = "1.0" %}{%set sha256 = "036c5e23f53ed5b612525d3a32095acca073a9c8d2bf73883deb852c89f40dcf" %}package:name:{{name|lower}}version:{{version}}source:url:https://github.com/davebx/bellerophon/archive/{{ version }}.tar.gzsha256:{{sha256}}build:noarch:pythonnumber:0script:{{PYTHON}}-m pip install . --no-deps --ignore-installed -vvrequirements:host:-python-piprun:-python-pysamtest:commands:-bellerophon --versionabout:home:https://github.com/davebx/bellerophon/license:MITlicense_file:LICENSEsummary:"Filterreadsthatspanamappingjunction,retainingthe5'-side."
Comment: Using build.sh
In this recipe, the command to execute for installing the package is very short, that’s why we write it directly in the meta.yaml file. When you need to run more complex commands (like compilation steps), it is preferable to remove the build > script entry in the meta.yaml file, and write all the commands in a script named build.sh in the same directory.
Building the recipe locally
Now that your recipe is written, you can try to build it locally.
Hands On: Building the recipe locally
Run conda-build
Code In: Bash
conda build recipes/bellerophon_bis
Conda build will try to build the recipe locally and will run the the test to check if the package was successfully built.
At the end, you should see something like this:
Code Out
TEST END: /home/abretaud/miniconda3/conda-bld/noarch/bellerophon-1.0-py_0.tar.bz2
Renaming work directory [...]
# Automatic uploading is disabled
# If you want to upload package(s) to anaconda.org later, type:

# To have conda build upload to anaconda.org automatically, use
# conda config --set anaconda_upload yes
anaconda upload \
   /home/xxxxx/miniconda3/conda-bld/noarch/bellerophon_bis-1.0-py_0.tar.bz2
anaconda_upload is not set.  Not uploading wheels: []
In this example, the build was successful, and the resulting package is placed in /home/xxxxx/miniconda3/conda-bld/noarch/bellerophon_bis-1.0-py_0.tar.bz2. This is the file that gets uploaded to the bioconda channel when you create a Pull Request on the Bioconda GitHub repository.
Comment: Note on building locally
While building locally is a quick way to check if a recipe is working, it’s not the most reliable way.
That’s because the build is occurring directly on your system, which means you might get interference between the conda requirements in the recipe and your system-wide installed libraries and system configuration.
The automatic testing of your recipe on GitHub when you create a Pull Request is more reliable as it is performed in a controlled and isolated environment.
Creating a Pull Request
After the recipe is complete, and when we have checked that it builds locally, we can commit and push to our fork, so that the recipe can eventually be integrated into Bioconda.
Hands On: Creating the PR
We start by making sure we’re on a branch, and that recipes/bellerophon/meta.yaml is the only modified file.
Code In: Bash
git status
Code Out
On branch bellerophon_bioconda
Untracked files:
  (use "git add <file>..." to include in what will be committed)

	recipes/bellerophon_bis/

no changes added to commit (use "git add" and/or "git commit -a")
Git will give you a url for creating the pull request, which can be clicked to be taken to github.
Code Out
$ git push origin -u bellerophon_bioconda
Total 0 (delta 0), reused 0 (delta 0)
remote:
remote: Create a pull request for'bellerophon_bioconda' on GitHub by visiting:
remote: https://github.com/davebx/bioconda-recipes/pull/new/bellerophon_bioconda
remote:
To ssh://github.com/davebx/bioconda-recipes.git
*[new branch] bellerophon_bioconda -> bellerophon_bioconda
Branch bellerophon_bioconda set up to track remote branch bellerophon_bioconda from origin.
Warning: Don't create the Pull request for real!
You can click on the link to see the diff of what would be included in the Pull Request, and how the form looks like. But please don’t click on the Create pull request button! We don’t want to get duplicate versions of this recipe integrated in bioconda everytime someone follows this tutorial!
Once on the github pull request page, you see a preview of the changes we propose, and you can write a short description of the recipe we want to merge. Have a look at the guidelines in the text box to understand how to properly fill the form, and get your Pull Request merged in the end. In real life, when creating a real new recipe, you would then click the Create pull request button.
Figure 1: An open pull request for the bellerophon conda recipe
Installing a Conda Package
Once our new recipe has been merged, installing the package should be fairly painless. Galaxy, if configured to do so,
will automatically install any conda dependencies a tool asks for, whereas manual installation can be as easy as using
the conda create command to install python, bellerophon, and pysam into a conda environment named bellerophon. The
-y flag tells conda not to ask for confirmation before installing the software and its dependencies into the named
environment.
Galaxy tool wrappers convert the available command line inputs and parameters of a given tool into a grapical
user interface, then translate the user’s selections back into the command to be run. This section will focus
on writing a wrapper. Although this section will cover the full process and many of the options available to
anyone wrapping a tool, a more complete list is available in the Galaxy tool docs.
Installing Planemo
Planemo is an important tool within the Galaxy development workflow. Although it will be covered in greater detail in the
next section of this tutorial, one of its functions is necessary for the tool wrapper development. planemo is available
via the python package manager pip. To that end, before beginning this section, please install planemo locally by running
Hands On: Installing `planemo` via pip
It is advised to install planemo in a virtual environment (step 1-2).
Create a virtual environment: virtualenv -p python3 ~/.venv/. Here ~/.venv/ is the path where the virtual environment should be crated and you may adapt the path to your needs. With -p python3 we make sure that a python intepreter version 3 is used.
Activate the virtual environment: . ~/.venv/bin/activate
Install planemopip install planemo
Note that for using planemofrom a new shell you will need to activate the python virtual environment again.
Hands On: Testing `planemo` and getting help
In order to test if the installation worked execute
Code In: Input: Bash
planemo --version
Code In: Output
This should output the version of planemo, e.g.
planemo, version 0.74.3
planemo --help will show the available commands with a short desctiption (lint, test, and serve will be part of this tutorial)
planemo SUBCOMMAND --help will show the usage information for the corresponding subcommand. Try to obtain the information for the lint subcommand.
Initializing a Tool Wrapper
Initializing a tool wrapper to be run in Galaxy is simple
Hands On: Creating a Tool Wrapper Skeleton
Go to the “tools” directory in your Galaxy instance.
Make a new directory for tools you will be wrapping.
Use planemo to initialize a new tool wrapper with basic formatting.
Here we will be using bellerophon, but the parameters can be set for any tool.
The tool ID is the internal reference id for the tool, and may contain no spaces or capitalized letters
The tool name is the text that will be visible to the user.
cd galaxy/tools
mkdir-p myTools/bellerophon
cd myTools/bellerophon
planemo tool_init --id bellerophon --name bellerophon
You can now open the new xml file that has been generated to begin the wrapping. It should look something like this:
<toolid="bellerophon"name="bellerophon"version="0.1.0"python_template_version="3.5"><requirements></requirements><commanddetect_errors="exit_code"><![CDATA[
TODO: Fill in command template.
]]></command><inputs></inputs><outputs></outputs><help><![CDATA[
TODO: Fill in help.
]]></help></tool>
Galaxy Tool Wrappers
Galaxy tool wrapper xml files are made up of several sections:
Tool
Description
Requirements
Macros
Command
Inputs
Outputs
Tests
Citations
Help
While many of those are present in the wrapper by default, others need to be added.
Tool section
The tool section at the head of the file defines several key pieces of information for both the user and Galaxy.
The tool ID and name are defined here as well as which minimum version of Galaxy is required to run it.
Hands On: Defining the tool section:
For this section, the following is necessary:
Tool ID
Tool name
Version (Version of the Galaxy wrapper)
This is set as '<Conda wrapper version>'+'galaxy<galaxy wrapper version>'
Profile
This is the minimum version of Galaxy required to run the tool
The @TOOL_VERSION@ and @VERSION_SUFFIX@ are what are referred to as “tokens”, and will be furter discussed in the “Macros” section.
Description section
This section adds help text to easily identify the tool. It is not intended as in-depth help, which should be in the help section.
The description is simply presented as plaintext between the tags. Bellerophon’s would look like this:
Hands On: Adding a description
Add the following description to your tool
<description>chimeric reads from Arima Genomics</description>
Which would present the tool’s in the toolbar and at the top of the tool form as
bellerophon: chimeric reads from Arima Genomics
Macros section
The macros section serves two functions – to create meta-variables for inside both the xml text and the command text, called
tokens, and xml sections that can be slotted in repeatedly. In this section we will only use tokens, but xml macros are very
useful for tools which have multiple options/modes that reuse parameters. We will use a simple xml macro in the following section.
The @TOOL_VERSION@ and @VERSION_SUFFIX@ used in the Tool line are defined here. Each need their own ‘token’ line, resulting in
This will cause the version string at the beginning to read “1.0+galaxy0”, and set the conda package that is pulled to be bellerophon version 1.0.
As versions are incremented, this will change. Any updates to the galaxy wrapper should iterate @VERSION_SUFFIX@, while any changes to the version
of the requirement would change the value for @TOOL_VERSION@ (and reset the @VERSION_SUFFIX@ to 0).
A basic example of the xml macros would look like this
<macros><xmlname="example_parameter"><paramname="ex_1"type="integer"label="Example help text"/><paramname="ex_2"type="text"label="Example help text"/></xml></macros>
One would then use that macro at any point in the xml it is relevant using the <expand/> tag like so:
<expandmacro="example_parameter"/>
This would add both of the <param/> tags at that location. Though inputs are used as an example macro here, any tag or group of tags can be made into a macro.
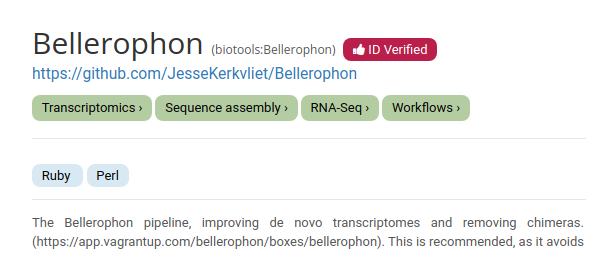
Bio.tools ID
We will now add a useful macro entry. With the Galaxy ecosystem is becoming more reliant on metadata, a bio.tools ID can help Galaxy to pull standardized metadata for your tool. This enables users to find and use the tool more easily from across the web, so we highly recommend setting a bio.tools identifier. If an entry already exists on https://bio.tools, it’s a simple task.
Hands On: Setting a bio.tools ID:
If we go to https://bio.tools and search “Bellerophon”, we find that it already has a bio.tools entry:
We just have to add the biotools ID as a <macro> tag.
Let’s create a macro xml file next to our tool xml: bellerophon_macros.xml
If your tool does not yet have an entry in bio.tools, we highly encourage you to create one!
It takes just 5 minutes to register with bio.tools to start contributing towards this global registry of computational resources.
Requirements section
The requirement section is where conda packages and docker/singularity containers are set. As this is a very basic tutorial,
the container requirements will not be discussed here.
For each conda package added to the environment in which the tool will run, a <requirement/> tag needs to be included in the <requirements/> section.
This specifies the
Bioconda or Conda Forge package ID
This is set as plain text betweeh the <requirement/> tags
Specific Bioconda/Conda Forge package version
This does not have to be the most recent version
Hands On: Adding requirements
In the case of bellerophon, which requires two dependencies, bellerophon and samtools, the requirements section appears like so. Add them to your tool XML.
This uses the macro token for @TOOL_VERSION@ for the Bioconda package version to retrieve the version number for bellerophon, while samtools’ version is set manually.
Question
If you wanted to add a requirement for the Seurat package of version 3.2, what would that look like?
Although the next section in the tool script is actually be the command section, the input section will be discussed first, as it sets variables that are used in the command.
The input section has three possible xml tags at the highest level – <conditional/>, ` <section/>, and `. Param will set any variable, conditional allows different available
parameters based on previous selections, and section simply breaks up the GUI into multiple parts that can be viewed or hidden at the user’s discression.
Param
The param tag sets the value of variables, and has several attributes associated with it:
Name
The name of the variable to be used in the command. Cannot include spaces.
Argument
The actual flag being set in the tool. If the name and the flag is the same as what the name attribute would be, only Argument needs to be set.
Label
The name of the parameter as shown to the user. Can include spaces.
Type
Sets the variable type. Available options are:
Text
A string input with a built-in sanitizer.
Integer
Also allows for a minimum and maximum value to be set.
Float
Like integer, also allows for a minimum and maximum value to be set.
Select
Allows the user to choose from a pre-set list of options.
Boolean
Allows the user to select between two options, not simply True or False.
Data
Input file, with required file format specified.
Help
Help text shown below the input for the parameter (optional).
Optional
Boolean flag that allows the user to leave the parameter blank to either use the default value or to not use the parameter at all (optional).
Conditional
Conditionals are used alongside param tags to change available options based on what has been selected and is used with select-type params. Writing
conditionals, then, is a three-tag or four-tag process – the <conditional/> tag, the <param/> of select type, and the <when/> tag,
used to specify the new paramaters available only on the selection of certain options. The param is of type “select”, a tag <option/> is used to specify
each possible value. A very generic select-type conditional might look like this:
<conditionalname="example_conditional"><paramname="example_select"label="Example Select"type="select"><optionvalue="ex1"/><optionvalue="ex2"/></param><whenvalue="ex1"><paramname="example_input"label="Example input"type="integer"min="0"help="Example help text"/></when><whenvalue="ex2"><paramname="example_input2"label="Example input 2"type="boolean"truevalue="--flag"falsevalue="--otherflag"help="Example help text"/></when></conditional>
Section
Section tags are useful for visually separating the parameters. They can make a long tool with many parameters more simple to navigate by breaking it into
groups of parameters with similar functions. Alternatively, it can hide “advanced” or optional parameters, so that the user doesn’t have to deal with
otherwise-irrelevant parameters if they don’t need to. There are only 4 attributes:
Name
Sets the internal reference name for the section. Cannot contain spaces.
Title
Sets the visible name of the section for the user. Can contain spaces.
Expanded
A boolean value that sets the default starting position of the section. If false, the section will begin collapsed, and only the title will be visible by default.
Help
Help text visible to the user that explains the purpose of the section.
Inputs Section in Practice
The bellerophon tool’s help section reads
optional arguments:
  -h, --help            show this help message and exit
  --forward FORWARD, -f FORWARD
                        SAM/BAM/CRAM file with the first set of reads.
  --reverse REVERSE, -r REVERSE
                        SAM/BAM/CRAM file with the second set of reads.
  --output OUTPUT, -o OUTPUT
                        Output BAM file for filtered and paired reads.
  --quality QUALITY, -q QUALITY
                        Minimum mapping quality.
  --threads THREADS, -t THREADS
                        Threads.
  --log-level {CRITICAL,ERROR,WARNING,INFO,DEBUG}, -l {CRITICAL,ERROR,WARNING,INFO,DEBUG}
                        Log level.
  --version             show program's version number and exit
This means that there are 6 total functional flags, –forward, –reverse, –output, –quality, –threads and –log-level.
Among these flags, two are file inputs, or ‘data’ type params, one is an integer type param, and three are parameters not
necessary for the user to have direct access to. As Galaxy uses specific file names or patterns to find output files, the
output file names need to be specific to the wrapper, not the actual running step. Since the user doesn’t know the capability
of the resources on which the tool will be running, they should not be given access to the threads flag. And since the log level
goes to the stderr instead of an output file, this can also be skipped. All three of these flags can be coded in the command,
but not exposed to the user.
Hands On: Adding parameters to your tool
Using information in the above sections, add parameters for the forward, reverse, and quality flags to your tool xml.
Question
What does your <inputs/> section look like?
To include all of the necessary parameters, then, the inputs section would appear like this
<inputs><paramargument="--forward"type="data"format="qname_sorted.bam,sam"label="First set of reads"help="This is usually the forward reads in your experiment."/><paramargument="--reverse"type="data"format="qname_sorted.bam,sam"label="Second set of reads"help="This is usually the reverse reads in your experiment."/><paramargument="--quality"type="integer"value="20"min="0"label="Minimum mapping quality"/></inputs>
This makes the variables “forward”, “reverse” and “quality” available in the command section and lets the users set them in the Galaxy interface. The “min” attribute prevents
a user from inputting a value below a specified number. Here, the quality flag cannot be set below 0.
Outputs section
The outputs section defines the files that Galaxy makes available in the history after running a tool using the <data/> and
<collection/> tags. In general, it tells Galaxy to look for a specific file after the job completes, and return it to the user.
It also defines the format of that file and the name shown to the user in the history.
Hands On: Adding your outputs
As Bellerophon has a single output file, add the following outputs section to your tool:
<outputs><dataname="outfile"label="${tool.name} on ${on_string}"format="bam"/></outputs>
This generates a history item called “bellerophon on <input file name>”, as the ${tool.name} and ${on_string} are reserved values
for the tool’s label and the input file labels.
As the name is hard-set using the output flag, and is output into the working directory, the name attribute can be used for the file
search. Alternatively, the attribute “from_work_dir” allows a lower directory to be specified.
Filtering the output
In the case where a certain output only appears when certain parameters are set, the <filter/> flag can help. Though not used in this
tool, a user might have a boolean or select that generate new output files. In this case, the data tag would appear like this
<dataformat="bam"label="example"name="output_bam"><filter>options['selection_mode'] == 'advanced' and options['bam_output']</filter></data>
Meaning that file only appears in the history if the user specified the “advanced” mode of the tool, and requested a bam output file.
Output collections
Collections are also useful for groups of output files, or simply data meant to be kept together like paired-end files.
In this case, the data to be grouped in the history like this.
Though paired-end data is used here, the type can also be ‘list’ or ‘paired list’, specifying a larger group of data, or a group of
paired-end data respectively.
Discover datasets
Datasets can also be found automatically, in the case where the number of output files is unknown.
This, for example finds a tabuar dataset in a directory named “outputs” that follows the naming convention of “<filename>.<extension>”,
where the extension is .tsv. This method is also able to be used in a collection, where the same function would find all datasets that
fit the pattern in the specified directory.
Command section
Returning to before the inputs section, the command section is written in bash with a built-in python interpreter called Cheetah. Because of that, the command section is, for the most part,
a list of bash commands connected by ‘&&’, with the conda packages listed in the requirement available to run.
Cheetah commands
Cheetah allows loops, logic gates, and assignments of variables in a command section. Creation of a logic gate is as simple as this
#if ${parameter} == "value":
<command>#end if
For an “else”:
#if ${parameter} == "value":
<command>#else:
<command_2>
#end if
For an “else if”:
#if ${parameter} == "value":
<command>#else if ${parameter} == "other value":
<command_2>
#else:
<command_3>
#end if
Similarly, loops would appear as
#for value in ${param}
    <Loop commands>
#end for
For all open loops and gates, an “#end” must be used to close.
Finally, to define a variable within the command section, use
#set $variable = value
Using other scripts
In the case where languages other than bash are necessary, such as R or python, by listing the languages in the requirements,
they can be called in this section. Any scripts present in the tools folder can also be called.
For example
python helloworld.py &&echo${variable}
runs the helloworld.py script present in the same folder as the tool xml, then echoes the value of the param named “variable” from the input section.
In practice
Hands On: Writing the command block
The bellerophon command section, based on the variables set previously, would be as follows. Please add it to your tool XML.
The variables set in the inputs and output sections generate a full command to be run inside the Galaxy environment. When inside a conditional or
section, the hierarchy is preserved using a period. For example
'$example.forward'
would look for the variable ‘forward’ within the section or conditional named ‘example’.
This command will run, assuming two sam input files, as:
ln-s`<forward input sam file>`'$forward_input'&&ln-s`<reverse input sam file>`'$reverse_input'&&
bellerophon --forward$forward_input--reverse$reverse_input--quality$quality--output'merged_out.bam'&& samtools sort--no-PG-O BAM -o`<outfile name generated by Galaxy>` -@ `<number of threads allocated>` merged_out.bam
Symlinks
The symlinks in the first two parts of this command serve to standardize the naming of files passed to the bellerophon command.
For tools which require specific naming conventions, such as a standard prefix across all input files, or which require specified
file extensions, this is necessary. When using non-symlinked files, Galaxy uses metadata for filetypes, but, by default, refers to
files using a .dat etension. For example, had the symlinks not been used here, the command actually given would look like this:
By adding the symlinks, the files are specified and will use proper names in the command. Although not strictly necessary for
bellerophon, it is best practice for command legibility.
Test section
The test section is an easy way to ensure your tool wrapper functions as intended. It runs the tool and compares the output Galaxy returns against a
specified output. The output can be a specific file, a check against the stdout/err, or simply a search to see if the output contains specific
text. There can be any number of tests for a given tool, and it is preferred that all parameters are tested at some point in these tests.
When writing a test, the <param> tag functions slightly differently. It finds the variable with the same name, and then provides a value to be input
for the test. These params can also be placed inside a conditional, simulating the same conditional present in the inputs section.
As all parameters in bellerophon are accessible at once, and do not contradict one another, only one test is necessary.
This runs the tool with the files forward.bam and reverse.bam from a folder named test-data in the tool’s directory. Since no quality parameter was specified, it uses the default of 20. The parameter can also be manually set with the same param tag and value attribute, just inputting an applicable value such as “21”. It then
compares the defined output called “outfile” from the outputs section against a file called “merged-out.bam” in the same test-data directory. It also
double checks that Galaxy only finds one output to put in the history with the “expect_num_outputs” attribute. This is very useful for tests on tools
that have filtered outputs or that use ‘discover_datasets’.
Collections and sections in tests
Though not used in this example, the sections and conditionals from the input section are used in tests as well. For example
simulates the selection of value 1 inside of a conditional when the initial select parameter is set to “first”.
Help section
This is help text to be shown at the bottom of the tool form. It uses standard markdown format.
Citations section
The citation section gives proper credit to the tool’s writers. Here, using either DOI format or a bibtex citation, the tool form will automatically
link out to the relevant papers/repositories. The format in this section is simple, and as bellerophon was written by a Galaxy team member as a translation
of an Arima Genomics tool in association with the Vertebrate Genomes project, that is the paper that will be cited.
<citations><citationtype="bibtex">@article{Butler2018,
abstract = {A new computational approach enables integrative analysis of disparate single-cell RNA–sequencing data sets by identifying shared patterns of variation between cell subpopulations.},
author = {Butler, Andrew and Hoffman, Paul and Smibert, Peter and Papalexi, Efthymia and Satija, Rahul},
doi = {10.1038/nbt.4096},
issn = {1546-1696},
journal = {Nature Biotechnology},
number = {5},
pages = {411--420},
title = {{Integrating single-cell transcriptomic data across different conditions, technologies, and species}},
url = {https://doi.org/10.1038/nbt.4096},
volume = {36},
year = {2018}
}</citation></citations>
Multiple citations can be added by using additional citation tags.
Hands On: Adding a citation
Add the citation above using either method (but not both!)
The .shed.yml file is placed in the same directory as the tool’s xml file and saves metadata for the tool. It enables
toolshed organization and search by using tags and descriptions.
It is made up of the following sections:
Field
YAML key
Description
Name
name
the tool’s name
Owner
owner
username of the person who wrapped the tool to be represented in the Galaxy Toolshed. If submitted through the Intergalactic Utilities Comission (IUC), can be set to iuc.
Description
description
short help text for the tool/package.
Homepage URL
homepage_url
URL of the tool’s website. Can also just be the Github repository for the tool.
Long Description
long_description
longer, more in-depth help section.
Remote Reposity URL
remote_repository_url
link to the repository for the tool’s files.
Type
type
kind of files in the directory. Can be set as unrestricted (tool), tool_dependency_definition, or repository_suite_definition.
Categories
categories
toolshed categories that are relevant to the tool or package.
For Bellerophon, the .shed.yml file would be:
name:bellerophonowner:iucdescription:Filter mapped reads where the mapping spans a junction, retaining the 5-prime read.homepage_url:https://github.com/davebx/bellerophonlong_description:|Filter mapped reads where the mapping spans a junction, retaining the 5-prime read.remote_repository_url:https://github.com/davebx/bellerophoncategories:-Sequence Analysis
In the case where the directory represents a group of tools or a ‘suite’, there are additional overarching sections into which the above tags fall:
Auto Tool Repositories
Suite
For more information on how to write automatic tool suites, visit the Galaxy docs.
Testing Galaxy tool with planemo
planemo is a command line utility that helps developing Galaxy tools.
Among many other tasks it can:
Lint the tool source errors and conformance to best practices.
Test tools, i.e. executing the tool with the tests described in the tool’s test section.
Serve tools, i.e. crate an ad-hoc Galaxy server running the tool.
For more information on planemo see its extensive documentation.
In this part of the tutorial we will be looking at planemo and
see it in action linting, testing, and serving the tool.
Using planemo to lint tools
When linting a Galaxy tool planemo checks the sources for common errors and violations of best practice rules. Examples are:
Presence to “TODO” in the help section
Absence of tests or citations
Missing when clauses in conditionals or the use of a boolean parameter as the selector in a conditional
If planemo finds a problem it outputs warnings or errors depending on the severity of the problem.
By default planemo will fail if any warning or error is found, i.e. return a non-zero exit code.
Hands On: Lint a tool with `planemo`
Change into the directory containing the tool
Run planemo lint
Inspect the output for any warnings or errors
Fix the problem(s) and rerun from step 2 until all problems are solved
By default planemo will lint all tools contained in the current working directory (including subdirectories).
You can also specify a directory or a tool by giving its path as additional argument.
Using planemo to test tools
Using planemo to execute the tests defined in a tool is probably the most frequently used feature.
In order to do so planemo will:
Start a local Galaxy instance
Stage all input data defined in the tests
Run the tool using the datasets and parameters defined in the tests (this also involves the installation of all requirements which is done with conda by default)
Check if the test assumptions are met, e.g. non-zero exit code, equivalence of the output files, number of outputs, …
Hands On: Test a tool with `planemo`
Change into the directory containing the tool
Run planemo test (as with planemo lint you can also specify a path to a tool explicitly as extra argument)
The most important output of planemo is found at the end and looks like:
Testing complete. HTML report is in "PATH/tool_test_output.html".
All X test(s) executed passed.
TOOL_NAME (Test #1): passed
TOOL_NAME (Test #2): passed
...
The last part lists for each test if it failed or passed. In case of a failure you can open the file tool_test_output.html (the path to this file is in the output) with a browser to get more information.
Open the HTML report firefox PATH/tool_test_output.html (replace the PATH as in planemo’s output).
The HTML report contains a table on the top giving the number of executed, successful, and failed tests:
If there are passed or failed tests you will find the text Passed tests, Failed tests, resp., below the table.
Clicking on this text will unfold the list of passed or failed tests, resp. Clicking again on one of the tests
Will show additional information like stdout, stderr and the executed command line. In most cases this is sufficient
to determine the source of the test failure.
--failed Will make planemo rerun only the tests that failed in the previous execution.
--update_test_data If there are differences to output files defined in the tests these will be updated (and the tests will run again).
--no_cleanupPlanemo will not cleanup the created Galaxy clone or the job working dir (see the details box below).
Sometimes it can be helpful to understand the planemo output in more detail.
The first lines show some git commands that create a local clone of the Galaxy sources (by default the master branch) and the command to start Galaxy. The end of the part is marked by the line Activated a virtualenv for Galaxy.
Then the python virtual environment used to run Galaxy is created and the requirements are installed
Then the worker threads and the Galaxy database are initialized, look for lines containing Initializing main Galaxy Queue Worker on and Install database targetting Galaxy's database configuration. The completion of the startup of Galaxy is indicated by the line INFO: Application startup complete.
The first two steps can take a while on the first run of planemo test (in particular on slow internet connections). Subsequent runs will be faster since the Galaxy sources as well as the virtual environment are cached in your home directory (~/.planemo/).
After this planemo will execute one test after the other. The start of a test is indicted by a line ( TOOL_ID ) > Test-TEST_NUMBER
For each test a number of Galaxy jobs are triggered (one upload job for each input dataset and the actual tool execution). Each job is indicated by a line Built script [JOB_WORKING_DIR/tool_script.sh] for tool command [COMMAND_LINE] which tell you the working directory of the job and the executed command line.
Suceccful tests will be marked with a line containing the text ok. Otherwise stdout and stderr and potentially a description of the test problem is shown.
Note that the first execution of the tool job can take longer since also the conda environment containing the requirements of the tool is created.
As an exercise
Start planemo test with the extra parameter --no_cleanup (this will prevent the deletion of the Galaxy clone and its job working directories after planemo finished).
Change into one job working directory (not an upload job)
Inspect tool_script.sh and find the command to activate the conda environment for the job and the executed command line.
Execute these commands from within the working dir in the jobs working dir (You may need to remove all files that are already existing there).
This procedure can be really helpful for debugging Galaxy tools.
Using planemo to serve tools
It can be very useful to check how Galaxy renders a tool and if this meets the expectations of the developer. For instance this is the best way to check if the help section is rendered as expected.
Hands On: Serve a tool with `planemo`
Change into the directory containing the tool
Run planemo serve (as with lint and test you can also specify a path to a tool explicitly as extra argument)
Planemo will again start a Galaxy instance that contains your tool. Note that starting the ad-hoc Galaxy might need longer than for planemo test since JavaScript components need to be initialized as well.
In order to stop planemo serve just press Ctrl-C
Publishing Galaxy tools
Galaxy tools are installed from the Galaxy toolshed. With the help of planemo tools can be added to the toolshed (documentation). But usually the sources of the tools are maintained in public source code repositories, for instance:
These tool source repositories have continuous integration workflows:
lint and test tools
lint supplementary python and R scripts
and publish tools to the toolshed
In addition the repositories run weekly workflows testing all tools in order to keep them working.
Another advantage of these repositories is that new tools and improvements to tools are subject to review of experienced tool developers.
The repository is structured as follows:
tools/: the main directory of the repository containing the tool descriptions. One directory for a tool repository (a directory with a .shed.yaml file that describes the tools) which can contain one or more set of tools.
tool_collections/ and suites/: Like tools/ but reserved for larger collections of tools like samtools or bedtools.
data_managers/: a directory containing data managers. These need to be in a separate directory since tool tests with planemo need to be ececuted slightly different from tests of normal tools.
deprecated/: deprecated tools. Tools in this directory are excluded from weekly CI.
macros/: macros that can be used by multiple tools.
In addition there are some important directories containing configurarion:
.github/: contains the CI workflows and other documents for the maintenance of the repository.
.tt_skip: a text file containing a list of tool repositories that are excluded from weekly CI as well as CI running in PR.
.tt_biocontainer_skip: a text file containing a list of tool repositories that should not be tested with containerized tool tests but use conda for resolving tool requirements.
setup.cfg: configuration for flake8 python linting in CI.
Furthermore there are README.md, CONTRIBUTING.md, and LICENSE that might be worth considering as contributor or adapting if you use the repository as template.
The workflow to add or update a tool in such a repository to open a pull request (PR) from a branch of a personal fork of the repository. In the following it will be demonstrated how this is done for the IUC repository
Fork and clone the github repository
For the following we will use a sandbox tool repository and not one of the main repositories.
But, the steps can be adapted easily by exchanging the repository URLs. Note that for some repositories
the development branch may have the name master instead of main.
Hands On: Fork and clone the IUC github repository
If you don’t have an account on github you need to sign up at first.
After a short while you will be redirected to your fork of the sandbox repository
(i.e. a 1:1 copy of the original repository)
In order to obtain a clone (i.e. a local copy of your fork) click the green button with text “Code” and copy the link. And execute the following commands on your computer
Code In: Bash
cd A_DIR_WHERE_YOU_WANT_TO_CREATE_THE_CLONE
git clone LINK_TO_YOUR_FORK
cd tools-iuc/
git remote add upstream https://github.com/mvdbeek/galaxy-tools-mvdbeek.git
The first command creates the clone in the current working dir, i.e. it will create a directory galaxy-tools-mvdbeek containing the copy.
The last command will add the original sandbox repository as a remote with the name upstream. This is necessary in order to keep your fork of the repository in sync with the original repository.
Check that git remote -v lists your fork under the name origin and the original repository unter the name upstream.
Hands On: Keeping your fork in sync
You should execute the following steps always before creating a new branch:
git checkout main: change to the main branch
git pull upstream main: get the most recent changes from the upstream repository to your local clone
git push origin main: publish the most recent changes from your local clone to your fork, i.e. origin
Create a pull request for a new tool
Hands On: Create a pull request
git checkout main
git checkout -b NAME_OF_THE_BRANCH: create a new feature branch and change to this branch. The branch name should not contain names and should be short and if possible descriptive, e.g. the tool name.
Introduce changes, e.g. created a directory under tools/, add the tool XML file, the .shed.yml file, and the test-data directory with the files needed for the test.
git add TOOL_DIRECTORY add all files in TOOL_DIRECTORY under version control
git commit -m 'COMMIT MESSAGE' commit the changes. The commit message should contain a short description of the changes. You can also use multiple lines: ommit the final quote and continue after pressing enter – finish by adding the single quote again and press enter.
Push to your fork git push --set-upstream origin NAME_OF_THE_BRANCH
Create a Pull Request (PR): in the output of the previous command you will find an URL that you can copy paste to your browser. Add a suitable title to you PR and describe the changes. The PR will be created after you click the button “Create pull request”
After you created a PR your changes will be reviewed and improvements will be requested. You can add changes to the PR as follows.
Hands On: Adding changes to a PR
git checkout NAME_OF_THE_BRANCH
Make changes as requested.
git add SPACE_SEPARATED_LIST_OF_CHANGED_FILES
git commit -m 'COMMIT MESSAGE'
git push origin NAME_OF_THE_BRANCH
The IUC style continuous integration workflows
When a new PR is created or new commits are added to the PR the continuous integration workflow starts and executes the following steps:
Setup: this mainly determines the list of changed tools and repositories (here repository refers to a set of tools with .shed.yaml). In addition some caches for pip and planemo are setup that are reused in the following jobs are maintained.
Tool linting: this essentially runs planemo shed_lint which does the same as planemo lint plus additional checks.
Python linting: run flake8 linting on all python scripts contained in changed repositories
R linting: run lintr linting on all R scripts contained in changed repositories
Tool testing: this runs planemo test on all tested repositories using containerized tests, i.e. docker containers are used to execute the tool tests instead of conda environments. Depending on the number of changed tools up to four parallel jobs execute the tool tests. Note that these jobs will always be reported as sucessful even if tool tests failed. Tool test failures will be reported in the subsequent job. The same version of these tests can be run locally by adding --docker to the planemo test command.
Combine tool test results: the results of the parallel tool test jobs are merged.
Determine success of the steps: this is just an auxilliary step needed for PR that do not change tools, but the framework (e.g. the worflows).
The same workflow runs once again when the PR is merged. In addition another job runs which deploys the tool(s) to the toolshed (and testtoolshed).
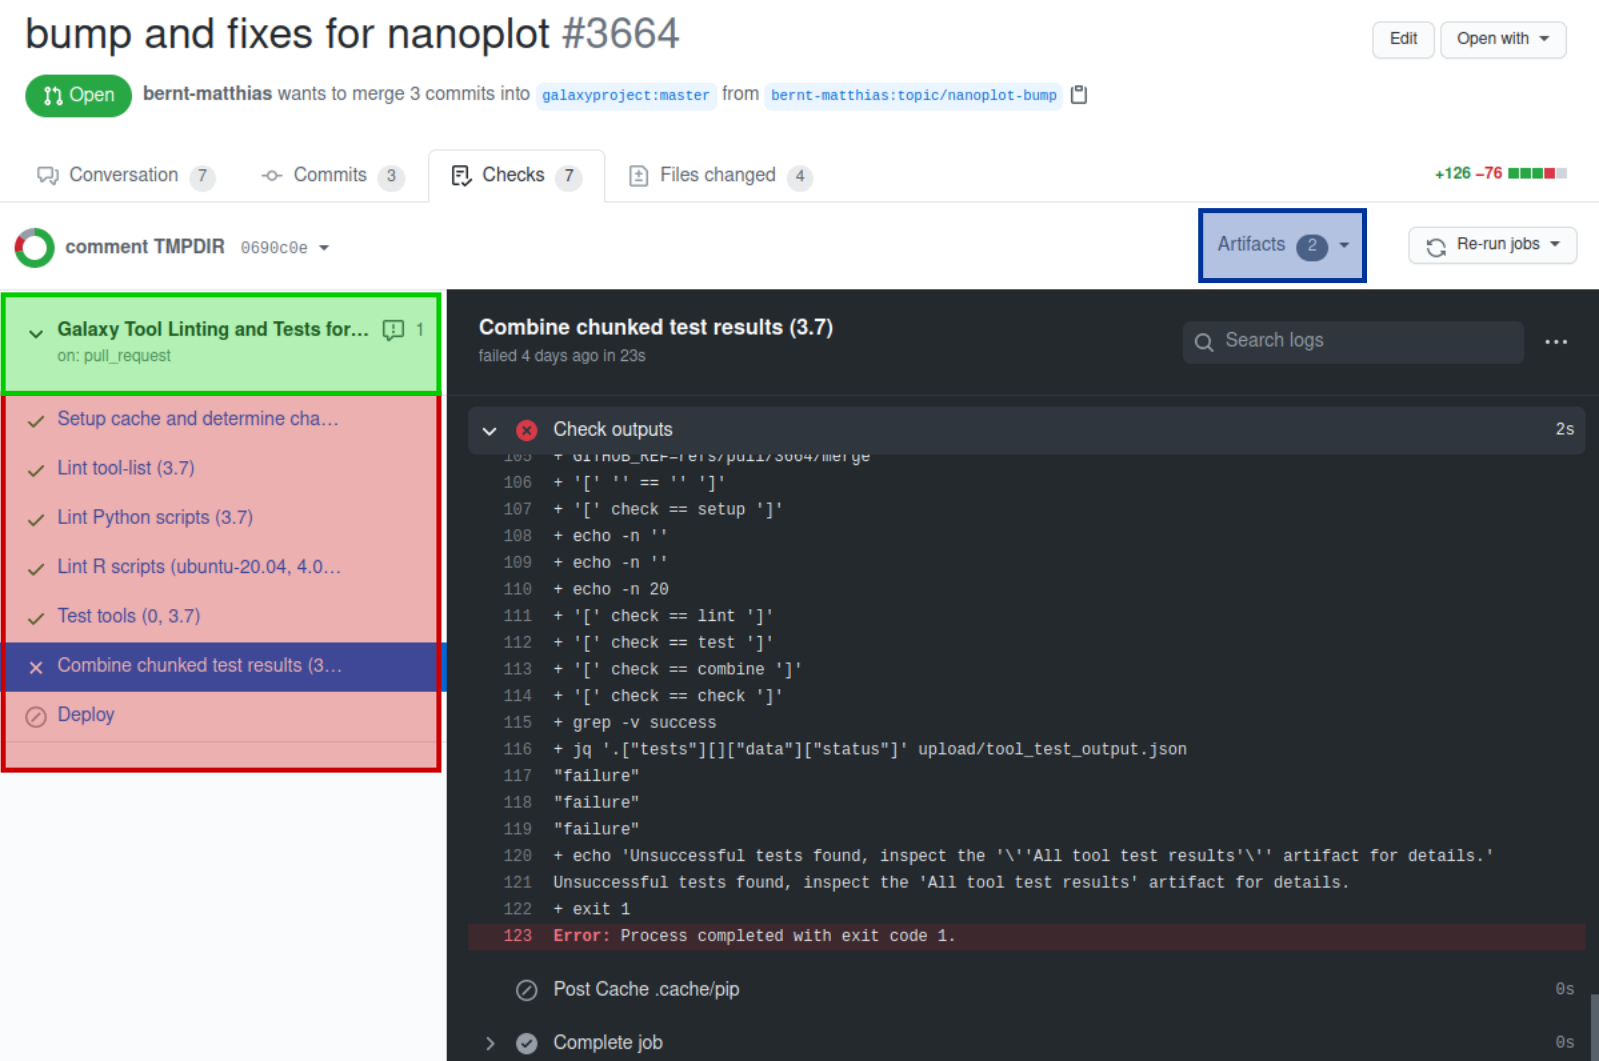
The CI jobs are listed on the bottom of the PR. Colored icons indicate the state of the jobs:
yellow circle: running
grey circled /: skipped
red x: failed job
green checkmark: successful job
The link “Details” on the right of the job brings you to a page showing the detailed output of the jobs (Alternatively the “Checks” tab on top of the PR page brings you to the CI output page.)
Green box: clicking this brings you to an overview page showing the CI workflow and listing errors and produced artifacts below.
Red box: the executed CI jobs. Clicking a job will show the outputs of the CI steps in the main (gray panel). The outputs of each step can be show by clicking on the corresponding step.
Blue box: direct link to the artifacts. This is currently the output of the “Combine tool test results” job: “All tool test results” (and the outputs of the separate tool test jobs which are a technical necessity and usually not relevant). Clicking “All tool test results” will trigger the download of a zip file that contains the planemo test html output. If the linting jobs have found errors then also their output will be provided as additional output.
Most of the steps executed in the jobs are boilerplate and only one/two steps in each stop are really relevant for the users:
Setup: show repository list – show tool list: here you can check if all repositories and tools that are changed in the PR are listed.
Lint tool-list: planemo lint – this contains the linter output of planemo test. Check here for non critical warning that would be good to fix.
Lint python scripts: flake8 – contains the output of the python linter flake8.
Lint R scripts: lintr – contains the output of the python linter lintr.
Test tools: planemo test – contains the output of planemo test.
Create your own IUC style tool repository
It is also easy to setup a github tool repository on your own that has the same structure and functionality as the IUC repository. This allows you to maintain the tools that you are developing on your own, but keep in mind the advantages of having tools in one of the community driven repositories (like long term support).
In order to setup your own tool repository the Galaxy community created a template repository. By clicking Use this template and follow the instructions in the README file you get you own tool repository.
Conclusion
You've Finished the Tutorial
Please also consider filling out the Feedback Form as well!
Key points
Galaxy tools are made in 3 parts – Conda, tool wrappers, and planemo
Anyone can write and deploy a tool wrapper!
Frequently Asked Questions
Have questions about this tutorial? Have a look at the available FAQ pages and support channels
Did you use this material as an instructor? Feel free to give us feedback on how it went.
Did you use this material as a learner or student? Click the form below to leave feedback.
Hiltemann, Saskia, Rasche, Helena et al., 2023 Galaxy Training: A Powerful Framework for Teaching! PLOS Computational Biology 10.1371/journal.pcbi.1010752
Batut et al., 2018 Community-Driven Data Analysis Training for Biology Cell Systems 10.1016/j.cels.2018.05.012
@misc{dev-tool-from-scratch,
author = "Alex Ostrovsky and Dave B. and Matthias Bernt",
	title = "Creating Galaxy tools from Conda Through Deployment (Galaxy Training Materials)",
	year = "",
	month = "",
	day = "",
	url = "\url{https://training.galaxyproject.org/training-material/topics/dev/tutorials/tool-from-scratch/tutorial.html}",
	note = "[Online; accessed TODAY]"
}
@article{Hiltemann_2023,
	doi = {10.1371/journal.pcbi.1010752},
	url = {https://doi.org/10.1371%2Fjournal.pcbi.1010752},
	year = 2023,
	month = {jan},
	publisher = {Public Library of Science ({PLoS})},
	volume = {19},
	number = {1},
	pages = {e1010752},
	author = {Saskia Hiltemann and Helena Rasche and Simon Gladman and Hans-Rudolf Hotz and Delphine Larivi{\`{e}}re and Daniel Blankenberg and Pratik D. Jagtap and Thomas Wollmann and Anthony Bretaudeau and Nadia Gou{\'{e}} and Timothy J. Griffin and Coline Royaux and Yvan Le Bras and Subina Mehta and Anna Syme and Frederik Coppens and Bert Droesbeke and Nicola Soranzo and Wendi Bacon and Fotis Psomopoulos and Crist{\'{o}}bal Gallardo-Alba and John Davis and Melanie Christine Föll and Matthias Fahrner and Maria A. Doyle and Beatriz Serrano-Solano and Anne Claire Fouilloux and Peter van Heusden and Wolfgang Maier and Dave Clements and Florian Heyl and Björn Grüning and B{\'{e}}r{\'{e}}nice Batut and},
	editor = {Francis Ouellette},
	title = {Galaxy Training: A powerful framework for teaching!},
	journal = {PLoS Comput Biol}
}
Congratulations on successfully completing this tutorial!
You can use Ephemeris's shed-tools install command to install the tools used in this tutorial.
5 stars:
Liked: Comprehensive
Disliked: end data tag is missing in outputs section , xml will fail to lint
March 2022
4 stars:
Liked: Explanations on how to create a galaxy tool
Disliked: Put planemo install first
4 stars:
Liked: clear for a beginner
Disliked: maybe planemo could be the first step, because needed in the wrapper section
February 2022
5 stars:
Liked: As usal, the step by step procedures.
Disliked: It is not clear that we have to set up the test-data folder and collect the bam files by our own for passing the test in the planemo section.
July 2021
5 stars:
Liked: Plenty of detail, teaching by example, and context provided
Disliked: > Written in markdown ### General - Should I be working in a clone of `galaxyproject/galaxy`? - Where are all the galaxy tools? They don't seem to be in the galaxy/tools/ dir? This is covered well in the "contributing" video at the end but could have mentioned briefly at the start. More generally, it would be good to explain that `galaxy-core` has built-in tools (with no `.shed.yml` file) and that all contributed tools (like we're building) are installed from an available toolshed. - I'm not sure if I should actually be following along with all of this... should I actually make a PR for a new Bioconda package in a tutorial? It would be great to clarify what the participant should be doing NOW versus what they would do in a genuine tool wrap. Also, presumably the package sometimes exists already in Bioconda? (I used an existing conda package in my 'practice' tool wrap). - At the end of the "Toolshed file" section: "In the case where the directory represents a group of tools or a ‘suite’, there are additional overarching sections into which the above tags fall" ... seems to imply that parent dirs can/should have a `.shed.yml` file too? Or is it only in `suite` and `suite/tool` dirs? Would be great to clarify or provide a link to a toolshed on GitHub as an example. - "Macros" section: should note that whitespace inside `` tags matters, and it will not be trimmed by the XML parser! (Should be picked up by the `planemo lint`) ### Typos - `bellerophon.xml` typo under "discover datasets": `directory="outputs"/>>` - And "Outputs section" (should have closing `/>` on `` according to planemo): `` - "crate an ad-hoc Galaxy" ### Planemo - Didn't work when `pip` installed into `conda` env (dependancy errors). `pip` install into a `virtualenv` env worked. - `pip` installing `planemo` into virtualenv requires `apt install python3-venv` as a dependancy **Some small issues with Planemo** - `tool_test_output.html` output is a bit weird to navigate - buttons don't look like buttons (no hover effect) so most of the content is hidden until you realise there are clickable elements - `planemo serve` doesn't print the local address at the end of output (had to scroll up a few pages to find `http://127.0.0.1:9090`)
Questions:
Open image in new tab
Open image in new tab
Open image in new tab
 Open image in new tab