In this tutorial, we’ll cover the basics of molecular modelling by setting up a protein in complex with a ligand and uploading the structure to Galaxy. This tutorial will make use of CHARMM-GUI. Please note that the follow-up to this tutorial (located in Running molecular dynamics simulations using NAMD) requires access to NAMD Galaxy tools, which can be accessed using the Docker container but are currently not available on any public Galaxy server.
Comment: Audience
This tutorial is intended for those who are new to the computational chemistry tools in Galaxy.
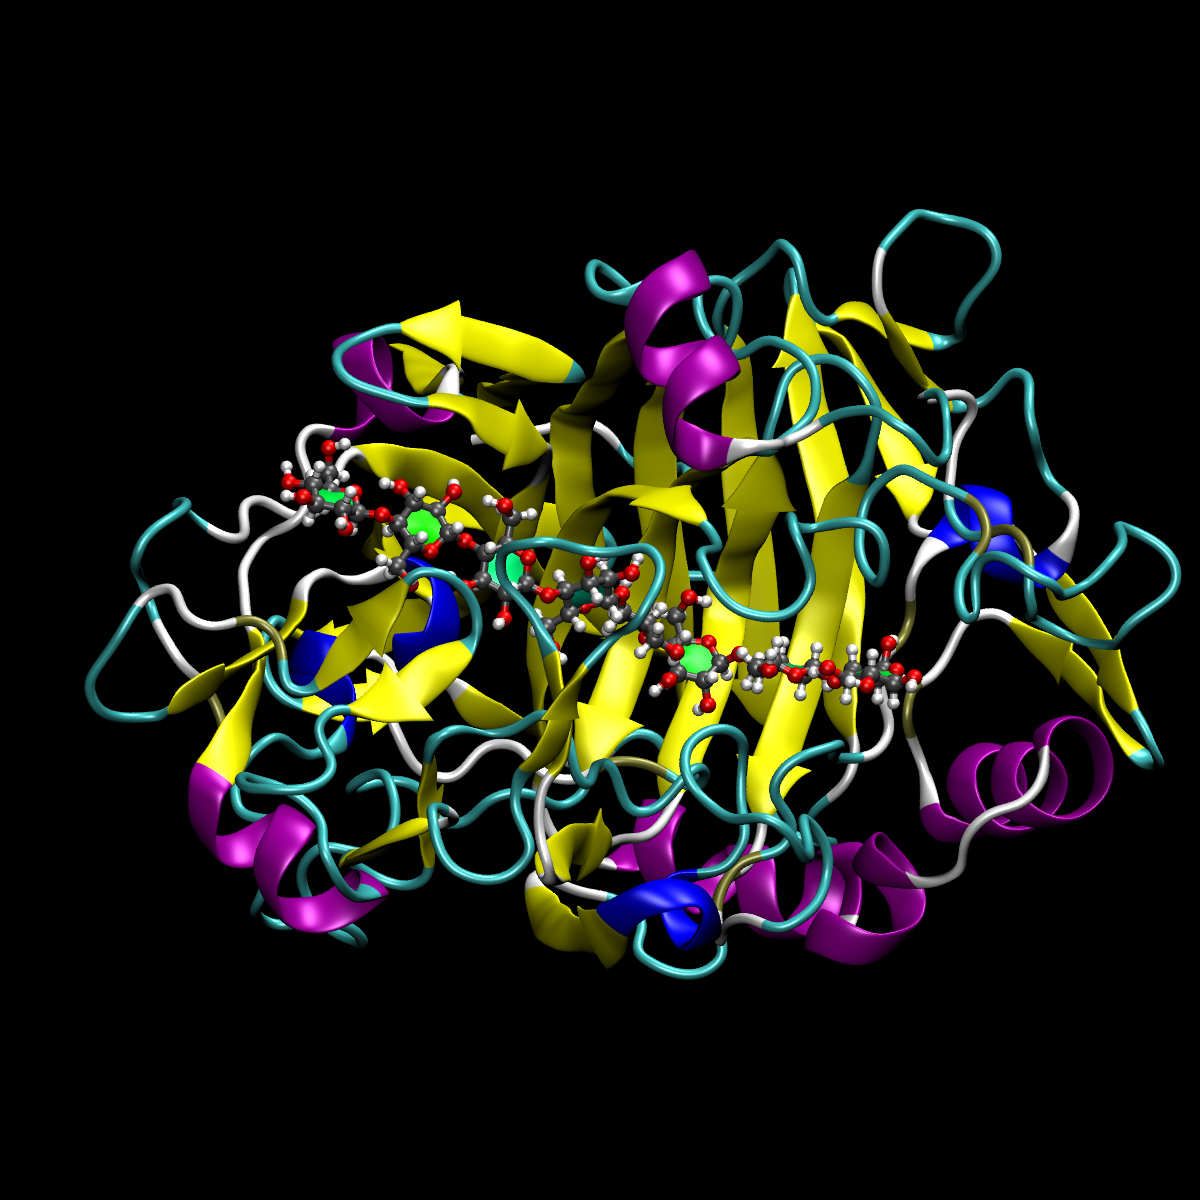
Figure 1: 7CEL Cellulase with a short chain cellulose (octaose) ligand
In this section we’ll access the PDB, download the correct structure, import it and view in Galaxy.
The Protein Data Bank (PDB) format contains atomic coordinates of biomolecules and provides a standard representation for macromolecular structure data derived from X-ray diffraction and NMR studies. Each structure is stored under a four-letter accession code. For example, the PDB file we will use is assigned the code 7CEL).
The 7CEL PDB does not include a complete 8 unit substrate and some modelling is required. The correctly modelled substrate is provided for this tutorial.
VMD (visualisation software) was used for atomic placement and CHARMM was used for energy minimisation.
The PDB structure contains a mutation at position 217 (glumatate to glutamine). Our structure reverses this.
The ligand was modelled separately and inserted into the binding site.
Hands On: Data upload
Create a new history for this tutorial.
To create a new history simply click the new-history icon at the top of the history panel:
Click galaxy-uploadUpload at the top of the activity panel
Select galaxy-wf-editPaste/Fetch Data
Paste the link(s) into the text field
Press Start
Close the window
As an alternative to uploading the data from a URL or your computer, the files may also have been made available from a shared data library:
Go into Libraries (left panel)
Navigate to the correct folder as indicated by your instructor.
On most Galaxies tutorial data will be provided in a folder named GTN - Material –> Topic Name -> Tutorial Name.
Select the desired files
Click on Add to Historygalaxy-dropdown near the top and select as Datasets from the dropdown menu
In the pop-up window, choose
“Select history”: the history you want to import the data to (or create a new one)
Click on Import
Rename the datasets.
Check that the datatype is correct. The file should have the PDB datatype.
Click on the galaxy-pencilpencil icon for the dataset to edit its attributes
In the central panel, click galaxy-chart-select-dataDatatypes tab on the top
In the galaxy-chart-select-dataAssign Datatype, select pdb from “New Type” dropdown
Tip: you can start typing the datatype into the field to filter the dropdown menu
Click the Save button
Modelling with CHARMM-GUI
It is convenient to set up the molecular system outside Galaxy using a tool such as CHARMM-GUI. Alternative methods are possible - see the GROMACS tutorial for an example. Jo et al. 2016
Some of the figures are screenshots and it may be difficult to make out details
Right-click on the image and choose ‘Open image in new tab’ to view
Go to the correct section depending on which MD engine you will be using.
CHARMM
Upload the PDB to CHARMM-GUI
Navigate to CHARMM-GUI and use the Input Generator, specifically the PDB Reader tool and upload the Cellulase PDB file. Press ‘Next Step: Select Model/Chain’ in the bottom right corner.
Two model chains are presented for selection: the protein (PROA) and the hetero residue, which is the ligand or glycan in this case (HETA). Select both, and press ‘Next Step: Generate PDB’ in the bottom right corner.
Figure 4: Select both ligand and protein models in CHARMM-GUI
Manipulate the system
Hands On: Make necessary modifications
Rename the hetero chain to BGLC and add ten disulfide bonds to the protein, as shown in the figure. Then press ‘Next Step: Generate PDB’ in the bottom right corner.
This is a compressed file which contains all the output files created by the CHARMM-GUI. To access them, the .tgz file needs to be decompressed. There should be a tool available on your operating system for this. If you prefer to use the command line, tar will work fine on Linux or Mac tar -zxvf example.tgz. On Windows use 7zip, or download Git for windows and use Git Bash.
Upload to Galaxy
Hands On: Upload files to Galaxy
Upload the step1_pdbreader.psf and step1_pdbreader.crd files to your Galaxy instance and run the system setup tool.
NAMD
Upload the PDB to CHARMM-GUI
Hands On: Upload the PDB to CHARMM-GUI
Retrieve the modelled PDB structure from Zenodo.
Navigate to CHARMM-GUI and use the Input Generator, specifically the Solution Builder tool. Upload the PDB file, selecting ‘CHARMM’ as the file format. Press ‘Next Step: Select Model/Chain’ in the bottom right corner.
Two model chains are presented for selection: the protein (PROA) and the hetero residue, which is the ligand or glycan in this case (HETA). Select both, and press ‘Next Step: Generate PDB’ in the bottom right corner.
Why is 10 angstrom a fair choice for the buffer? Why choose 0.15M NaCl?
Under periodic boundary conditions, we need to ensure the protein can never interact with its periodic image, otherwise artefacts are introduced. Allowing 10 angstroms between the protein and the box edge ensures the two images will always be at minimum 20 angstroms apart, which is sufficient.
Some of the residues on the protein surface are charged and counter-ions need to be present nearby to neutralise them. Failure to explicitly model salt ions may destabilise the protein.
Generate the FFT automatically
Hands On: Generate the FFT
Particle Mesh Ewald (PME) summation is the method being used to calculate long-range interactions in this system. To improve the computational time a Fast Fourier Transform (FFT) is used. A detailed discussion of FFT will not be presented here; there are many articles on the subject. Try Wikipedia and Toukmaji and Board 1996.
This is a compressed file and needs to be uncompressed using the correct tool.
On Linux or Mac: tar will work fine tar -zxvf example.tgz.
On Windows use 7zip or download Git for windows and use Git Bash.
Upload to Galaxy
Hands On: Upload files to Galaxy
Upload the following files to your Galaxy instance and ensure the correct datatype is selected:
You are now ready to run the NAMD workflow, which is discussed in another tutorial.
Conclusion
trophy Well done! You have started modelling a cellulase protein and uploaded it into Galaxy. The next step is running molecular dynamics simulations (tutorial)
You've Finished the Tutorial
Please also consider filling out the Feedback Form as well!
Key points
The PDB is a key resource for finding protein structures.
Using CHARMM-GUI is one way to prepare a protein and ligand system.
To get data into Galaxy you can upload a file from your computer or paste in a web address.
Frequently Asked Questions
Have questions about this tutorial? Have a look at the available FAQ pages and support channels
Further information, including links to documentation and original publications, regarding the tools, analysis techniques and the interpretation of results described in this tutorial can be found here.
References
Toukmaji, A. Y., and J. A. Board, 1996 Ewald summation techniques in perspective: a survey. Computer Physics Communications 95: 73–92. 10.1016/0010-4655(96)00016-1
Barnett, C. B., K. A. Wilkinson, and K. J. Naidoo, 2010 Pyranose Ring Transition State Is Derived from Cellobiohydrolase I Induced Conformational Stability and Glycosidic Bond Polarization. J. Am. Chem. Soc. 132: 12800–12803. 10.1021/ja103766w
Barnett, C. B., K. A. Wilkinson, and K. J. Naidoo, 2011 Molecular Details from Computational Reaction Dynamics for the Cellobiohydrolase I Glycosylation Reaction. Journal of the American Chemical Society 133: 19474–19482. 10.1021/ja206842j
Payne, C. M., B. C. Knott, H. B. Mayes, H. Hansson, M. E. Himmel et al., 2015 Fungal Cellulases. Chem. Rev. 115: 1308–1448. 10.1021/cr500351c
Jo, S., X. Cheng, J. Lee, S. Kim, S.-J. Park et al., 2016 CHARMM-GUI 10 years for biomolecular modeling and simulation. Journal of Computational Chemistry 38: 1114–1124. 10.1002/jcc.24660
Feedback
Did you use this material as an instructor? Feel free to give us feedback on how it went.
Did you use this material as a learner or student? Click the form below to leave feedback.
Hiltemann, Saskia, Rasche, Helena et al., 2023 Galaxy Training: A Powerful Framework for Teaching! PLOS Computational Biology 10.1371/journal.pcbi.1010752
Batut et al., 2018 Community-Driven Data Analysis Training for Biology Cell Systems 10.1016/j.cels.2018.05.012
@misc{computational-chemistry-setting-up-molecular-systems,
author = "Christopher Barnett and Simon Bray and Nadia Goué",
	title = "Setting up molecular systems (Galaxy Training Materials)",
	year = "",
	month = "",
	day = "",
	url = "\url{https://training.galaxyproject.org/training-material/topics/computational-chemistry/tutorials/setting-up-molecular-systems/tutorial.html}",
	note = "[Online; accessed TODAY]"
}
@article{Hiltemann_2023,
	doi = {10.1371/journal.pcbi.1010752},
	url = {https://doi.org/10.1371%2Fjournal.pcbi.1010752},
	year = 2023,
	month = {jan},
	publisher = {Public Library of Science ({PLoS})},
	volume = {19},
	number = {1},
	pages = {e1010752},
	author = {Saskia Hiltemann and Helena Rasche and Simon Gladman and Hans-Rudolf Hotz and Delphine Larivi{\`{e}}re and Daniel Blankenberg and Pratik D. Jagtap and Thomas Wollmann and Anthony Bretaudeau and Nadia Gou{\'{e}} and Timothy J. Griffin and Coline Royaux and Yvan Le Bras and Subina Mehta and Anna Syme and Frederik Coppens and Bert Droesbeke and Nicola Soranzo and Wendi Bacon and Fotis Psomopoulos and Crist{\'{o}}bal Gallardo-Alba and John Davis and Melanie Christine Föll and Matthias Fahrner and Maria A. Doyle and Beatriz Serrano-Solano and Anne Claire Fouilloux and Peter van Heusden and Wolfgang Maier and Dave Clements and Florian Heyl and Björn Grüning and B{\'{e}}r{\'{e}}nice Batut and},
	editor = {Francis Ouellette},
	title = {Galaxy Training: A powerful framework for teaching!},
	journal = {PLoS Comput Biol}
}
Congratulations on successfully completing this tutorial!
Do you want to extend your knowledge?
Follow one of our recommended follow-up trainings:
Questions:
 Open image in new tab

 Open image in new tab
Open image in new tab
Open image in new tab
Open image in new tab
Open image in new tab
Open image in new tab
Open image in new tab
Open image in new tab
Open image in new tab
