Annotate, prepare tests and publish Galaxy workflows in workflow registries
| Author(s) |
|
| Reviewers |
|
OverviewQuestions:
Objectives:
How can a Galaxy workflow be annotated to improve reusability?
What are the best practices for testing a Galaxy workflow?
How can a Galaxy workflow be submitted to the Intergalactic Workflow Commission (IWC)?
Requirements:
Annotate a Galaxy workflows with essential metadata
Annotate and apply best practices to data analysis Galaxy workflows for consistency and reusability
Implement robust tests to ensure workflow reliability and accuracy
Successfully integrate key data analysis Galaxy workflows into IWC, improving accessibility and usability
- tutorial Hands-on: Galaxy Basics for genomics
- tutorial Hands-on: Creating, Editing and Importing Galaxy Workflows
Time estimation: 2 hoursLevel: Intermediate IntermediateSupporting Materials:Published: May 26, 2025Last modification: May 26, 2025License: Tutorial Content is licensed under Creative Commons Attribution 4.0 International License. The GTN Framework is licensed under MITpurl PURL: https://gxy.io/GTN:T00533version Revision: 1
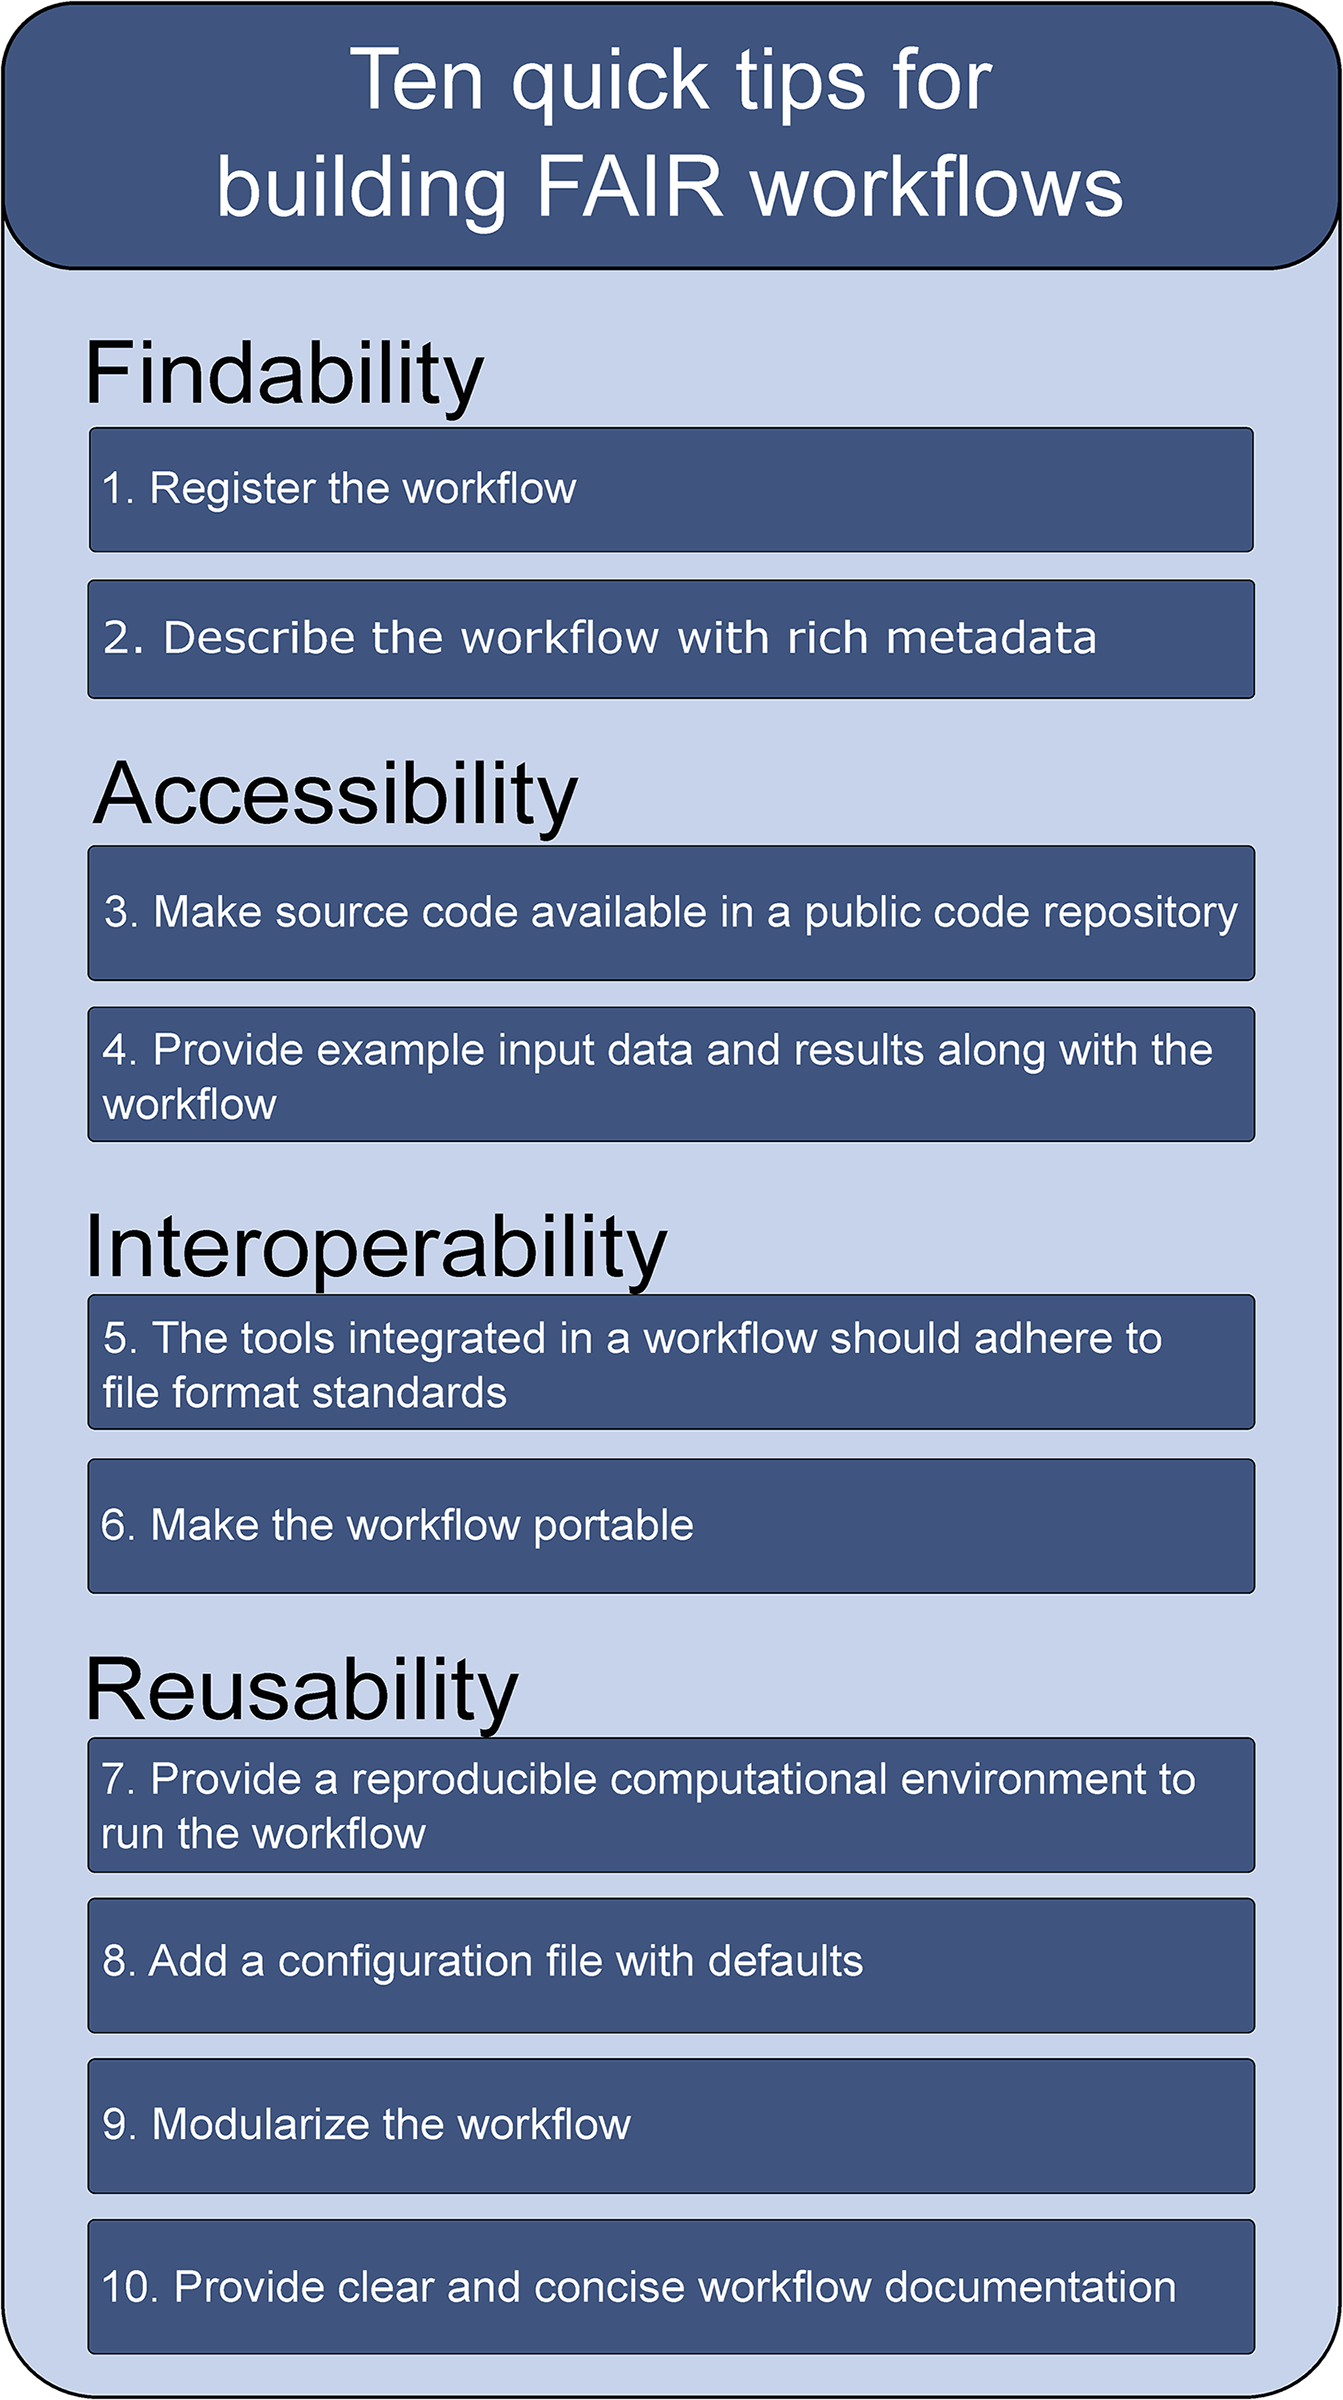
Research data is accumulating at an unprecedented rate, presenting significant challenges for achieving fully reproducible science. As a result, implementing high-quality management of scientific data has become a global priority. One key aspect of this effort is the use of computational workflows, which describe the complex, multi-step methods used for data analysis. In Galaxy, workflows are a powerful feature that allows researchers to link multiple steps of complex analyses seamlessly. To maximize their impact, these workflows should adhere to best practices that make them FAIR: Findable, Accessible, Interoperable, and Reusable.
The FAIR principles —-Findable, Accessible, Interoperable, and Reusable—- provide practical guidelines for enhancing the value of research data:
- Findable: Easy to locate through rich metadata and unique identifiers.
- Accessible: Stored in a way that allows them to be retrieved by those who need them.
- Interoperable: Usable across different systems and platforms without extensive adaptation.
- Reusable: Well-documented and clearly licensed to enable reuse in different contexts.
Comment
You can learn more about FAIR Data, Workflows, and Research in our dedicated topic with numerous tutorials
Applying these principles to workflows is equally important for good data management:
- Enhanced Discoverability: Well-annotated and documented workflows are easier to find, making them more likely to be used and cited.
- Improved Reproducibility: Standardized and tested workflows ensure that analyses can be reproduced, validating research findings.
- Community Collaboration: Sharing workflows through centralized registries fosters collaboration and innovation within the bioinformatics community.
- Sustainability: Regular updates and versioning ensure that workflows remain compatible with the latest tools, extending their lifespan and utility.
While making a workflow FAIR might seem complicated (Wilkinson et al. 2025, Goble et al. 2020), publications like “Ten quick tips for building FAIR workflows” (de Visser et al. 2023) provide practical guidelines to simplify the process:
 Open image in new tab
Using Galaxy as a workflow management system, many of these tips (all related to Interoperability and Reusability) are already fulfilled:
- Tip 5 (Interoperability): “The tools integrated in a workflow should adhere to file format standards.”
- Tip 6 (Interoperability): “Make the workflow portable.”
- Tip 7 (Reusability): “Provide a reproducible computational environment to run the workflow.”
- Tip 8 (Reusability): “Add a configuration file with defaults.”
- Tip 9 (Reusability): “Modularize the workflow.”
In this tutorial, we will demonstrate how to fulfill the remaining tips:
- Tip 1 (Findability): “Register the workflow.”
- Tip 2 (Findability): “Describe the workflow with rich metadata.”
- Tip 3 (Accessibility): “Make source code available in a public code repository.”
- Tip 4 (Accessibility): “Provide example input data and results along with the workflow.”
- Tip 10 (Reusability): “Provide clear and concise workflow documentation.”
To illustrate the process, we will use a simple workflow with 2 steps as an example.
AgendaIn this tutorial, we will cover:
Prepare the workflow
Here, we will use a workflow running Falco (FastQC alternative, de Sena Brandine and Smith 2021) and MultiQC (Ewels et al. 2016) but you can use your own workflow.
Hands On: Create the workflow into Galaxy
- Go to the workflow page
Create a new workflow
- Click Workflow on the top bar
- Click the new workflow galaxy-wf-new button
- Give it a clear and memorable name
- Clicking Save will take you directly into the workflow editor for that workflow
- Need more help? Please see the How to make a workflow subsection here
Add a single data input
Add Falco ( Galaxy version 1.2.4+galaxy0) and MultiQC ( Galaxy version 1.27+galaxy3)
- Connect the input to Falco
- Define MultiQC parameter
- Which tool was used generate logs?:
FastQC- Connect
text_fileFalco to MultiQC input
Annotate the Galaxy workflow with essential metadata
The first step to FAIRify a Galaxy workflow is to fulfill Tip 2 (Findability): “Describe the workflow with rich metadata”. Describing the workflow with rich metadata helps both humans and machines understand its purpose, facilitating discovery by search engines. Galaxy allows to associate workflows with metadata directly in its interface.
Hands On: Open workflow attributes
- Click on Attributes on the left side of the workflow editor (or right side for older Galaxy version for clicking on galaxy-pencil Edit Attributes)
Some workflow metadata should appear.
Question
- What is the name of the workflow?
- “Unnamed Workflow”
Metadata should include details about the workflow’s components and clearly outline its purpose, scope, and limitations. This ensures the workflow is easily findable and understandable.
QuestionWhich metadata is supported in Galaxy workflow interface?
Galaxy workflow interface supports:
- Name
- Version
- Annotation: These notes will be visible when this workflow is viewed.
- License
- Creator: Either a person or an organization.
- Tags: Apply tags to make it easy to search for and find items with the same tag.
Galaxy workflow interface supports some metadata. Are they enough to fulfill Tip 2 and also Tip 1 “Register the workflow.”? WorkflowHub, a workflow registry we will explain more later, supports the following metadata:
| Name | Description | Mandatory |
|---|---|---|
| Title | This field is mandatory and is with some workflow types pre-filled with the title of the workflow. | Yes |
| Description | If a CWL (abstract) file is given, the description will be parsed automatically out of the doc attribute. In any other case this field can be used to write some documentation that will be shown on the workflow page. | No |
| Source | If the workflow came from an external repository (i.e. GitHub), you can include its original URL here. | No |
| Maturity | This field can be used to specify in which maturity state the workflow is. The two available options are: work-in-progress, stable |
No |
| Teams | Every workflow registration is linked to one or more teams. | Yes |
| Licence | The standard licence is Apache Software Licence 2.0. If you did not make the workflow yourself, be sure that the licence corresponds to the licence where you took the workflow from (for example github licences). | No |
| Sharing | Specify who can view the summary, get access to the content, and edit the Workflow. This is possibly already filled in according to the selected project. | No |
| Tags | Choose an appropriate tag for your workflow. Please check if your tag is already available and use the existing one if so. If you make a new tag, keep it simple without capitals or spaces. For example all new covid-19 workflows need to be tagged with covid-19. | No |
| Creators | This is an important section where all the people that were involved in making / publishing this workflow are listed. | No |
Question
- Which WorkflowHub metadata is supported in Galaxy workflow interface?
- Which values should we put for our workflow?
Workflow metadata Galaxy metadata Mapping workflow value Title Name Quality control and mapping Description Annotation Workflow runs quality control and mapping of paired-end short-reads data. Source Not supported in Galaxy workflow interface Teams Not supported in Galaxy workflow interface License License MIT License Sharing Supported in Galaxy workflow interface but not in the same way as WorkflowHub Tags Tags sequence-analysis,mappingCreators Creator
Let’s annotate the workflow
Hands On: Add metadata to the workflow
- Add a proper title in Name
- Add a workflow description in Annotation
Select a license in License
CommentThe most appropriate license are MIT or GNU Affero (if you want a copyleft).
Add creators in Creator with their name and a unique identifier (typically an orcid.org ID)
CommentDo not forget to click on Save
- Add tags in Tags
- Save the workflow
Tip 2 is now fulfilled. We can now move toward the other recommendations:
- Tip 1 (Findability): “Register the workflow.”
- Tip 3 (Accessibility): “Make source code available in a public code repository.”
- Tip 4 (Accessibility): “Provide example input data and results along with the workflow.”
-
Tip 10 (Reusability): “Provide clear and concise workflow documentation.”
The workflow annotation provides a short and concise description of the workflow. So Tip 10 is partially fullfilled. In addition to the workflow annotation, each step could annotated and commented so users could have an idea about the purpose of the steps
Let’s add label and annotation to each step and comments to the workflow.
Hands On: Add tool label and annotation and comments- Add tool label and step annotation to Falco
- Click on Falco
- Fill in Label with
Quality controlin the right panel - Fill in Step Annotation with
This step uses Falco (FastQC alternative) to generate statistics of raw reads quality including basic statistics, per base sequence quality, per sequence quality scores, adapter content, etc. - Save the workflow
- Add tool label and step annotation to MultiQC
- Add comments and annotations to workflow to create an high resolution image of the Galaxy Workflow by following the dedicated tutorial
- Add tool label and step annotation to Falco
Before we care about Tip 3 and 4, lets use the build-in Galaxy Wizard to check if our workflow adheres to best practices of Galaxy workflows.
Adhere to best practices for Galaxy workflows
Galaxy has a build-in Wizard to check against community developed best practice workflows. It will recommend to use a License, add Authors etc but also ensures that workflows are easy to test, that they are usable as subworkflows and invocation reports, and can be consumed easily via an API. The reusablility will be greatly enhanced if you stick to those recommendations.
Hands On: Check alignment with best practices
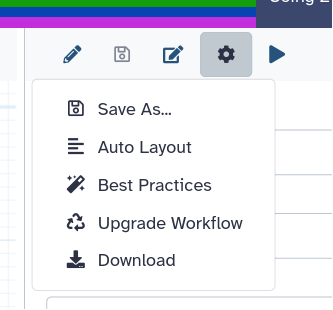
Click on galaxy-wf-best-practices Best Practices on the right
When you are editing a workflow, there are a number of additional steps you can take to ensure that it is a Best Practice workflow and will be more reusable.
- Open a workflow for editing
- In the workflow menu bar, you’ll find the galaxy-wf-options Workflow Options dropdown menu.
Click on it and select galaxy-wf-best-practices Best Practices from the dropdown menu.
This will take you to a new side panel, which allows you to investigate and correct any issues with your workflow.
The Galaxy community also has a guide on best practices for maintaining workflows. This guide includes the best practices from the Galaxy workflow panel, plus:
- adding tests to the workflow
- publishing the workflow on GitHub, a public GitLab server, or another public version-controlled repository
- registering the workflow with a workflow registry such as WorkflowHub or Dockstore
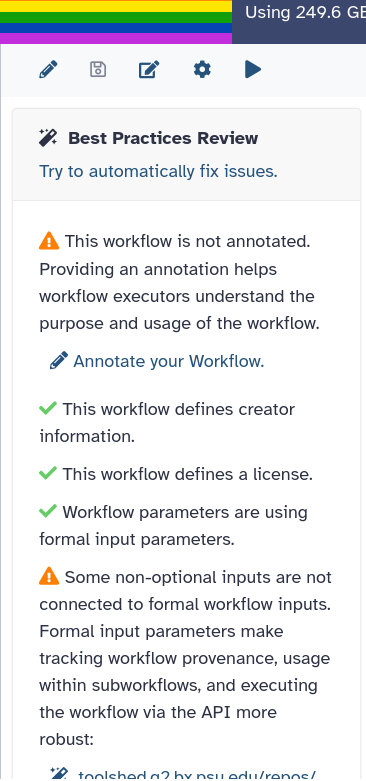
A side panel will open showing a review of the best practices with
- Green checks indicating that certain elements are already correctly defined (e.g., creator information, license).
- Orange warnings highlighting potential issues such as missing annotations, unconnected inputs, or other workflow problems.
By following the steps with orange warnings and checking the side panel, we will ensure our workflow adheres to best practices and is ready for public use.
QuestionHow many orange warnings do we have?
2
The first warning is Some workflow inputs are missing labels and/or annotations. To follow best practices, all inputs should be explicit (with labelled input nodes) and tool steps should not have disconnected data inputs (even though the GUI can handle this) or consume workflow parameters. Older style “runtime parameters” should only be used for post job actions and newer type workflow parameter inputs should be used to manipulate tool logic.
Hands On: Add label to input
- Click on Input dataset: Missing a label and annotation
- Fill in Label in the
1: Input datasetside panel that opened on the right- Save the workflow
- Check the best practices
QuestionIs it okay for the input?
The input is missing an annotation
Let’s add annotation to input.
Hands On: Add annotation to input
- Click on Input dataset: Missing a label and annotation
- Fill in Annotation in the
1: Input datasetside panel that opened on the right- Save the workflow
- Check the best practices
We now have a green check for the input. The second orange warning mentions This workflow has no labeled outputs, please select and label at least one output.
As for inputs, workflows should define explicit, labeled outputs. While Galaxy does not require this, declaring and labeling outputs offers significant advantages. A workflow with clearly defined outputs provides an explicit interface, making it easier to generate reports, test the workflow, and document them.
Hands On: Add labels to outputs
- Rename labels for all outputs to add tool name (e.g. Falco
text_filebecomesfalco_text_file)- Check boxes on the left of HTML outputs of both Falco and MultiQC in the middle pannel
- Save the workflow
- Check the best practices
QuestionIs the workflow following all best practices?
Yes!
After confirming that all the best practices are applied, make the workflow public. This allows other users to access, reuse, and share the workflow in the Galaxy community.
Hands On: Make the workflow public
Make the workflow public
- Click on galaxy-workflows-activity Workflows in the Galaxy activity bar (on the left side of the screen, or in the top menu bar of older Galaxy instances). You will see a list of all your workflows
- Click on the history-share Share button of the workflow you would like to publish
- Click on Make Workflow accessible. This makes the workflow publicly accessible but unlisted.
- To also list the workflow for all users on the Public workflows tab of the galaxy-workflows-activity Workflows page, click Make Workflow publicly available in Published Workflows
Prepare example input data and results
To fulfill Tip 4 (“Provide example input data and results along with the workflow.”), we will create test data that can be used to test the workflow. The data should be small and simple, so it can interact with the workflow and generate results without excessive processing time.
Hands On: Create an example Galaxy History
Create a new Galaxy history for this analysis.
To create a new history simply click the new-history icon at the top of the history panel:
Rename the history.
- Click on galaxy-pencil (Edit) next to the history name (which by default is “Unnamed history”)
- Type the new name
- Click on Save
- To cancel renaming, click the galaxy-undo “Cancel” button
If you do not have the galaxy-pencil (Edit) next to the history name (which can be the case if you are using an older version of Galaxy) do the following:
- Click on Unnamed history (or the current name of the history) (Click to rename history) at the top of your history panel
- Type the new name
- Press Enter
galaxy-upload Upload test data to the newly created history from the following link:
https://zenodo.org/record/3977236/files/female_oral2.fastq-4143.gz
- Copy the link location
Click galaxy-upload Upload at the top of the activity panel
- Select galaxy-wf-edit Paste/Fetch Data
Paste the link(s) into the text field
Press Start
- Close the window
galaxy-eye Preview the datasets to verify that the uploaded data looks correct and is ready for analysis.
Run the workflow using the uploaded test data.
- Click on Workflows on the Activity Bar on the left.
- At the top of the resulting page you will have the option to switch between the My workflows, Workflows shared with me and Public workflows tabs.
- Select the tab you want to see all workflows in that category
Search for your desired workflow.
- Click on the workflow name: a pop-up window opens with a preview of the workflow.
- To run it directly: click Run (top-right).
- Recommended: click Import (left of Run) to make your own local copy under Workflows / My Workflows.
Make the history public
Sharing your history allows others to import and access the datasets, parameters, and steps of your history.
Access the history sharing menu via the History Options dropdown (galaxy-history-options), and clicking “history-share Share or Publish”
- Share via link
- Open the History Options galaxy-history-options menu at the top of your history panel and select “history-share Share or Publish”
- galaxy-toggle Make History accessible
- A Share Link will appear that you give to others
- Anybody who has this link can view and copy your history
- Publish your history
- galaxy-toggle Make History publicly available in Published Histories
- Anybody on this Galaxy server will see your history listed under the Published Histories tab opened via the galaxy-histories-activity Histories activity
- Share only with another user.
- Enter an email address for the user you want to share with in the Please specify user email input below Share History with Individual Users
- Your history will be shared only with this user.
- Finding histories others have shared with me
- Click on the galaxy-histories-activity Histories activity in the activity bar on the left
- Click the Shared with me tab
- Here you will see all the histories others have shared with you directly
Note: If you want to make changes to your history without affecting the shared version, make a copy by going to History Options galaxy-history-options icon in your history and clicking Copy this History


With this example history we fulfilled Tip 4. We will now fulfill Tip 1 (“Register the workflow.”) and Tip 3 (“Make source code available in a public code repository.”) at the same time
Register the workflow by making the workflow available in the public IWC GitHub repository
To make your workflow FAIR, it’s essential to start by making it findable. Let’s now register the workflow in a public registry that enables systematic scientific annotations and supports multiple workflow languages. We recommend using specialized workflow registries such as WorkflowHub (Gustafsson et al. 2024) or Dockstore (Yuen et al. 2021), which cater to workflows written in different languages and provide unique features like digital object identifiers (DOIs) for easy citation and version tracking.
A Galaxy workflow can be registered by anyone on the WorkflowHub and Dockstore by following their documentation. In this section, we will see how to register a workflow on both WorkflowHub and Dockstore (Tip 1 - “Register the workflow.”) by making it available in a public GitHub repository (Tip 3 - “Make source code available in a public code repository.”) maintained by the Intergalactic Workflow Commission (IWC), a Galaxy community effort.
The IWC maintains high-quality Galaxy Workflows via a Galaxy Workflows Library. All workflows are reviewed and tested before publication and with every new Galaxy release. Deposited workflows follow best practices and are versioned using GitHub releases. Workflows also contain important metadata. Additionally the IWC collects further best practices, tips and tricks, FAQs and assists the community in designing high-quality Galaxy workflows.
IWC offer guidelines for adding workflow that will go through:
- Check for workflow eligibility
- Ensure workflows follow best-practices (already done)
- Generate tests
Check for workflow eligibility
IWC collects production workflows targeted at users that want to analyze their own data. As such, the workflow should be sufficiently generic that users can provide their own data.
IWC encourage, but do not require, links to related Galaxy Training Network Tutorials. Importantly, each workflow should be described in a way that a user can run the workflow on their own data without modifying the workflow. If we want to deposit a workflow that accompanies a tutorial we have to make sure that the workflow does not refer to datasets that only make sense in the context of the tutorial.
By fulfilling the first Tips as we did before, we guarantee for workflow eligibility.
Generate tests
This is usually the most difficult part and we encourage all new contributors to IWC to propose their workflows even if they did not managed to generate tests. However, the publication of these workflow will be speed up if tests are already present.
Find input datasets
To test the workflow, we need input datasets. By fulfilling Tip 4 (“Provide example input data and results along with the workflow.”), we generated a toy dataset. We now need to publish it to Zenodo to have a permanent URL, also allowing others to easily retrieve and reuse the data when running or validating the workflow.
Hands On: Upload test data to Zenodo
- Create an account on Zenodo or log in using your GitHub account.
- Click on the ”+” button at the top of the page and select “New upload”.
- Drag and drop the test dataset files into the upload area.
- Fill in the metadata:
- Resource type:
Dataset.- Title:
Dataset for "..." workflow- Creator: Add the relevant author(s).
- Description:
This dataset is associated with the Galaxy workflow "..."- License: Choose
GNU General Public License v3.0 or later- Click “Publish” to make the dataset publicly available.
Uploading test data to Zenodo ensures that it has a permanent DOI, making it easy to reference in workflow documentation, publications, and testing pipelines.
Generate test from a workflow invocation
To generate tests, we can either write test cases by hand, or use a workflow invocation to generate a test case. We will do the second case. Let’s first prepare the folder to store the tests in the IWC git repository.
Hands On: Prepare the folder for the tests
Fork the IWC GitHub repositoryto your GitHub account.
Clone your fork locally:
git clone https://github.com/yourusername/iwc.git
cd iwc
Create a new branch for adding the workflow:
git checkout -b add-new-workflowCreate a new directory under one of the directories that represent categories
CommentIf no category is suitable, we can create a new category directory. We should name the directory that contains our workflow(s) appropriately, as it will become the name of the repository deployed to iwc-workflows GitHub organization and only use lower-case and
-in names of categories and repositories.Move the newly created directory
We have earlier executed the workflow on our example dataset. We can use this workflow invocation to generate the tests using Planemo, a software development kit for tools and workflows (Bray et al. 2023)
Hands On: Extract the tests from the example history workflow invocation
Install Planemo (if not already installed) by following the Planemo installation guide.
Get your Galaxy API key from the Galaxy server.
- In your browser, open your Galaxy homepage
- Log in, or register a new account, if it’s the first time you’re logging in
- Go to
User -> Preferencesin the top menu bar, then click onManage API key- If there is no current API key available, click on
Create a new keyto generate it- Copy your API key to somewhere convenient, you will need it throughout this tutorial
Get the workflow invocation.
- Go to the workflow invocations page
- Before Galaxy 24.0: Go to User > Workflow Invocations
- In Galaxy 24.0: Go to Data > Workflow Invocations
- Above Galaxy 24.1: Go to Workflow Invocation in the activity bar on the left
- Open the most recent item
- Find the invocation id:
Below 24.0, you can get it here:
Above Galaxy 24.1 (activity bar), you can find the workflow invocation id from the URL. For example,
https://usegalaxy.org/workflows/invocations/be5c48c113145dd5means that the workflow invocation id isbe5c48c113145dd5.Extract the workflow with test data using:
planemo workflow_test_init \
   --from_invocation <workflow_invocation_id> \
   --galaxy_url <galaxy_server_url> \
   --galaxy_user_key <your_api_key>

This will place in the current working directory:
- a
<workflow_name>.gawith the workflow - a
<workflow_name-test>.ymlto describe the tests - a
test-datafolder with input file and selected outputs
QuestionIn the
<workflow_name-test>.yml,
- How is the input file provided?
- How are the workflow outputs checked for validity?
- How big are the files in the
test-datafile?
The input file is given by:
job:
  FastQ:
    class: File
    path: test-data/FastQ.fastqsanger.gz
    filetype: fastqsanger.gz
The workflow outputs are checked for validity by comparing the generated outputs to the files stored in the
test-datafolder.outputs: multiqc_html: path: test-data/multiqc_html.html falco_html: path: test-data/falco_html.htmlThe files are quite large:
FastQ.fastqsanger.gz: 132 KBfalco_html.html: 169 KBmultiqc_html.html: 5 MB
The HTML files in the test-data folder are quite large, above the 1 MB limit of IWC. To limit the size in the IWC GitHub repository, we will remove test files in test-data folder. To do that, we will:
- use the file stored on Zenodo for the input.
-
edit the test comparisons to use assertions testing the output content, rather than comparing the entire output file with test data.
The description of assertion can be find in the Galaxy XML documentation.
Do not hesitate to look at different test files in the IWC GitHub for examples.
Hands On: Edit the test description
- Remove the
test-datafolderOpen the
<workflow_name-test>.ymlfileReplace the
pathof input by the Zenodo URL:https://zenodo.org/record/3977236/files/female_oral2.fastq-4143.gzEnsure all test output names are included.
For Falco step
- Open the Falco HTML output on Galaxy
- Search for a text specific to this data (e.g.
female_oral2_fastq-4143_gz.gzhere)Replace in the
<workflow_name-test>.ymlfile thepathline offalco_htmloutput by:asserts: has_text: text: "female_oral2_fastq-4143_gz.gz"- Do the same for MultiQC
- Save the file
CommentIf the workflow is using build-in indexes, we should use the available indexes on CernVM-FS (CVMFS), a distributed filesystem perfectly designed for sharing readonly data across the globe. IWC continuous integration uses it for the tests.
Lint the workflow
To make sure the workflow and its test are syntactically correct, we can now run planemo workflow_lint :
Hands On: Lint the workflow
Run the tests on the extracted workflow using
planemo workflow_lint <workflow_file.ga>
Test the workflow against an instance which have all tools installed.
Before submitting the workflow to IWC, it might be interesting to run the tests against a Galaxy instance using Planemo so we can easily see what is failing and what are the differences between our expectations and the output we get:
Hands On: Run the tests
Run the tests on the extracted workflow using
 planemo test \
    --galaxy_url <galaxy_server_url> \
    --galaxy_user_key <your_api_key> \
    <workflow_file.ga>
If the tests are not passing because of an error into the test file, we can modify the test file and use Planemo to check that the test is valid against the same invocation.
planemo workflow_test_on_invocation \
   --galaxy_url <galaxy_server_url> \
   --galaxy_user_key <your_api_key> \
   <workflow-tests.yml> \
   <workflow_invocation_id>
Add required metadata
Once the workflow tests has been created and tested, we are almost ready to submit it to IWC. Few last steps are missing to add required metadata
The first step is to generate a .dockstore.yml file that contains metadata needed for Dockstore.
Hands On: Generate a `.dockstore.yml` file
Run:
planemo dockstore_initOpen the generated
docker.ymland verify that author names and details are correct.
We now need
- a
README.mdfile that briefly describes the workflow -
a
CHANGELOG.mdfile that lists changes, additions and fixed.For that, we need to follow the formatting and principles proposed on keepachangelog.com.
Hands On: Create README and CHANGELOG files
Create a
README.mdfile inside the workflow folder (example README).Create a
CHANGELOG.mdfile inside the workflow folder given the following template:# Changelog ## [0.1] yyyy-mm-dd First release.
Finally, there is currently no user interface within Galaxy to define release versions, so we have to manually set a release: "0.1" key value pair in the .ga file.
Hands On: Edit the release version in the workflow
Edit the
workflow.gafile to include the release number], "format-version": "0.1", "license": "GPL-3.0-or-later", "release": "0.1", "name": "NameOfTheWorkflow", "steps": { "0": {
Submit the workflow to IWC
Hands On: Submit the workflow to IWC
- Commit the changes to the createw branch
- Push the branch to your fork
- Open a Pull Request (PR) on the IWC GitHub repository to submit your workflow.
Once the PR is reviewed and merged, the workflow will be available in Galaxy’s IWC GitHub repository (Tip 3 - “Make source code available in a public code repository.”) and indexed in both WorkflowHub and Dockstore registries (Tip 1 - “Register the workflow.”), making it discoverable and reusable by the community.
CommentThe Best practices for workflows in GitHub repositories GTN provides additional recommendations for structuring and maintaining workflows in Github.
Conclusion
By following this tutorial, you have ensured that your Galaxy workflow is following the “Ten quick tips for building FAIR workflows” (de Visser et al. 2023) and adheres to best practices. From creating and refining the workflow to creating test data and submitting it to the IWC, each step contributes to making workflows more reliable, shareable, and reusable.
For further workflow optimization and maintenance, the Galaxy community provides a comprehensive guide on best practices. This guide extends beyond the best practices panel in Galaxy and includes additional recommendations, such as:
- Adding automated tests to validate workflow functionality.
- Publishing workflows on platforms like GitHub, GitLab, or other public version-controlled repositories.
- Registering workflows in well-known registries like WorkflowHub and Dockstore, ensuring wider accessibility and discoverability.
By continuously following these practices, you contribute to a stronger, more open, and collaborative bioinformatics community, where workflows are easily shared, improved, and adapted to new challenges.
You've Finished the Tutorial
Key points
Workflow annotation and best practices improve clarity and reusability
Standardized metadata enhances workflow documentation
Testing ensures workflow reliability and accuracy
IWC submission enables version control and usability by the Galaxy community
Frequently Asked Questions
Have questions about this tutorial? Have a look at the available FAQ pages and support channelsReferences
- Ewels, P., M. Magnusson, S. Lundin, and M. K\~ A\textcurrencyller, 2016 MultiQC: summarize analysis results for multiple tools and samples in a single report. Bioinformatics 32: 3047–3048. 10.1093/bioinformatics/btw354
- Goble, C., S. Cohen-Boulakia, S. Soiland-Reyes, D. Garijo, Y. Gil et al., 2020 FAIR computational workflows. Data Intelligence 2: 108–121. 10.1162/dint_a_00033
- Yuen, D., L. Cabansay, A. Duncan, G. Luu, G. Hogue et al., 2021 The Dockstore: enhancing a community platform for sharing reproducible and accessible computational protocols. Nucleic Acids Research 49: W624–W632. 10.1093/nar/gkab346
- Sena Brandine, G. de, and A. D. Smith, 2021 Falco: high-speed FastQC emulation for quality control of sequencing data. F1000Research 8: 1874. 10.12688/f1000research.21142.2
- Bray, S., J. Chilton, M. Bernt, N. Soranzo, M. van den Beek et al., 2023 The Planemo toolkit for developing, deploying, and executing scientific data analyses in Galaxy and beyond. Genome Research 33: 261–268. 10.1101/gr.276963.122
- Visser, C. de, L. F. Johansson, P. Kulkarni, H. Mei, P. Neerincx et al., 2023 Ten quick tips for building FAIR workflows. PLoS Computational Biology 19: e1011369. 10.1371/journal.pcbi.1011369
- Gustafsson, O. J. R., S. R. Wilkinson, F. Bacall, L. Pireddu, S. Soiland-Reyes et al., 2024 WorkflowHub: a registry for computational workflows. arXiv preprint. 10.48550/arXiv.2410.06941
- Wilkinson, S. R., M. Aloqalaa, K. Belhajjame, M. R. Crusoe, B. de Paula Kinoshita et al., 2025 Applying the FAIR principles to Computational Workflows. Scientific Data 12: 328. 10.1038/s41597-025-04451-9
Feedback
Did you use this material as an instructor? Feel free to give us feedback on how it went.
Did you use this material as a learner or student? Click the form below to leave feedback.

Citing this Tutorial
- Clea Siguret, Nadia Goué, Bérénice Batut, Annotate, prepare tests and publish Galaxy workflows in workflow registries (Galaxy Training Materials). https://training.galaxyproject.org/training-material/topics/galaxy-interface/tutorials/workflow-fairification/tutorial.html Online; accessed TODAY
- Hiltemann, Saskia, Rasche, Helena et al., 2023 Galaxy Training: A Powerful Framework for Teaching! PLOS Computational Biology 10.1371/journal.pcbi.1010752
- Batut et al., 2018 Community-Driven Data Analysis Training for Biology Cell Systems 10.1016/j.cels.2018.05.012
@misc{galaxy-interface-workflow-fairification,
author = "Clea Siguret and Nadia Goué and Bérénice Batut",
	title = "Annotate, prepare tests and publish Galaxy workflows in workflow registries (Galaxy Training Materials)",
	year = "",
	month = "",
	day = "",
	url = "\url{https://training.galaxyproject.org/training-material/topics/galaxy-interface/tutorials/workflow-fairification/tutorial.html}",
	note = "[Online; accessed TODAY]"
}
@article{Hiltemann_2023,
	doi = {10.1371/journal.pcbi.1010752},
	url = {https://doi.org/10.1371%2Fjournal.pcbi.1010752},
	year = 2023,
	month = {jan},
	publisher = {Public Library of Science ({PLoS})},
	volume = {19},
	number = {1},
	pages = {e1010752},
	author = {Saskia Hiltemann and Helena Rasche and Simon Gladman and Hans-Rudolf Hotz and Delphine Larivi{\`{e}}re and Daniel Blankenberg and Pratik D. Jagtap and Thomas Wollmann and Anthony Bretaudeau and Nadia Gou{\'{e}} and Timothy J. Griffin and Coline Royaux and Yvan Le Bras and Subina Mehta and Anna Syme and Frederik Coppens and Bert Droesbeke and Nicola Soranzo and Wendi Bacon and Fotis Psomopoulos and Crist{\'{o}}bal Gallardo-Alba and John Davis and Melanie Christine Föll and Matthias Fahrner and Maria A. Doyle and Beatriz Serrano-Solano and Anne Claire Fouilloux and Peter van Heusden and Wolfgang Maier and Dave Clements and Florian Heyl and Björn Grüning and B{\'{e}}r{\'{e}}nice Batut and},
	editor = {Francis Ouellette},
	title = {Galaxy Training: A powerful framework for teaching!},
	journal = {PLoS Comput Biol}
}
Funding
These individuals or organisations provided funding support for the development of this resource
Congratulations on successfully completing this tutorial!

You can use Ephemeris's
shed-tools installcommand to install the tools used in this tutorial.shed-tools install [-g GALAXY] [-a API_KEY] -t <(curl https://training.galaxyproject.org/training-material/api/topics/galaxy-interface/tutorials/workflow-fairification/tutorial.json | jq .admin_install_yaml -r)Alternatively you can copy and paste the following YAML
---
install_tool_dependencies: true
install_repository_dependencies: true
install_resolver_dependencies: true
tools:
- name: falco
  owner: iuc
  revisions: 959a14c1f2dd
  tool_panel_section_label: FASTA/FASTQ
  tool_shed_url: https://toolshed.g2.bx.psu.edu/
- name: multiqc
  owner: iuc
  revisions: 31c42a2c02d3
  tool_panel_section_label: Quality Control
  tool_shed_url: https://toolshed.g2.bx.psu.edu/