Connecting Galaxy to a compute cluster
| Author(s) |
|
| Reviewers |
|
OverviewQuestions:
Objectives:
How to connect Galaxy to a compute cluster?
What are job metrics?
What sort of information can I collect?
Where can I find this information?
Requirements:
Be familiar with the basics of installing, configuring, and using Slurm
Understand all components of the Galaxy job running stack
Understand how the job conf controls Galaxy’s jobs subsystem
Have a strong understanding of Galaxy job destinations
Understand the purpose and function of Galaxy job metrics
- slides Slides: Ansible
- tutorial Hands-on: Ansible
- slides Slides: Galaxy Installation with Ansible
- tutorial Hands-on: Galaxy Installation with Ansible
Time estimation: 1 hourSupporting Materials:Published: Jan 7, 2018Last modification: Nov 24, 2025License: Tutorial Content is licensed under Creative Commons Attribution 4.0 International License. The GTN Framework is licensed under MITpurl PURL: https://gxy.io/GTN:T00002rating Rating: 2.0 (1 recent ratings, 16 all time)version Revision: 65
The tools that are added to Galaxy can have a wide variance in the compute resources that they require and work efficiently on. To account for this, Galaxy’s job configuration needs to be tuned to run these tools properly. In addition, site-specific variables must be taken into consideration when choosing where to run jobs and what parameters to run them with.
Comment: Results may varyYour results may be slightly different from the ones presented in this tutorial due to differing versions of tools, reference data, external databases, or because of stochastic processes in the algorithms.
Agenda
Comment: Galaxy Admin Training PathThe yearly Galaxy Admin Training follows a specific ordering of tutorials. Use this timeline to help keep track of where you are in Galaxy Admin Training.
Installing Slurm
Comment: Ansible Best PracticesIf you’ve set up your Galaxy server using the Galaxy Installation with Ansible tutorial, you will have created a
galaxyserversgroup in your inventory file,hosts, and placed your variables ingroup_vars/galaxyservers.yml. Although for the purposes of this tutorial, the Galaxy server and Slurm controller/node are one and the same, in a real world deployment they are very likely to be different hosts. We will continue to use thegalaxyserversgroup for simplicity, but in your own deployment you should consider creating some additional groups for Slurm controller(s), Slurm nodes, and Slurm clients.
If you have a smaller server, do you still need a DRM? Yes! You should definitely run Slurm or a similar option. If you don’t, as soon as you restart Galaxy with local runners, any running jobs will be killed. Even with a handful of users, it is a good idea to keep 1-2 CPU cores/4GB RAM reserved for Galaxy.
Hands On: Installing Slurm
Edit your
requirements.ymland include the following contents:--- a/requirements.yml +++ b/requirements.yml @@ -22,3 +22,8 @@ # Singularity/Apptainer - src: usegalaxy_eu.apptainer version: 0.0.3 +# SLURM as our DRM +- src: galaxyproject.repos + version: 0.0.3 +- src: galaxyproject.slurm + version: 1.0.2If you haven’t worked with diffs before, this can be something quite new or different.
If we have two files, let’s say a grocery list, in two files. We’ll call them ‘a’ and ‘b’.
Code In: Old$ cat old
🍎
🍐
🍊
🍋
🍒
🥑Code Out: New$ cat new
🍎
🍐
🍊
🍋
🍍
🥑We can see that they have some different entries. We’ve removed 🍒 because they’re awful, and replaced them with an 🍍
Diff lets us compare these files
$ diff old new
5c5
< 🍒
---
> 🍍
Here we see that 🍒 is only in a, and 🍍 is only in b. But otherwise the files are identical.
There are a couple different formats to diffs, one is the ‘unified diff’
$ diff -U2 old new
--- old	2022-02-16 14:06:19.697132568 +0100
+++ new	2022-02-16 14:06:36.340962616 +0100
@@ -3,4 +3,4 @@
 🍊
 🍋
-🍒
+🍍
 🥑
This is basically what you see in the training materials which gives you a lot of context about the changes:
--- oldis the ‘old’ file in our view+++ newis the ‘new’ file- @@ these lines tell us where the change occurs and how many lines are added or removed.
- Lines starting with a - are removed from our ‘new’ file
- Lines with a + have been added.
So when you go to apply these diffs to your files in the training:
- Ignore the header
- Remove lines starting with - from your file
- Add lines starting with + to your file
The other lines (🍊/🍋 and 🥑) above just provide “context”, they help you know where a change belongs in a file, but should not be edited when you’re making the above change. Given the above diff, you would find a line with a 🍒, and replace it with a 🍍
Added & Removed Lines
Removals are very easy to spot, we just have removed lines
--- old	2022-02-16 14:06:19.697132568 +0100
+++ new	2022-02-16 14:10:14.370722802 +0100
@@ -4,3 +4,2 @@
 🍋
 🍒
-🥑
And additions likewise are very easy, just add a new line, between the other lines in your file.
--- old	2022-02-16 14:06:19.697132568 +0100
+++ new	2022-02-16 14:11:11.422135393 +0100
@@ -1,3 +1,4 @@
 🍎
+🍍
 🍐
 🍊
Completely new files
Completely new files look a bit different, there the “old” file is
/dev/null, the empty file in a Linux machine.$ diff -U2 /dev/null old
--- /dev/null 2022-02-15 11:47:16.100000270 +0100
+++ old 2022-02-16 14:06:19.697132568 +0100
@@ -0,0 +1,6 @@
+🍎
+🍐
+🍊
+🍋
+🍒
+🥑And removed files are similar, except with the new file being /dev/null
--- old	2022-02-16 14:06:19.697132568 +0100
+++ /dev/null	2022-02-15 11:47:16.100000270 +0100
@@ -1,6 +0,0 @@
-🍎
-🍐
-🍊
-🍋
-🍒
-🥑
The
galaxyproject.reposrole adds the Galaxy Packages for Enterprise Linux (GPEL) repository for RedHat/CentOS, which provides both Slurm and Slurm-DRMAA (neither are available in standard repositories or EPEL). For Ubuntu versions 18.04 or newer, it adds the Slurm-DRMAA PPA (Slurm-DRMAA was removed from Debian/Ubuntu in buster/bionic).In the same directory, run:
Code In: Bashansible-galaxy install -p roles -r requirements.ymlAdd
galaxyproject.repos,galaxyproject.slurmto the beginning of your roles section in yourgalaxy.ymlplaybook:--- a/galaxy.yml +++ b/galaxy.yml @@ -34,6 +34,8 @@ dest: /libraries/ roles: - galaxyproject.tusd + - galaxyproject.repos + - galaxyproject.slurm - usegalaxy_eu.apptainer - galaxyproject.galaxy - role: galaxyproject.minicondaAdd the slurm variables to your
group_vars/galaxyservers.yml:--- a/group_vars/galaxyservers.yml +++ b/group_vars/galaxyservers.yml @@ -199,6 +199,17 @@ nginx_ssl_role: usegalaxy_eu.certbot nginx_conf_ssl_certificate: /etc/ssl/certs/fullchain.pem nginx_conf_ssl_certificate_key: /etc/ssl/user/privkey-www-data.pem +# Slurm +slurm_roles: ['controller', 'exec'] # Which roles should the machine play? exec are execution hosts. +slurm_nodes: +- name: localhost # Name of our host + CPUs: 2 # Here you would need to figure out how many cores your machine has. For this training we will use 2 but in real life, look at `htop` or similar. + RealMemory: 8192 # Adjust based on available memory. For this training 8192 is sufficient. +slurm_config: + SlurmdParameters: config_overrides # Ignore errors if the host actually has cores != 2 + SelectType: select/cons_tres + SelectTypeParameters: CR_CPU_Memory # Allocate individual cores/memory instead of entire node + # TUS galaxy_tusd_port: 1080 galaxy_tus_upload_store: /data/tusRun the playbook
Code In: Bashansible-playbook galaxy.yml
Note that the above Slurm config options are only those that are useful for this training exercise. In production, you would want to use a more appropriate configuration specific to your cluster (and setting SlurmdParameters to config_overrides is not recommended).
Installed with Slurm is MUNGE (MUNGE Uid ‘N Gid Emporium…) which authenticates users between cluster hosts. You would normally need to ensure the same Munge key is distributed across all cluster hosts (in /etc/munge/munge.key) - A great task for Ansible. However, the installation of the munge package has created a random key for you, and you will not need to distribute this since you’ll run jobs only on a single host.
You can now check that all of the daemons are running with the command systemctl status munge slurmd slurmctld
$ sudo systemctl status munge slurmd slurmctld
● munge.service - MUNGE authentication service
  Loaded: loaded (/usr/lib/systemd/system/munge.service; enabled; vendor preset: disabled)
   Active: active (running) since Sa 2019-01-26 22:38:13 CET; 28min ago
     Docs: man:munged(8)
 Main PID: 22930 (munged)
    Tasks: 4
   Memory: 128.0K
   CGroup: /system.slice/munge.service
           └─22930 /usr/sbin/munged

Jan 26 22:38:13 helena-test.novalocal systemd[1]: Starting MUNGE authentication service...
Jan 26 22:38:13 helena-test.novalocal systemd[1]: Started MUNGE authentication service.

● slurmd.service - Slurm node daemon
   Loaded: loaded (/usr/lib/systemd/system/slurmd.service; enabled; vendor preset: disabled)
   Active: active (running) since Sa 2019-01-26 23:04:21 CET; 2min 25s ago
  Process: 15051 ExecStart=/usr/sbin/slurmd $SLURMD_OPTIONS (code=exited, status=0/SUCCESS)
 Main PID: 15054 (slurmd)
    Tasks: 1
   Memory: 628.0K
   CGroup: /system.slice/slurmd.service
           └─15054 /usr/sbin/slurmd

Jan 26 23:04:21 helena-test.novalocal systemd[1]: Starting Slurm node daemon...
Jan 26 23:04:21 helena-test.novalocal systemd[1]: PID file /var/run/slurmd.pid not readable (yet?) after start.
Jan 26 23:04:21 helena-test.novalocal systemd[1]: Started Slurm node daemon.

● slurmctld.service - Slurm controller daemon
   Loaded: loaded (/usr/lib/systemd/system/slurmctld.service; enabled; vendor preset: disabled)
   Active: active (running) since Sa 2019-01-26 23:04:20 CET; 2min 26s ago
  Process: 15040 ExecStart=/usr/sbin/slurmctld $SLURMCTLD_OPTIONS (code=exited, status=0/SUCCESS)
 Main PID: 15042 (slurmctld)
    Tasks: 7
   Memory: 1.1M
   CGroup: /system.slice/slurmctld.service
           └─15042 /usr/sbin/slurmctld

Jan 26 23:04:20 helena-test.novalocal systemd[1]: Starting Slurm controller daemon...
Jan 26 23:04:20 helena-test.novalocal systemd[1]: PID file /var/run/slurmctld.pid not readable (yet?) after start.
Jan 26 23:04:20 helena-test.novalocal systemd[1]: Started Slurm controller daemon.
Running the playbook, the Slurm configuration, /etc/slurm/slurm.conf (or /etc/slurm-llnl/slurm.conf on Debian-based distributions) was created for you automatically. All of the variables were set by default. If you need to override the configuration yourself, Slurm provides an online tool which will help you configure it.
Using Slurm
You should now be able to see that your Slurm cluster is operational with the sinfo command. This shows the state of nodes and partitions (synonymous with queues in other DRMs). The “node-oriented view” provided with the -N flag is particularly useful:
$ sinfo
PARTITION AVAIL  TIMELIMIT  NODES  STATE NODELIST
debug*       up   infinite      1   idle localhost
$ sinfo -Nel
Fri Nov  4 16:51:24 2016
NODELIST   NODES PARTITION       STATE CPUS    S:C:T MEMORY TMP_DISK WEIGHT FEATURES REASON
localhost      1    debug*        idle    1    2:1:1      1        0      1   (null) none
If your node state is not idle, something has gone wrong. If your node state ends with an asterisk *, the Slurm controller is attempting to contact the Slurm execution daemon but has not yet been successful (the * next to the partition name is normal, it indicates the default partition).
We want to ensure that Slurm is actually able to run jobs. There are two ways this can be done:
srun: Run an interactive job (e.g. a shell, or a specific program with its stdin, stdout, and stderr all connected to your terminal.sbatch: Run a batch job, with stdin closed and stdout/stderr redirected to a file.
Galaxy runs sbatch jobs but we can use both srun and sbatch to test:
Hands On: Running commands with `srun`
Use
srunto run the commanduname -aCode In: Bashsrun uname -aCode OutYour output may look slightly different:
$ srun uname -a
Linux gat-1.oz.training.galaxyproject.eu 5.4.0-48-generic #52-Ubuntu SMP Thu Sep 10 10:58:49 UTC 2020 x86_64 x86_64 x86_64 GNU/Linux
Although it looks like this command ran as if I had not used srun, it was in fact routed through Slurm.
Hands On: Running commands with `sbatch`
Create a test job script somewhere, such as in
~/sbatch-test.sh. It should be a batch script which runsuname -a,uptime, and sleeps for 30 seconds.QuestionWhat does your shell script look like?
#!/bin/bash
uname -a
uptime
sleep 30
Make the script executable:
Code In: Bashchmod +x ~/sbatch-test.shUse
sbatchto submit the job scriptQuestionWhat command did you run?
$ sbatch ~/sbatch-test.shUse
squeueto check the queueCode In: BashsqueueCode OutYour output may look slightly different:
JOBID PARTITION     NAME     USER ST       TIME  NODES NODELIST(REASON)
   3     debug sbatch-t   ubuntu  R       0:22      1 localhost
If you’ve made it this far, your Slurm installation is working!
Slurm-DRMAA
Above Slurm in the stack is slurm-drmaa, a library that provides a translational interface from the Slurm API to the generalized DRMAA API in C.
Hands On: Installing Slurm-DRMAA
Add a
post_taskto your playbook to installslurm-drmaa1(Debian/Ubuntu) orslurm-drmaa(RedHat/CentOS).--- a/galaxy.yml +++ b/galaxy.yml @@ -52,3 +52,6 @@ minute: "0" hour: "0" job: "SHELL=/bin/bash source {{ galaxy_venv_dir }}/bin/activate && GALAXY_LOG_DIR=/tmp/gxadmin/ GALAXY_ROOT={{ galaxy_root }}/server GALAXY_CONFIG_FILE={{ galaxy_config_file }} /usr/local/bin/gxadmin galaxy cleanup 60" + - name: Install slurm-drmaa + package: + name: slurm-drmaa1Run the playbook (
ansible-playbook galaxy.yml)Code In: Bashansible-playbook galaxy.yml
Moving one level further up the stack, we find DRMAA Python. This is a Galaxy framework conditional dependency. Conditional dependencies are only installed if, during startup, a configuration option is set that requires that dependency. The galaxyproject.galaxy Ansible role will install these conditional dependencies, automatically.
Galaxy and Slurm
At the top of the stack sits Galaxy. Galaxy must now be configured to use the cluster we’ve just set up. The DRMAA Python documentation (and Galaxy’s own documentation) instruct that you should set the $DRMAA_LIBRARY_PATH environment variable so that DRMAA Python can find libdrmaa.so (aka slurm-drmaa). Because Galaxy runs under systemd, the environment that Galaxy starts under is controlled by the environment option in systemd service unit that the ansible role manages. The galaxy task should thus be updated to refer to the path to slurm-drmaa, which is /usr/lib/slurm-drmaa/lib/libdrmaa.so.1:
Hands On: Making Galaxy aware of DRMAA
We need to configure the Slurm job runner. First, we instruct Galaxy’s job handlers to load the Slurm job runner plugin, and set the Slurm job submission parameters. A job runner plugin definition must have a unique name as its key, and a
loadattribute. Since we already have a good default destination that uses singularity, we will simply modify that to use the slurm runner. Galaxy will do the equivalent of submitting a job assbatch /path/to/job_script.sh. In a job environment, the key is a unique identifier for that environment and therunnerattribute must match the key of a defined runner plugin:--- a/group_vars/galaxyservers.yml +++ b/group_vars/galaxyservers.yml @@ -21,14 +21,29 @@ galaxy_job_config: local_runner: load: galaxy.jobs.runners.local:LocalJobRunner workers: 4 + slurm: + load: galaxy.jobs.runners.slurm:SlurmJobRunner + drmaa_library_path: /usr/lib/slurm-drmaa/lib/libdrmaa.so.1 handling: assign: ['db-skip-locked'] execution: - default: singularity + default: slurm environments: local_env: runner: local_runner tmp_dir: true + slurm: + runner: slurm + singularity_enabled: true + # Enabling access to the reference data on CVMFS in the container + singularity_volumes: $defaults,/cvmfs/data.galaxyproject.org:ro + env: + - name: LC_ALL + value: C + - name: APPTAINER_CACHEDIR + value: /tmp/singularity + - name: APPTAINER_TMPDIR + value: /tmp singularity: runner: local_runner singularity_enabled: trueRun your Galaxy playbook
Code In: Bashansible-playbook galaxy.ymlWatch the logs to check that everything loads correctly
Code In: Bashjournalctl -f -u 'galaxy-*'Code OutYour output may look slightly different:
Jan 12 15:46:01 gat-1.oz.training.galaxyproject.eu gunicorn[1821134]: galaxy.jobs.runners DEBUG 2021-01-12 15:46:01,109 [p:1821134,w:0,m:1] [MainThread] Starting 4 SlurmRunner workers
Jan 12 15:46:01 gat-1.oz.training.galaxyproject.eu gunicorn[1821134]: galaxy.jobs DEBUG 2021-01-12 15:46:01,110 [p:1821134,w:0,m:1] [MainThread] Loaded job runner 'galaxy.jobs.runners.slurm:SlurmJobRunner' as 'slurm'
Running a Job
You should now be able to run a Galaxy job through Slurm. The simplest way to test is using the digest tool to calculate an md5sum.
Hands On: Testing a Slurm Job
If you’re not still following the log files with
journalctl, do so now.Code In: Bashjournalctl -f -u 'galaxy-*'- Click the upload button at the top of the tool panel (on the left side of the Galaxy UI).
- In the resulting modal dialog, click the “Paste/Fetch data” button.
- Type some random characters into the text field that has just appeared.
- Click “Start” and then “Close”
Open Secure Hash / Message Digest tool
Code OutYour output may look slightly different. In your
journalctlterminal window you should see the following messages:galaxy.jobs.mapper DEBUG 2020-02-10 09:37:17,946 [p:9859,w:0,m:2] [JobHandlerQueue.monitor_thread] (1) Mapped job to destination id: slurm galaxy.jobs.handler DEBUG 2020-02-10 09:37:17,976 [p:9859,w:0,m:2] [JobHandlerQueue.monitor_thread] (1) Dispatching to slurm runner galaxy.jobs DEBUG 2020-02-10 09:37:18,016 [p:9859,w:0,m:2] [JobHandlerQueue.monitor_thread] (1) Persisting job destination (destination id: slurm) galaxy.jobs DEBUG 2020-02-10 09:37:18,021 [p:9859,w:0,m:2] [JobHandlerQueue.monitor_thread] (1) Working directory for job is: /srv/galaxy/jobs/000/1 galaxy.jobs.runners DEBUG 2020-02-10 09:37:18,358 [p:9859,w:0,m:2] [JobHandlerQueue.monitor_thread] Job [1] queued (380.809 ms) galaxy.jobs.handler INFO 2020-02-10 09:37:18,372 [p:9859,w:0,m:2] [JobHandlerQueue.monitor_thread] (1) Job dispatched galaxy.jobs.command_factory INFO 2020-02-10 09:37:18,564 [p:9859,w:0,m:2] [SlurmRunner.work_thread-0] Built script [/srv/galaxy/jobs/000/1/tool_script.sh] for tool command [python '/srv/galaxy/server/tools/data_source/upload.py' /srv/galaxy/server /srv/galaxy/jobs/000/1/registry.xml /srv/galaxy/jobs/000/1/upload_params.json 1:/srv/galaxy/jobs/000/1/working/dataset_1_files:/data/000/dataset_1.dat] ... galaxy.jobs.runners.drmaa DEBUG 2020-02-10 09:37:18,645 [p:9859,w:0,m:2] [SlurmRunner.work_thread-0] (1) submitting file /srv/galaxy/jobs/000/1/galaxy_1.sh galaxy.jobs.runners.drmaa INFO 2020-02-10 09:37:18,654 [p:9859,w:0,m:2] [SlurmRunner.work_thread-0] (1) queued as 4 galaxy.jobs DEBUG 2020-02-10 09:37:18,654 [p:9859,w:0,m:2] [SlurmRunner.work_thread-0] (1) Persisting job destination (destination id: slurm)At this point the job has been accepted by Slurm and is awaiting scheduling on a node. Once it’s been sent to a node and starts running, Galaxy logs this event:
galaxy.jobs.runners.drmaa DEBUG 2020-02-10 09:37:19,537 [p:9859,w:0,m:2] [SlurmRunner.monitor_thread] (1/4) state change: job is runningFinally, when the job is complete, Galaxy performs its job finalization process:
galaxy.jobs.runners.drmaa DEBUG 2020-02-10 09:37:24,700 [p:9859,w:0,m:2] [SlurmRunner.monitor_thread] (1/4) state change: job finished normally
galaxy.model.metadata DEBUG 2020-02-10 09:37:24,788 [p:9859,w:0,m:2] [SlurmRunner.work_thread-1] loading metadata from file for: HistoryDatasetAssociation 1
galaxy.jobs INFO 2020-02-10 09:37:24,883 [p:9859,w:0,m:2] [SlurmRunner.work_thread-1] Collecting metrics for Job 1 in /srv/galaxy/jobs/000/1
galaxy.jobs DEBUG 2020-02-10 09:37:24,917 [p:9859,w:0,m:2] [SlurmRunner.work_thread-1] job_wrapper.finish for job 1 executed (154.514 ms)
Note a few useful bits in the output:
Persisting job destination (destination id: slurm): Galaxy has selected theslurmdestination we definedsubmitting file /srv/galaxy/server/database/jobs/000/2/galaxy_2.sh: This is the path to the script that is submitted to Slurm as it would be withsbatch(1) queued as 4: Galaxy job id “1” is Slurm job id “4”, this can also be seen with the(1/4)in other output lines.- If
job <id> endedis reached, the job should show as done in the UI
1-test-cat1.sh
Slurm allows us to query the exit state of jobs for a time period of the value of Slurm’s MinJobAge option, which defaults to 300 (seconds, == 5 minutes):
Code In: BashYour job number is potentially different.
scontrol show job 4
Code OutYour output may also look slightly different:
JobId=4 JobName=g1_upload1_admin_example_org
   UserId=galaxy(999) GroupId=galaxy(999) MCS_label=N/A
   Priority=4294901757 Nice=0 Account=(null) QOS=(null)
   JobState=COMPLETED Reason=None Dependency=(null)
   Requeue=1 Restarts=0 BatchFlag=1 Reboot=0 ExitCode=0:0
   RunTime=00:00:05 TimeLimit=UNLIMITED TimeMin=N/A
   SubmitTime=2020-02-10T09:37:18 EligibleTime=2020-02-10T09:37:18
   StartTime=2020-02-10T09:37:19 EndTime=2020-02-10T09:37:24 Deadline=N/A
   PreemptTime=None SuspendTime=None SecsPreSuspend=0
   LastSchedEval=2020-02-10T09:37:19
   Partition=debug AllocNode:Sid=gcc-1:9453
   ReqNodeList=(null) ExcNodeList=(null)
   NodeList=localhost
   BatchHost=localhost
   NumNodes=1 NumCPUs=1 NumTasks=1 CPUs/Task=1 ReqB:S:C:T=0:0:*:*
   TRES=cpu=1,mem=1M,node=1,billing=1
   Socks/Node=* NtasksPerN:B:S:C=0:0:*:* CoreSpec=*
   MinCPUsNode=1 MinMemoryNode=1M MinTmpDiskNode=0
   Features=(null) DelayBoot=00:00:00
   Gres=(null) Reservation=(null)
   OverSubscribe=OK Contiguous=0 Licenses=(null) Network=(null)
   Command=(null)
   WorkDir=/srv/galaxy/jobs/000/1
   StdErr=/srv/galaxy/jobs/000/1/galaxy_1.e
   StdIn=StdIn=/dev/null
   StdOut=/srv/galaxy/jobs/000/1/galaxy_1.o
   Power=
After the job has been purged from the active jobs database, a bit of information (but not as much as scontrol provides) can be retrieved from Slurm’s logs. However, it’s a good idea to set up Slurm’s accounting database to keep old job information in a queryable format.
The following directories need to be accesible via the same path on both the head node and compute nodes:
galaxy_shed_tools_dirgalaxy_tool_dependency_dirgalaxy_file_pathgalaxy_job_working_directorygalaxy_server_dirgalaxy_venv_dir
Recording Job Metrics
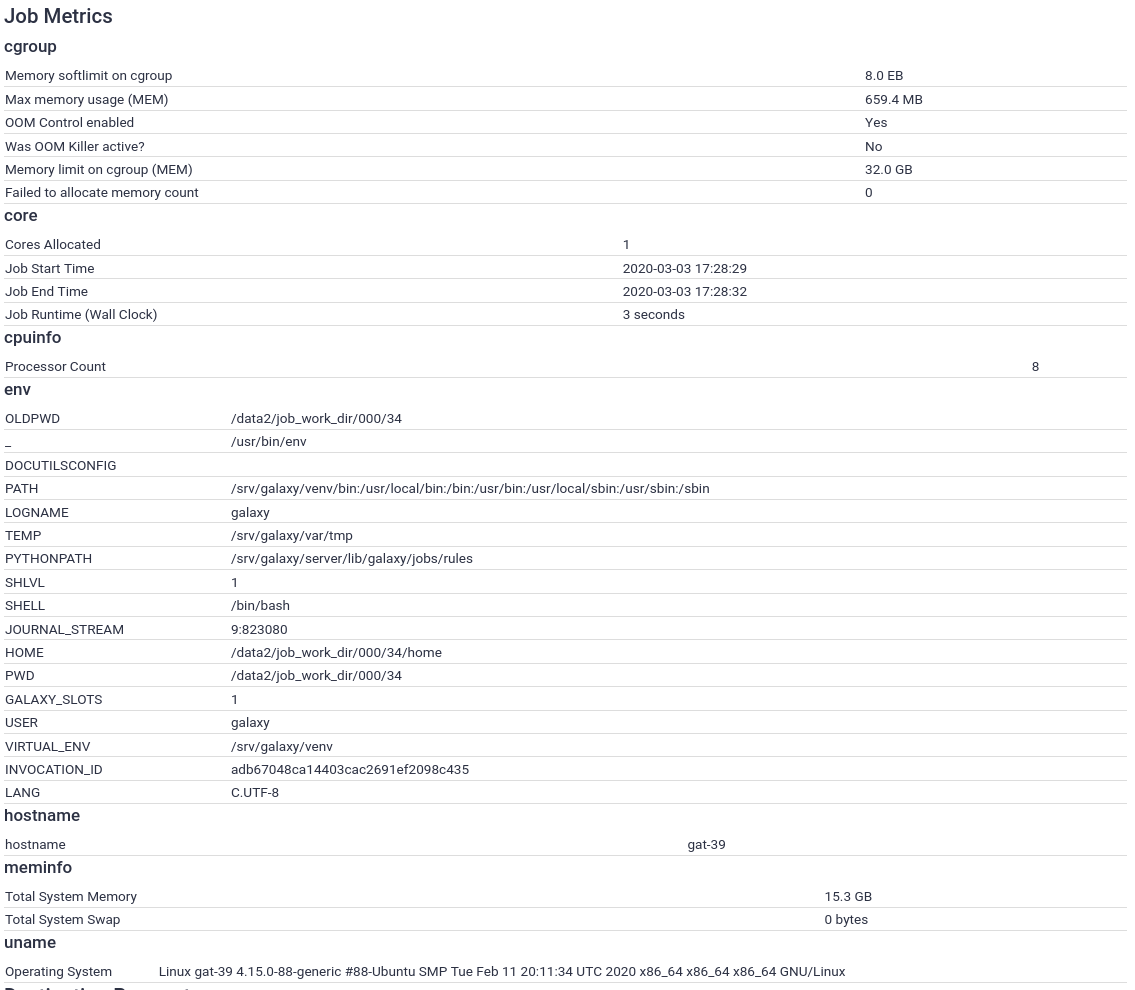
Job metrics record properties of the jobs that are executed, information that can help you plan for trainings or plan capacity for further expansions of your Galaxy server. These properties include details such as the number of slots (cores) assigned to a job, the amount of memory available, details about the node on which the job executed, environment variables that were set at execution time, and more.
Galaxy collects and records very few job metrics by default, enabling more metrics plugins is recommended for any cluster-enabled Galaxy deployment. The metrics are stored in the Galaxy database, which can be queried externally to generate reports and debug job problems.
Some work has been done to try to analyse job runtime metrics to optimise cluster allocation based on job inputs, and enhance job submission (Tyryshkina et al. 2019). More work will be done in this area.
Comment: NoteJob metrics are only visible to Galaxy admin users, unless you set
expose_potentially_sensitive_job_metrics: true, like UseGalaxy.eu does. EU’s intention with this is to empower users and make everything as transparent as possible.This is the only option controlling which metrics general users see. Admins see all metrics collected, and by default general users see none. However most of the metrics exposed by this setting are quite safe (e.g. cgroups information on resource consumption, walltime, etc.)
Setting up Galaxy
By default, Galaxy enables the core metrics:

These include very basic submission parameters. We want more information!
Hands On: Setting up the job metrics plugin configuration
Edit the global (for all hosts) group variables file,
group_vars/all.yml:Both Galaxy and Pulsar use job metrics plugins, and when we configure Pulsar later, we will want it to have the same metrics plugin configuration as Galaxy. Putting this variable in
all.ymlwill allow us to refer to it later when setting the corresponding variable for Pulsar.The variable we’ll set is named
galaxy_job_metrics_plugins:--- a/group_vars/all.yml +++ b/group_vars/all.yml @@ -10,3 +10,13 @@ galaxy_db_name: galaxy cvmfs_role: client galaxy_cvmfs_repos_enabled: config-repo cvmfs_quota_limit: 500 + +# Galaxy vars that will be reused by Pulsar +galaxy_job_metrics_plugins: + - type: core + - type: cpuinfo + - type: meminfo + - type: uname + - type: env + - type: cgroup + - type: hostnameRun your Galaxy playbook
Code In: Bashansible-playbook galaxy.yml
Currently, the job metrics plugin configuration is stored in a separate configuration file from Galaxy’s main configuration file (galaxy.yml). By setting galaxy_job_metrics_plugins, we instructed the galaxyproject.galaxy role to create this file, and update the option (job_metrics_config_file) in galaxy.yml that sets the path to this file. You can inspect the contents of the new config file on your Galaxy server:
Code In: Bashcat /srv/galaxy/config/job_metrics_conf.yml
Code Out: Bash--- ## ## This file is managed by Ansible. ALL CHANGES WILL BE OVERWRITTEN. ## - type: core - type: cpuinfo - type: meminfo - type: uname - type: env - type: cgroup - type: hostname
Generating Metrics
With this, the job metrics collection and recording should be set up. Now when you run a job, you will see many more metrics:
Hands On: Generate some metrics
Run a job (any tool is fine, even upload)
View the information of the output dataset (galaxy-info)
What should I collect?
There is not a good rule we can tell you, just choose what you think is useful or will be. Numeric parameters are “cheaper” than the text parameters (like uname to store), eventually you may find yourself wanting to remove old job metrics if you decide to collect the environment variables or similar.
Accessing the data
You can access the data via BioBlend (JobsClient.get_metrics), or via SQL with gxadmin.
Hands On: Time to git commitIt’s time to commit your work! Check the status with
git statusAdd your changed files with
git add ... # any files you see that are changedAnd then commit it!
git commit -m 'Finished Connecting Galaxy to a compute cluster'
Comment: Got lost along the way?If you missed any steps, you can compare against the reference files, or see what changed since the previous tutorial.
If you’re using
gitto track your progress, remember to add your changes and commit with a good commit message!
Further Reading
- Galaxy’s cluster documentation describes in detail alternative cluster configurations.
- The job_conf documentation fully describes the syntax of the job configuration file.
- The Distributed Resource Management Application API (DRMAA) page contains the DRMAA specification as well as documentation for various implementations. It also includes a list of DRMs supporting DRMAA.
- The Slurm documentation is extensive and covers all the features and myriad of ways in which you can configure slurm.
- PSNC slurm-drmaa’s page includes documentation and the SVN repository, which has a few minor fixes since the last released version. PSNC also wrote the initial implementations of the DRMAA libraries for PBSPro and LSF, so all three are similar.
- Our own fork of slurm-drmaa includes support for Slurms
-M/--clustersmulti-cluster functionality and newer versions of Slurm. - Slurm Accounting documentation explains how to set up SlurmDBD.
Comment: Galaxy Admin Training PathThe yearly Galaxy Admin Training follows a specific ordering of tutorials. Use this timeline to help keep track of where you are in Galaxy Admin Training.
You've Finished the Tutorial
Key points
Galaxy supports a variety of different DRMs.
You should absolutely set one up, it prevents jobs from being killed during server restarts.
Frequently Asked Questions
Have questions about this tutorial? Have a look at the available FAQ pages and support channelsReferences
- Tyryshkina, A., N. Coraor, and A. Nekrutenko, 2019 Predicting runtimes of bioinformatics tools based on historical data: five years of Galaxy usage (J. Wren, Ed.). Bioinformatics 35: 3453–3460. 10.1093/bioinformatics/btz054
Feedback
Did you use this material as an instructor? Feel free to give us feedback on how it went.
Did you use this material as a learner or student? Click the form below to leave feedback.

Citing this Tutorial
- Nate Coraor, Björn Grüning, Helena Rasche, Connecting Galaxy to a compute cluster (Galaxy Training Materials). https://training.galaxyproject.org/training-material/topics/admin/tutorials/connect-to-compute-cluster/tutorial.html Online; accessed TODAY
- Hiltemann, Saskia, Rasche, Helena et al., 2023 Galaxy Training: A Powerful Framework for Teaching! PLOS Computational Biology 10.1371/journal.pcbi.1010752
- Batut et al., 2018 Community-Driven Data Analysis Training for Biology Cell Systems 10.1016/j.cels.2018.05.012
@misc{admin-connect-to-compute-cluster,
author = "Nate Coraor and Björn Grüning and Helena Rasche",
	title = "Connecting Galaxy to a compute cluster (Galaxy Training Materials)",
	year = "",
	month = "",
	day = "",
	url = "\url{https://training.galaxyproject.org/training-material/topics/admin/tutorials/connect-to-compute-cluster/tutorial.html}",
	note = "[Online; accessed TODAY]"
}
@article{Hiltemann_2023,
	doi = {10.1371/journal.pcbi.1010752},
	url = {https://doi.org/10.1371%2Fjournal.pcbi.1010752},
	year = 2023,
	month = {jan},
	publisher = {Public Library of Science ({PLoS})},
	volume = {19},
	number = {1},
	pages = {e1010752},
	author = {Saskia Hiltemann and Helena Rasche and Simon Gladman and Hans-Rudolf Hotz and Delphine Larivi{\`{e}}re and Daniel Blankenberg and Pratik D. Jagtap and Thomas Wollmann and Anthony Bretaudeau and Nadia Gou{\'{e}} and Timothy J. Griffin and Coline Royaux and Yvan Le Bras and Subina Mehta and Anna Syme and Frederik Coppens and Bert Droesbeke and Nicola Soranzo and Wendi Bacon and Fotis Psomopoulos and Crist{\'{o}}bal Gallardo-Alba and John Davis and Melanie Christine Föll and Matthias Fahrner and Maria A. Doyle and Beatriz Serrano-Solano and Anne Claire Fouilloux and Peter van Heusden and Wolfgang Maier and Dave Clements and Florian Heyl and Björn Grüning and B{\'{e}}r{\'{e}}nice Batut and},
	editor = {Francis Ouellette},
	title = {Galaxy Training: A powerful framework for teaching!},
	journal = {PLoS Comput Biol}
}
Funding
These individuals or organisations provided funding support for the development of this resource


Do you want to extend your knowledge?Follow one of our recommended follow-up trainings: