Terrestrial ecosystem models have been widely used to study the impact of climate changes on vegetation and terrestrial biogeochemical cycles in climate modelling community. They are also more and more applied in ecological studies to help ecologists to better understand the processes. But the technical challenges are still too high for most of the ecologists to use them. This practical aims at familiarizing you (especially ecologists) with running a terrestrial ecosystem model (i.e., CLM-FATES) at site-level in Galaxy and analyzing the model results.
It will also teach you on how to create Galaxy workflow for your site-level CLM-FATES simulations to make your research fully reproducible. We hope this tutorial will promote the use of CLM-FATES and other terrestrial ecosystem models by a broader community.
Preparing CLM-FATES input data is out of scope for this tutorial. We assume the input data tarball contains the following folders:
atm cpl lnd share
Each sub-folder will then contain all the necessary inputs for running your CLM-FATES case. For instance, ‘atm’ contains all the meteorological forcing data for running CLM-FATES. ‘lnd’ contains the data required to describe surface conditions (e.g., soil depth) for the model. More details about the model inputdata can be found in CLM and FATES documentation.
For the purpose of this tutorial, input data for a single point location (ALP1) on the Norwegian alpine tundra ecosystem (Latitude: 61.0243N, Longitude: 8.12343E, Elevation: 1208 m) has been prepared and is ready to use. This is a site included in the modelling platform developed under [EMERALD project] (https://www.mn.uio.no/geo/english/research/projects/emerald/). More details about the sites can be found in Klanderud et al. 2015 and Vandvik et al. 2020
Hands On: Data upload
Create a new history for this tutorial. If you are not inspired, you can name it fates.
To create a new history simply click the new-history icon at the top of the history panel:
Import the input data and the restart dataset from Zenodo
or from the shared data library. Restart dataset will be used if you want to initialize the model from exisiting experiments rather than running the model from a cold start to shorten spin-up time needed for the model.
Click galaxy-uploadUpload at the top of the activity panel
Select galaxy-wf-editPaste/Fetch Data
Paste the link(s) into the text field
Press Start
Close the window
As an alternative to uploading the data from a URL or your computer, the files may also have been made available from a shared data library:
Go into Libraries (left panel)
Navigate to the correct folder as indicated by your instructor.
On most Galaxies tutorial data will be provided in a folder named GTN - Material –> Topic Name -> Tutorial Name.
Select the desired files
Click on Add to Historygalaxy-dropdown near the top and select as Datasets from the dropdown menu
In the pop-up window, choose
“Select history”: the history you want to import the data to (or create a new one)
Click on Import
Check the datatype (for both files) is tar
Click on the galaxy-pencilpencil icon for the dataset to edit its attributes
In the central panel, click galaxy-chart-select-dataDatatypes tab on the top
In the galaxy-chart-select-dataAssign Datatype, select datatypes from “New Type” dropdown
Tip: you can start typing the datatype into the field to filter the dropdown menu
Click the Save button
Rename galaxy-pencil datasets
Dataset names are the full URL, but this is not very nice to work with, and can even give errors for some tools
It is good practice to change the dataset names to something more meaningful and without any special characters
E.g. by stripping off the beginning of the URL
Example: rename https://zenodo.org/record/4108341/files/inputdata_version2.0.0_ALP1.tar to inputdata_version2.0.0_ALP1.tar
Do the same for the other dataset
Click on the galaxy-pencilpencil icon for the dataset to edit its attributes
In the central panel, change the Name field
Click the Save button
Setting up a CLM-FATES simulation
We will be using the CTSM/FATES-EMERALD Galaxy tool.This tool is based on the version of CLM-FATES that have been adapted to run at the sites included in the EMERALD project. More details about this model version can be found in README_fates_emerald_api
Comment: Tip: Finding your tool
Different Galaxy servers may have tools available under different sections, therefore it is often useful to use the search bar at the top of the tool panel to find your tool.
Additionally different servers may have multiple, similarly named tools which accomplish similar functions. When following tutorials, you should use precisely the tools that they describe. For real analyses, however, you will need to search among the various options to find the one that works for you.
Comment: Tip: Pre-selected tool parameters
When selecting a tool, Galaxy will pre-fill the tool parameters, selecting the first dataset with the corresponding type in your history.
Be aware that very often, the default pre-selection is incorrect and do not correspond to the required dataset.
So always check and update accordingly the tool parameters!
Hands On: Creating a new CTSM/FATES-EMERALD case
CTSM/FATES-EMERALD ( Galaxy version 2.0.1) with the following parameters:
param-file“inputdata for running FATES EMERALD”: inputdata_version2.0.0_ALP1.tar file from your history
“Name of your case”: ALP1_exp
In section “Customize the model run period”:
param-select“Determines the model run initialization type:: hybrid
“Reference case for hybrid or branch runs”: ALP1_refcase
“Reference date for hybrid or branch runs (yyyy-mm-dd)”: 2300-01-01
“Run start date (yyyy-mm-dd). Only used for startup or hybrid runs”: 0001-01-01
param-file“Restart for running FATES EMERALD”: CTSM_FATES-EMERALD_version2.0.0_ALP1_restart_2300-01-01.tar
“Provides a numerical count for STOP_OPTION”: 5
“Sets the run length along with STOP_N and STOP_DATE”: nyears
Comment: Startup versus Hybrid
When using startup, the FATES model will start from some arbitrary baseline state that is not linked to any previous run.
Startup runs are typically initialized using a start date of 0001-01-01 except if you change it (start date option).
For any scientific study, starting from an arbitraty baseline state implies you would need to run the model for a long period (between 100 and 200 years)
before being able to use the model outputs. For this reason, we usually make a first simulation (spin-up) in startup mode and reuse this case as a baseline
for our scientific study. We then use hybrid type and give additional inputs (restart files) to our simulation case. It is then important to specify the dates
of your restart files. This is what we do in this tutorial.
Check that the datatype galaxy-pencil of your outputs (history file) is netcdf
If this is not the case, please change the datatype now
Comment: About CLM-FATES history files
All the CLM-FATES history files are organized in a collection.
Comment: About datatypes
All the history files contain gridded data values written at specified times during the model run.
Depending on the length of your simulation, you may have one or more history files that you can recognize from their names:
ALP1_exp.clm2.h0.yyyy-mm-dd-sssss.nc (for non-monthly history files).
Datatypes are, by default, automatically guessed. Here, as the prefix is .nc, the format is not always recognized as netcdf files.
To cope with that, one can change the datatype manually, as shown below.
Click on the galaxy-pencilpencil icon for the dataset to edit its attributes
In the central panel, click galaxy-chart-select-dataDatatypes tab on the top
In the galaxy-chart-select-dataAssign Datatype, select datatypes from “New Type” dropdown
Tip: you can start typing the datatype into the field to filter the dropdown menu
Click the Save button
Renamegalaxy-pencil the output dataset (history file) to ALP1_exp.nc
Our FATES model has run for 5 years only, so we get a single output file. As previously, we recommend
to rename all netCDF files so that they do not contain any special characters or dots (except for the file extension) or slashes. Some tools, in
particular Panoply, won’t be able to recognize your file if not named properly.
Click on the galaxy-pencilpencil icon for the dataset to edit its attributes
In the central panel, change the Name field
Click the Save button
NetCDF xarray Metadata Info ( Galaxy version 0.15.1) to get metadata information for CLM-FATES netCDF outputs:
param-file“Netcdf file”: ALP1_exp.nc
Inspectgalaxy-eye the generated output files
Identify which variables would provide you some insights about canopy transpiration.
Question
What are the short names of the relevant variables? Which one will you pick if you want a result in mm/s?
What are the dimensions of these variables?
FCTR is the canopy transpiration in W/m^2 and QVEGT is in mm/s. Therefore, we would select the latter.
These variables are stored as a function of time and lndgrid and since we have only one grid cell, lngrid=1, hence the time series.
Quick visualization with Panoply
Opening up Panoply
Hands On: Launch Panoply
Panoply plots geo-referenced and other arrays from netCDF and is available as a Galaxy interactive environment and may not be available on all Galaxy servers.
Currently Panoply in Galaxy is available on useGalaxy.eu instance, on the “Interactive tools” tool panel section or,
as all interactive tools, from the dedicated useGalaxy.eu subdomain: live.useGalaxy.eu.
You may have to login again to live.usegalaxy.eu (use the same username and password than on other useGalaxy.eu subdomains)
and switch to the correct history.
Plot the rate of total mortality per PFT (MORTALITY)
Select a 2D plot with time as x-axis and colored by the rate of total mortality per PFT (Plant functional type).
Make sure to adjust the y-axis and save your plots in the output folder (as png file).
Question
Can you observe any pattern? Does it make any sense?
Comment: Quit Panoply properly to save your plots!
To make sure all your plots stored in outputs folder get exported to Galaxy, you need to quit panoply: File –> Quit Panoply.
Using Galaxy tools for analysing your CLM-FATES simulation
Panoply is a great tool for exploring the results of your simulations but what we would like is to automate the generation of the plots
so that we can reuse it for any simulations.
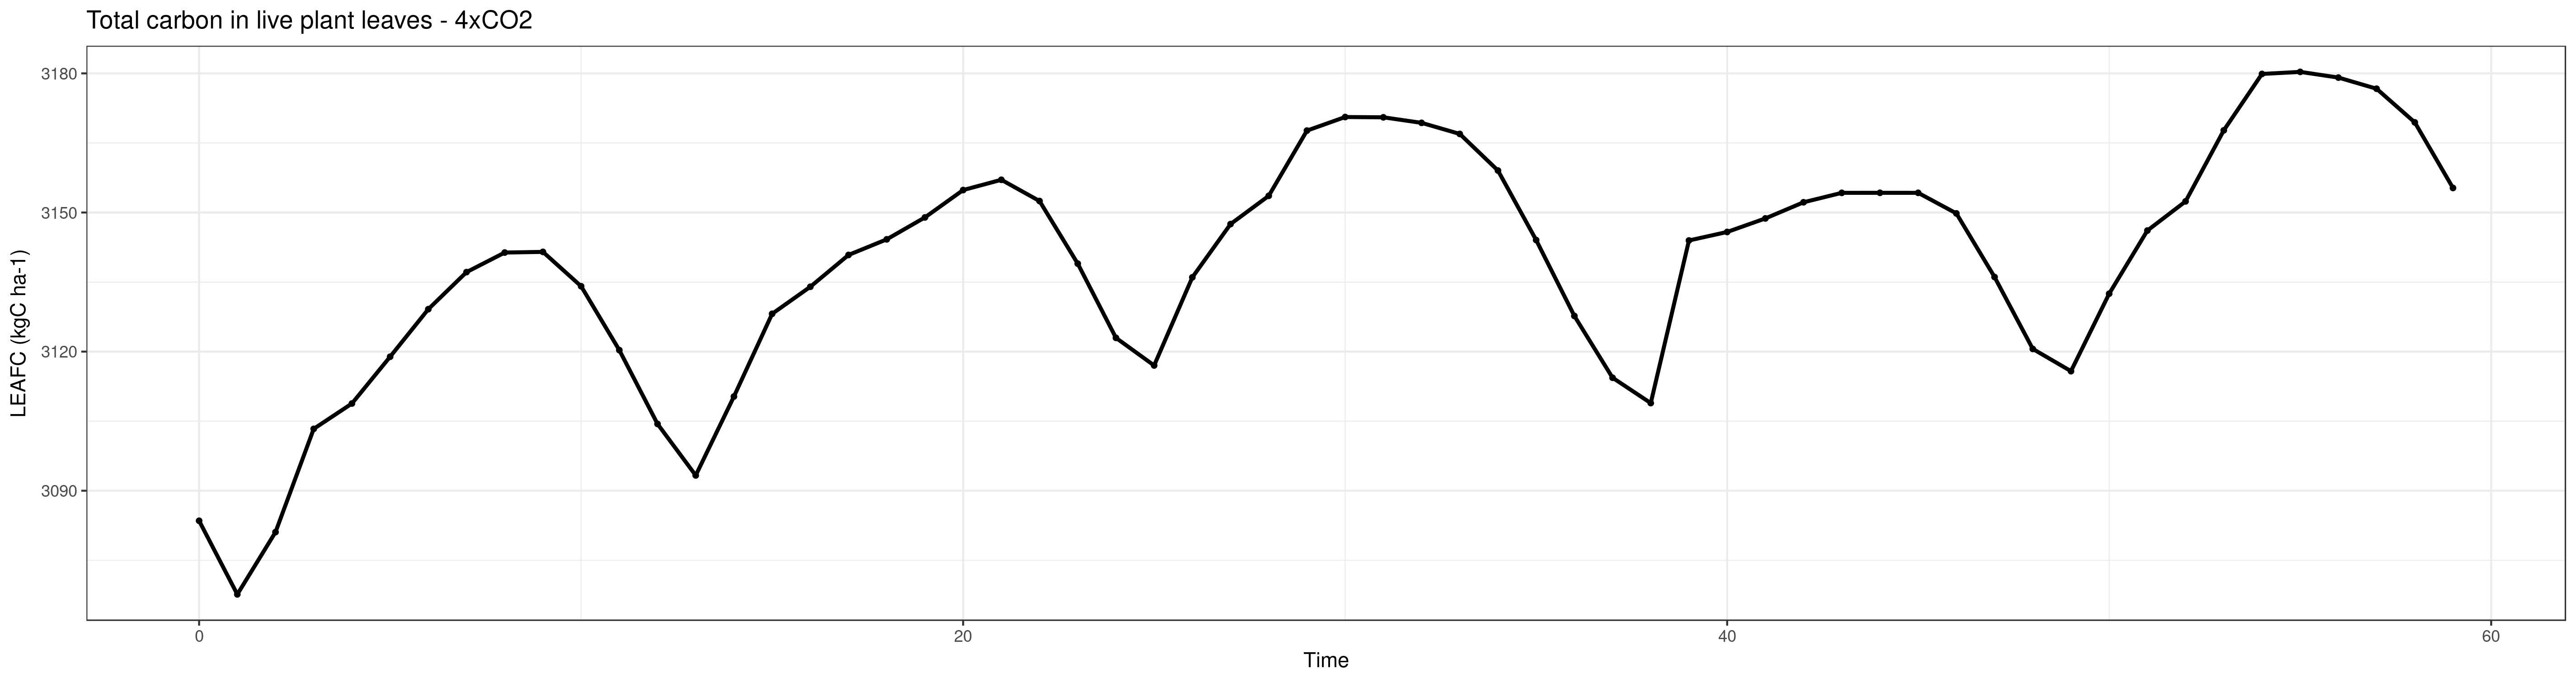
Hands On: Select and plot LEAFC
NetCDF xarray Selection ( Galaxy version 0.15.1) to select the total carbon in live plant leaves (LEAFC)
param-file“Input netcdf file”: ALP1_exp.nc
param-file“Tabular of variables”: Metadata info from ALP1_exp.nc (output of NetCDF xarray Metadata Infotool)
param-select“Choose the variable to extract”: LEAFC
Renamegalaxy-pencil dataset to NetCDF xarray Selection on ALP1_exp.nc
Click on the galaxy-pencilpencil icon for the dataset to edit its attributes
In the central panel, change the Name field
Click the Save button
Replace parts of text ( Galaxy version 1.1.3) to clean date column for plotting:
param-file“File to process”: NetCDF xarray Selection on ALP1_exp.nc
param-text“Find pattern”: 00:00:00
“Find-Pattern is a regular expression”: No
“Replace all occurences of the pattern”: Yes
“Case-Insensitive search”: No
“Find whole-words”: Yes
“Ignore first line”: Yes
param-select“Find and Replace text in”: entire line
Renamegalaxy-pencil dataset to LEAFC_clean.tabular
Click on the galaxy-pencilpencil icon for the dataset to edit its attributes
In the central panel, change the Name field
Click the Save button
Scatterplot w ggplot2tool to plot the total carbon in live plant leaves (LEAFC):
param-file“Input in tabular format”: LEAFC_clean.tabular
“Column to plot on x-axis”: 1
“Column to plot on y-axis”: 4
“Plot title”: Total carbon in live plant leaves
“Label for x axis”: Time
“Label for y axis”: LEAFC (kgC ha-1)
In Advanced Options
param-select“Type of plot”: Points and Lines
In Output options
“width of output”:19.0
“height of output”: 5.0
Viewgalaxy-eye the resulting plot:
Convert your analysis history into a Galaxy workflow
Hands On: Extract workflow
Go to the History Options menugalaxy-gear menu
Select the Extract Workflow option.
Remove any unwanted steps, in particular all steps with Panoply as we do not want to have interactive tools in our automated workflow..
Rename the workflow to something descriptive
For example: CLM-FATES_ ALP1 simulation (5 years).
If there are any steps that shouldn’t be included in the workflow, you can uncheck them.
Click “Create Workflow”
Click on “edit” and check your workflow
Check all the steps
Change your CLM-FATES case and rerun your workflow
We would like to run a CLM-FATES case where the atmospheric Carbon Dioxyde Concentration (CO2) is increased by a factor of 4.
Hands On: Compare the two simulations
Using the results from your two CLM-FATES simulations and the generated plots, assess the impact
of an increase in the atmosperhic CO2 on the outputs of the model.
Open the workflow editor
Click on galaxy-workflows-activityWorkflows in the Galaxy activity bar (on the left side of the screen, or in the top menu bar of older Galaxy instances)
Click on the galaxy-wf-editEdit button of the workflow you would like to edit
Make your desired changes in the workflow editor
Click on the dataset-saveSave icon, which appears next to the workflow title if you have unsaved changes, to save your changes and continue editing, or on dataset-saveSave + Exit in the activity bar to save your changes and leave the workflow editor.
Edit your workflow and customize it to run your new CO2 experiment. For this you would need to:
In “Advanced customization”, change “Atmospheric CO2 molar ratio (by volume) only used when co2_type==constant (umol/mol)” from 367.0 to 1468.0.
Add an extra step to extract the first history file from the history collection: Extract Dataset
and make sure to select “netcdf” in the change datatype field.
Generate the corresponding plot.
The final workflow would be similar to the one shown below:
Is the model response to this significant increase of atmospheric CO2 what you expected?
Justify your answer.
Is the current workflow (in particular the variables selected for the plots) the best choice?
What changes/additions would you recommend?
Running 5 years is already sufficient to highlight significant changes.
Many suggestions can be given here. One simple addition can be the generation of plots where
both simulations are represented on the same plot.
Share your work
One of the most important features of Galaxy comes at the end of an analysis. When you have published striking findings, it is important that other researchers are able to reproduce your in-silico experiment. Galaxy enables users to easily share their workflows and histories with others.
Sharing your history allows others to import and access the datasets, parameters, and steps of your history.
Access the history sharing menu via the History Options dropdown (galaxy-history-options), and clicking “history-share Share or Publish”
Share via link
Open the History Optionsgalaxy-history-options menu at the top of your history panel and select “history-share Share or Publish”
galaxy-toggleMake History accessible
A Share Link will appear that you give to others
Anybody who has this link can view and copy your history
Publish your history
galaxy-toggleMake History publicly available in Published Histories
Anybody on this Galaxy server will see your history listed under the Published Histories tab opened via the galaxy-histories-activityHistories activity
Share only with another user.
Enter an email address for the user you want to share with in the Please specify user email input below Share History with Individual Users
Your history will be shared only with this user.
Finding histories others have shared with me
Click on the galaxy-histories-activityHistories activity in the activity bar on the left
Click the Shared with me tab
Here you will see all the histories others have shared with you directly
Note: If you want to make changes to your history without affecting the shared version, make a copy by going to History Optionsgalaxy-history-options icon in your history and clicking Copy this History
Hands On: Share history
Share your history with your neighbour (ask for his/her galaxy username).
Find the history shared by your neighbour. Histories shared with specific users can be accessed by those users under their top masthead “User” menu under Histories shared with me.
Comment: Publish your history to https://workflowhub.eu/
One step further is to share your workflow on https://workflowhub.eu where it
will be stored in a Galaxy workflow format as well as in Common Workflow Language.
It provides standardised workflow identifiers and descriptions needed for workflow discovery, reuse, preservation, interoperability and monitoring and metadata harvesting using standard protocols.
Please note that https://workflowhub.eu is still under active development.
Conclusion
We have learnt to run single-point simulations with FATES-CLM and generate workflows for multi-site scenarios.
You've Finished the Tutorial
Please also consider filling out the Feedback Form as well!
Key points
CLM-FATES is a numerical terrestrial ecosystem model used in climate models
Panoply is a quick visualization tools for plotting your results
Multi-case simulations can be easily developed and shared with a Galaxy workflow
Frequently Asked Questions
Have questions about this tutorial? Have a look at the available FAQ pages and support channels
Taking off the training wheels: the properties of a dynamic vegetation model without climate envelopes, CLM4.5(ED), 2015. 10.5194/gmd-8-3593-2015
Klanderud, K., V. Vandvik, and D. Goldberg, 2015 The Importance of Biotic vs. Abiotic Drivers of Local Plant Community Composition Along Regional Bioclimatic Gradients (C. Armas, Ed.). PLOS ONE 10: e0130205. 10.1371/journal.pone.0130205
Fisher, R. A., C. D. Koven, W. R. L. Anderegg, B. O. Christoffersen, M. C. Dietze et al., 2017 Vegetation demographics in Earth System Models: A review of progress and priorities. Global Change Biology 24: 35–54. 10.1111/gcb.13910
Koven, C. D., R. G. Knox, R. A. Fisher, J. Q. Chambers, B. O. Christoffersen et al., 2020 Benchmarking and parameter sensitivity of physiological and vegetation dynamics using the Functionally Assembled Terrestrial Ecosystem Simulator (FATES) at Barro Colorado Island, Panama. Biogeosciences 17: 3017–3044. 10.5194/bg-17-3017-2020
Vandvik, V., O. Skarpaas, K. Klanderud, R. J. Telford, A. H. Halbritter et al., 2020 Biotic rescaling reveals importance of species interactions for variation in biodiversity responses to climate change. Proceedings of the National Academy of Sciences 117: 22858–22865. 10.1073/pnas.2003377117
Feedback
Did you use this material as an instructor? Feel free to give us feedback on how it went.
Did you use this material as a learner or student? Click the form below to leave feedback.
Hiltemann, Saskia, Rasche, Helena et al., 2023 Galaxy Training: A Powerful Framework for Teaching! PLOS Computational Biology 10.1371/journal.pcbi.1010752
Batut et al., 2018 Community-Driven Data Analysis Training for Biology Cell Systems 10.1016/j.cels.2018.05.012
@misc{climate-fates,
author = "Anne Fouilloux and Hui Tang",
	title = "Functionally Assembled Terrestrial Ecosystem Simulator (FATES) (Galaxy Training Materials)",
	year = "",
	month = "",
	day = "",
	url = "\url{https://training.galaxyproject.org/training-material/topics/climate/tutorials/fates/tutorial.html}",
	note = "[Online; accessed TODAY]"
}
@article{Hiltemann_2023,
	doi = {10.1371/journal.pcbi.1010752},
	url = {https://doi.org/10.1371%2Fjournal.pcbi.1010752},
	year = 2023,
	month = {jan},
	publisher = {Public Library of Science ({PLoS})},
	volume = {19},
	number = {1},
	pages = {e1010752},
	author = {Saskia Hiltemann and Helena Rasche and Simon Gladman and Hans-Rudolf Hotz and Delphine Larivi{\`{e}}re and Daniel Blankenberg and Pratik D. Jagtap and Thomas Wollmann and Anthony Bretaudeau and Nadia Gou{\'{e}} and Timothy J. Griffin and Coline Royaux and Yvan Le Bras and Subina Mehta and Anna Syme and Frederik Coppens and Bert Droesbeke and Nicola Soranzo and Wendi Bacon and Fotis Psomopoulos and Crist{\'{o}}bal Gallardo-Alba and John Davis and Melanie Christine Föll and Matthias Fahrner and Maria A. Doyle and Beatriz Serrano-Solano and Anne Claire Fouilloux and Peter van Heusden and Wolfgang Maier and Dave Clements and Florian Heyl and Björn Grüning and B{\'{e}}r{\'{e}}nice Batut and},
	editor = {Francis Ouellette},
	title = {Galaxy Training: A powerful framework for teaching!},
	journal = {PLoS Comput Biol}
}
Congratulations on successfully completing this tutorial!
You can use Ephemeris's shed-tools install command to install the tools used in this tutorial.
Questions:


Open image in new tab
Open image in new tab
Open image in new tab
Open image in new tab