Parameter tuning and optimization - Evaluating nuclei segmentation with Galaxy
| Author(s) |
|
| Reviewers |
|
OverviewQuestions:
Objectives:
What are the challenges of using the same settings for every biological image, and how does parameter tuning address these challenges?
How can we choose the best filters for preprocessing images for nuclei segmentation?
Requirements:
Understand the importance of parameter tuning in bioimage analysis for achieving accurate results
Learn how to perform parameter tuning for segmentation in Galaxy
- Introduction to Galaxy Analyses
- tutorial Hands-on: FAIR Bioimage Metadata
- tutorial Hands-on: REMBI - Recommended Metadata for Biological Images – metadata guidelines for bioimaging data
Time estimation: 1 hourLevel: Introductory IntroductorySupporting Materials:Published: Apr 28, 2025Last modification: Jan 21, 2026License: Tutorial Content is licensed under Creative Commons Attribution 4.0 International License. The GTN Framework is licensed under MITpurl PURL: https://gxy.io/GTN:T00532rating Rating: 5.0 (0 recent ratings, 1 all time)version Revision: 4
Parameter tuning is super important in image analysis. When you’re doing image analysis — like segmentation, quantification, or feature extraction — the settings you choose make a big difference in how accurate your results are. But biological images can vary strongly in terms of quality, contrast, and structure. So you can’t just use the same settings for every image.
That’s where parameter tuning comes in. By adjusting these settings carefully, researchers can make sure their tools are capturing the right biological info without adding noise or messing up the images. This helps make sure their work is repeatable and reliable, which is key for getting accurate scientific results. Basically, it’s all about finding the perfect balance to get the most useful and accurate data possible.
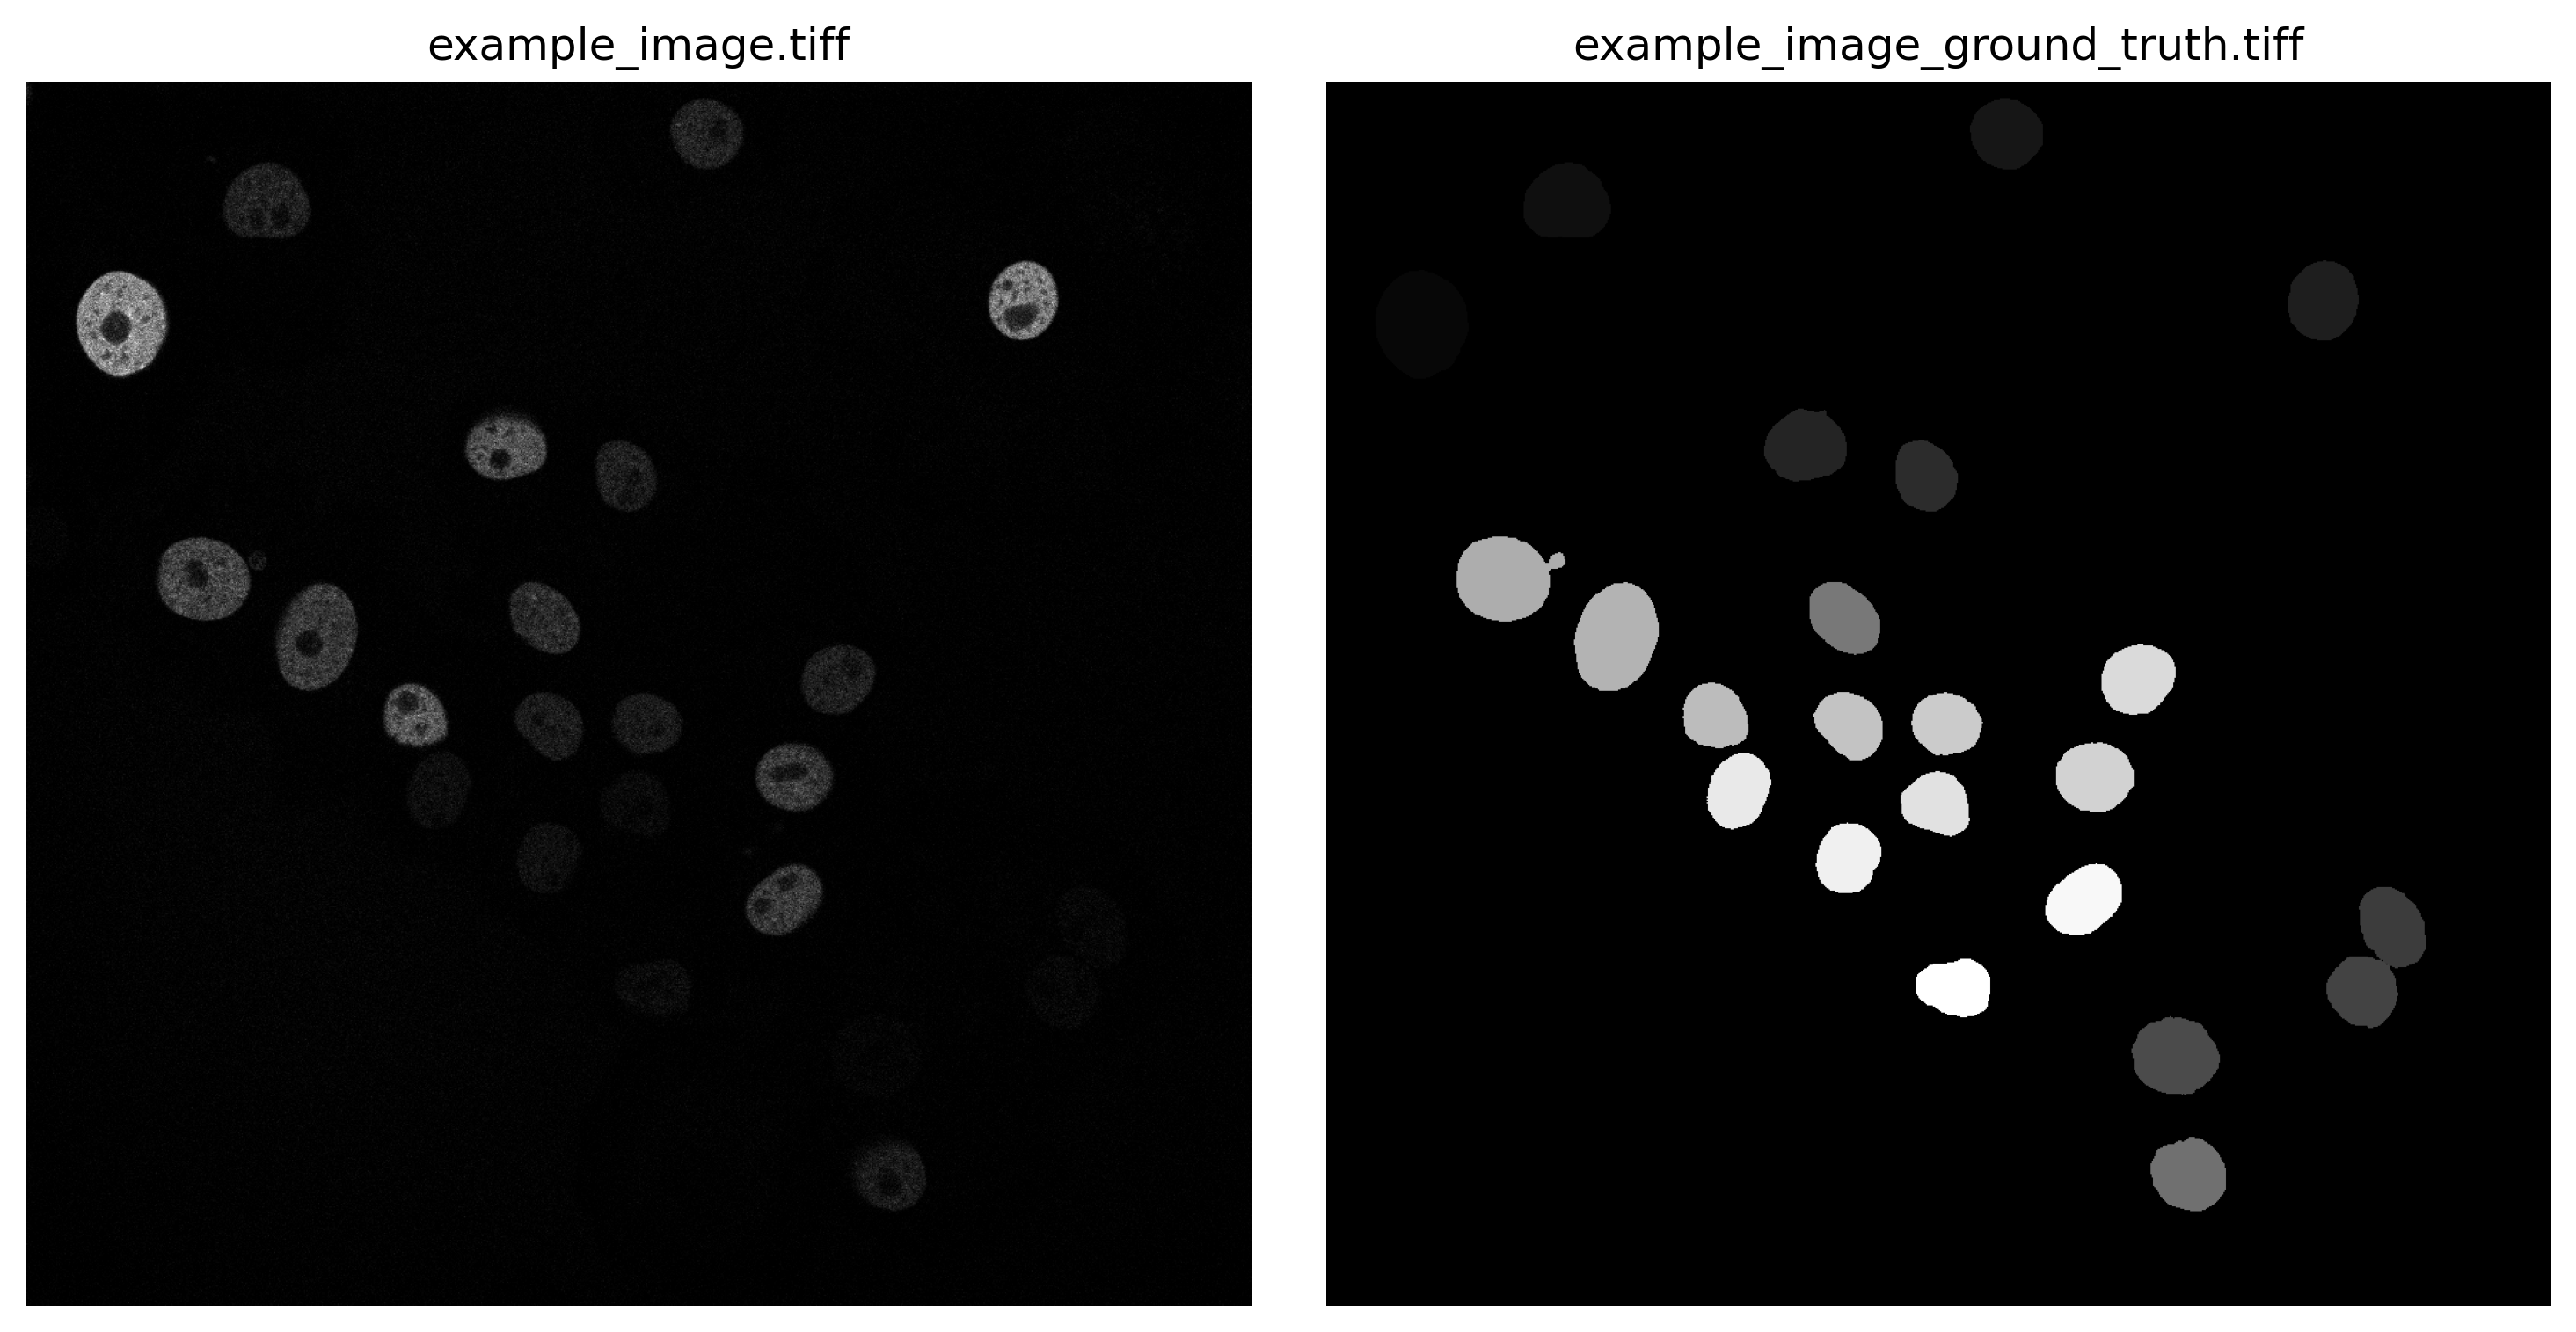
In this tutorial, we will show how to perform parameter tuning for segmentation. In particular, we will fine-tune a parameter of Gaussian filters for nuclei segmentation by quantitatively comparing ground-truth segmentation with the ones processed in Galaxy. As a dataset, we will use GFP-GOWT1 mouse stem cell images, which were acquired from Bártová et al. 2011. The training dataset contains a collection of images plus their ground truth (Maška et al. 2014). The images are publicly available at the ISBI Cell Tracking Challenge repository.
So, let’s proceed!
Get the image data
Hands On: Data Upload
Create a new history for this tutorial.
- Download the following image and import it into your Galaxy history.
If you are importing the image via URL:
- Copy the link location
Click galaxy-upload Upload at the top of the activity panel
- Select galaxy-wf-edit Paste/Fetch Data
Paste the link(s) into the text field
Press Start
- Close the window
If you are importing the image from the shared data library:
As an alternative to uploading the data from a URL or your computer, the files may also have been made available from a shared data library:
- Go into Libraries (left panel)
- Navigate to the correct folder as indicated by your instructor.
- On most Galaxies tutorial data will be provided in a folder named GTN - Material –> Topic Name -> Tutorial Name.
- Select the desired files
- Click on Add to History galaxy-dropdown near the top and select as Datasets from the dropdown menu
In the pop-up window, choose
- “Select history”: the history you want to import the data to (or create a new one)
- Click on Import
Rename the datasets appropriately if needed (e.g.
"original_image","ground_truth")Confirm the datatypes are correct (
tifffor both images)
- Click on the galaxy-pencil pencil icon for the dataset to edit its attributes
- In the central panel, click galaxy-chart-select-data Datatypes tab on the top
- In the galaxy-chart-select-data Assign Datatype, select
datatypesfrom “New Type” dropdown
- Tip: you can start typing the datatype into the field to filter the dropdown menu
- Click the Save button
As an alternative to uploading the data from a URL or your computer, the files may also have been made available from a shared data library:
- Go into Libraries (left panel)
- Navigate to the correct folder as indicated by your instructor.
- On most Galaxies tutorial data will be provided in a folder named GTN - Material –> Topic Name -> Tutorial Name.
- Select the desired files
- Click on Add to History galaxy-dropdown near the top and select as Datasets from the dropdown menu
In the pop-up window, choose
- “Select history”: the history you want to import the data to (or create a new one)
- Click on Import

Define a series of values to test
The parameter of Gaussian filters that you are going to tune in this tutorial is sigma, that is the size of the filters. You can now input a series of sigma values you want to test. Values need to be imported as a tabular file as shown in the figure:
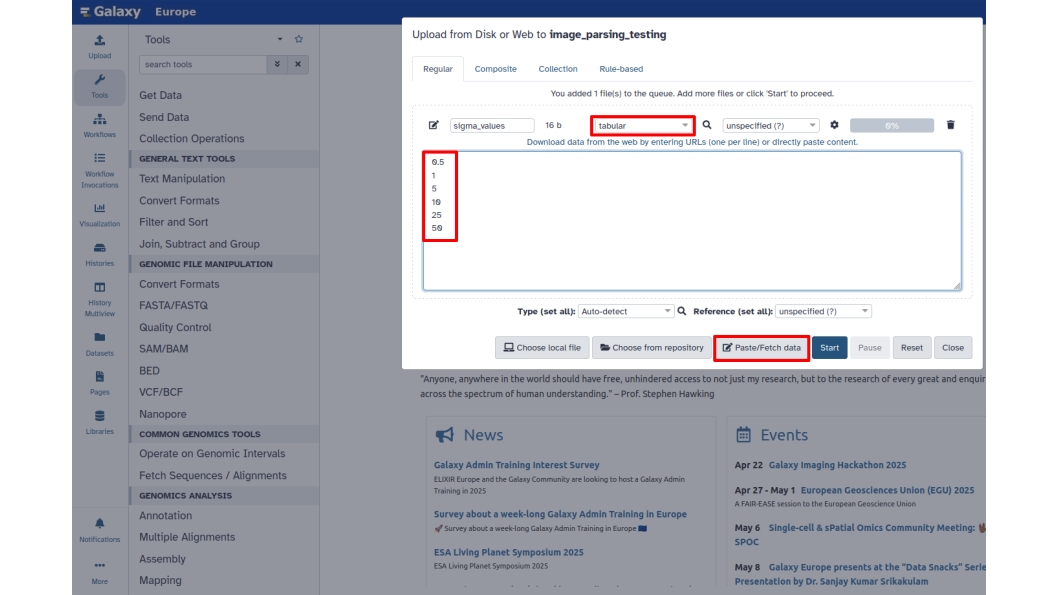
Next, copy and paste or manually add the desired values. Additionally, change the file format to tabular. Then, rename the file to sigma_values and click Start.
The dataset will appear now in your history.
You now have everything you need to build the parameter tuning workflow!
Evaluate nuclei segmentation - Full workflow
Hands On: Create a workflow to evaluate nuclei segmentation
Create a new workflow in the workflow editor.
- Click Workflow on the top bar
- Click the new workflow galaxy-wf-new button
- Give it a clear and memorable name
- Clicking Save will take you directly into the workflow editor for that workflow
- Need more help? Please see the How to make a workflow subsection here
- Add three tool Input dataset:
- param-file 1: Input Dataset, param-file 2: Input Dataset and param-file 3: Input Dataset will appear in your workflow. Change the “Label” of these inputs to Dataset to perform segmentation, Input ground truth and Sigma values to test
- Add Split by group ( Galaxy version 0.6)
- Add Parse parameter value from the list of tools with the following recommended parameters:
- Select type of parameter to parse: Float
- Add Filter 2-D image ( Galaxy version 1.12.0+galaxy1) from the list of tools with the following recommended parameters:
- Filter Type: Gaussian
- Sigma: Click the “Add Connection to Module” symbol
- Add Perform histogram equalization ( Galaxy version 0.18.1+galaxy0) from the list of tools with the following recommended parameters:
- Histogram equalization algorithm: CLAHE
- Add Threshold image ( Galaxy version 0.18.1+galaxy3) from the list of tools with the following recommended parameters:
- Thresholding method : Globally Adaptive/Otsu
- Offset: 0.0
- Add Compute image segmentation and object detection performance measures ( Galaxy version 1.4.0-2) from the list of tools with the following recommended parameters:
- Unzip: No
- Segmentation is uniquely labeled: No
- Ground truth is uniquely labeled: No
- Performance measure(s):
- Region-based / Dice
- Region-based / Jaccard Coefficent
- Region-based / Rand Index
- Add Collapse Collection ( Galaxy version 5.1.0) from the list of tools with the following recommended parameters:
- Prepend File name: Yes
- Where to add dataset name: Same line and only once per dataset
- Connect the following inputs:
- Connect the output of param-file 3: Sigma values to test to the param-file “File to split” input of tool 4: Split by group.
- Connect the output of param-file 4: Split by group to the param-file “Object ID” input of tool 5: Input file containing parameter to parse out of.
- Connect the output of param-file 5: Input file containing parameter to parse out of to the param-file “Sigma” input of tool 6: Filter 2-D image.
- Connect the output of param-file 2: Dataset to perform segmentation to the param-file “Input Image” input of tool 6: Filter 2-D image.
- Connect the output of param-file 6: Filter 2-D image to the param-file “Input Image” input of tool 7: Perform histogram equalization.
- Connect the output of param-file 7: Perform histogram equalization to the param-file “Input Image” input of tool 8: Threshold image.
- Connect the output of param-file 8: Threshold image to the param-file “Segmented images” input of tool 9: Compute image segmentation and object detection performance measures.
- Connect the output of param-file 2: Input Ground Truth to the param-file “Ground truth images” input of tool 9: Compute image segmentation and object detection performance measures.
- Connect the output of param-file 9: Compute image segmentation and object detection performance measures to the param-file “Collection of files to collapse into single dataset” input of tool 10: Collapse Collection.
This is how the workflow should look like!
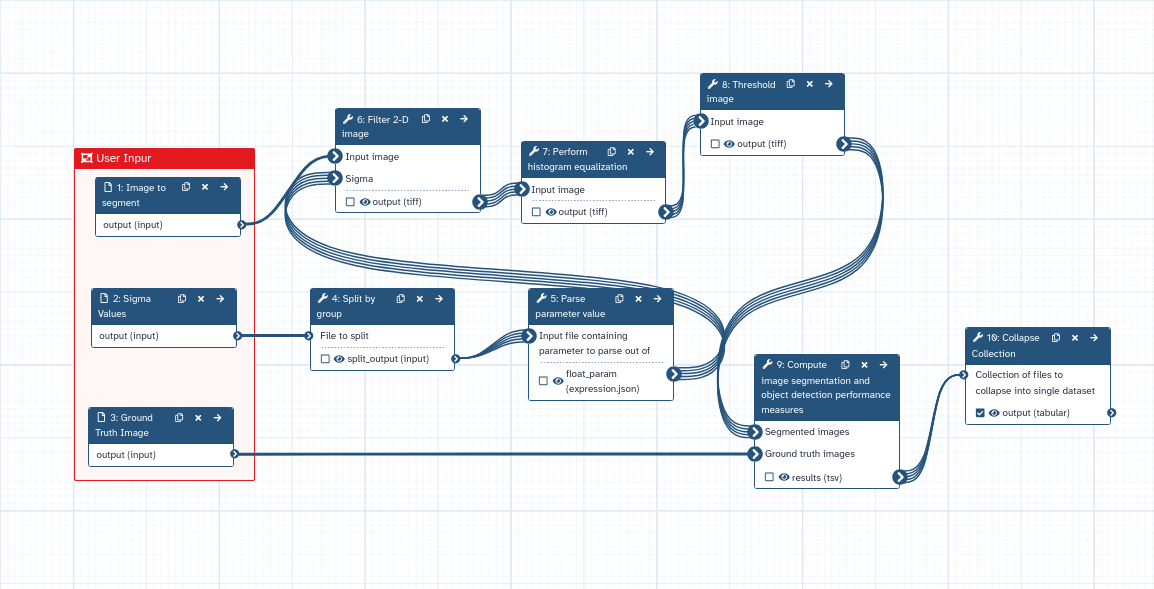
In this workflow, the Parse parameter value tool is passing sigma values one by one to the workflow downstream. In this way, a collection of datasets is created for each sigma value and each one is processed individually. Such strategy can be adapted for any parameter of the workflow and, in general, for any tool.
Coming back to the results, here are the results from segmentation with four different sigmas…
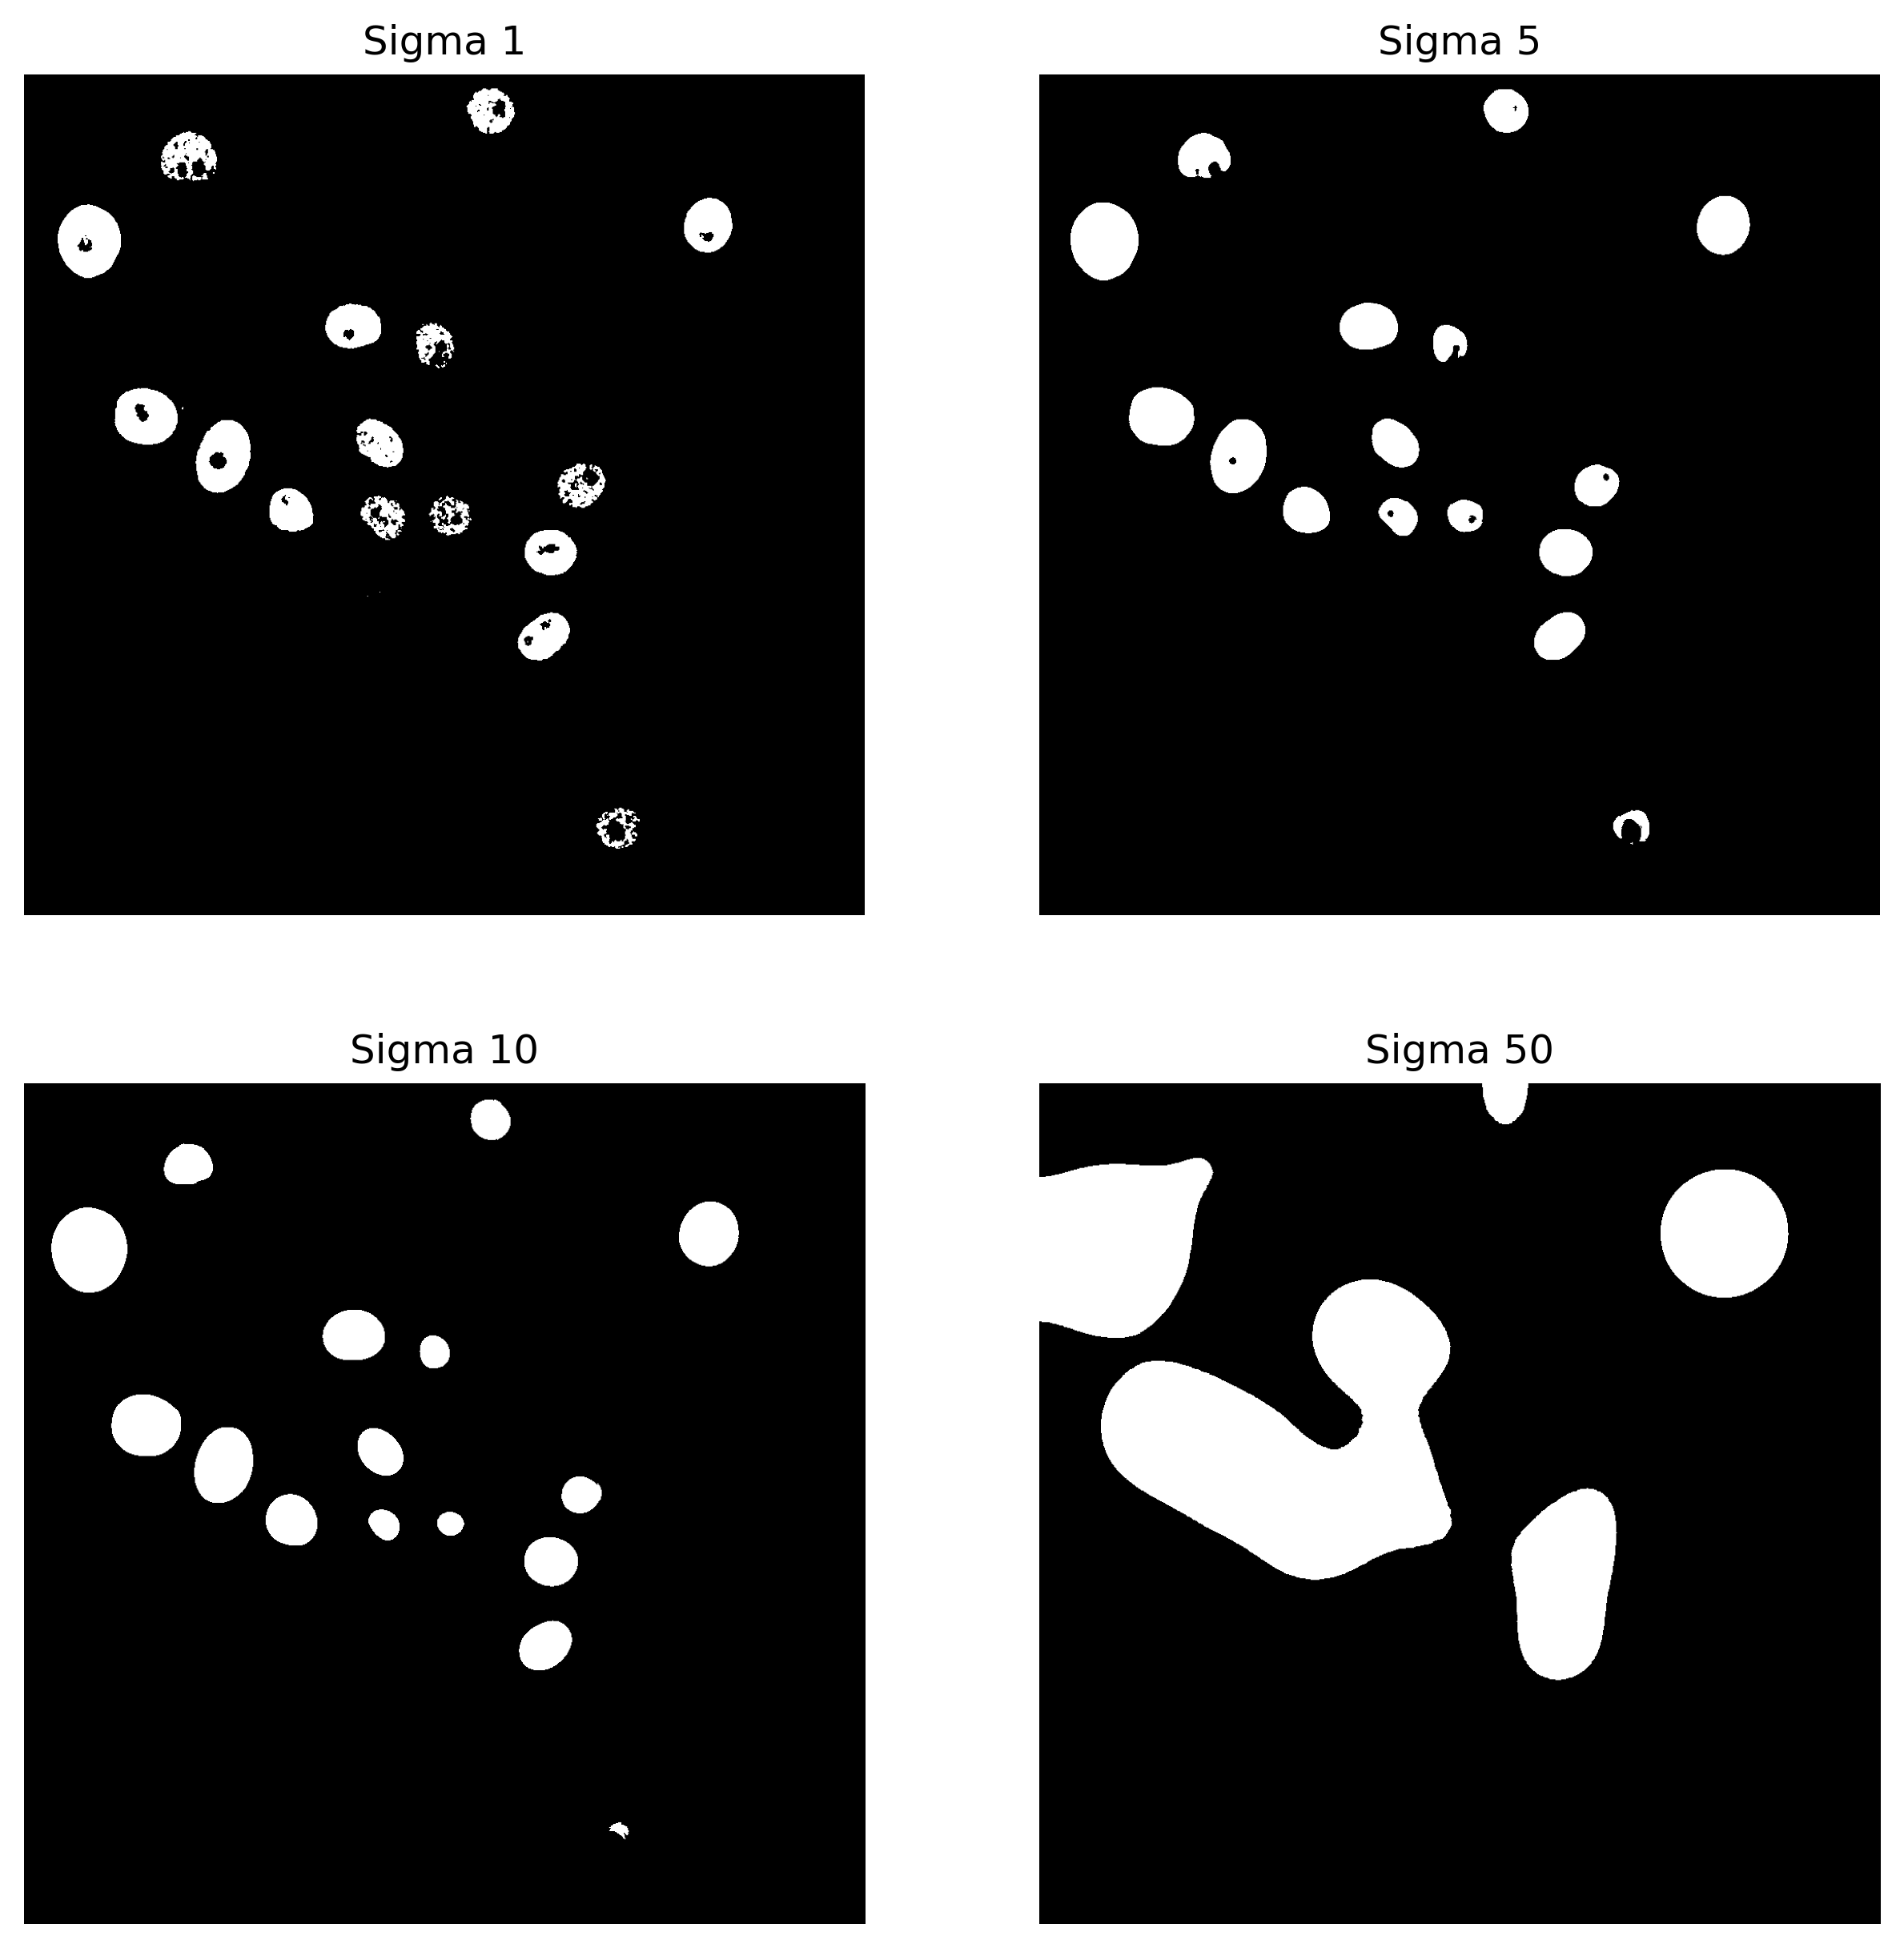
…and below we can see the output of the analysis:

We are comparing three different performance measures region-based segmentation Dice, Jaccard and Rand. All three indexes measure the agreement of the predicted segmentation image foreground and the ground truth image foreground
Overall, the results suggest that as the sigma value increases too much, the coefficient values decrease. Lower sigma values result in segmentations that more closely match the ground truth, with the highest Dice coefficient of 0.74 achieved at a sigma value of 5.
Conclusions
In this tutorial, we demonstrate how to test different sigma values to evaluate segmentation with a ground truth image.
Overall, the Parse parameter value tool can be easily reused for testing other parameters and applied to different workflows.
You've Finished the Tutorial
Key points
Parameter tuning helps achieve reliable and repeatable results
Frequently Asked Questions
Have questions about this tutorial? Have a look at the available FAQ pages and support channelsUseful literature
Further information, including links to documentation and original publications, regarding the tools, analysis techniques and the interpretation of results described in this tutorial can be found here.
References
- Bártová, E., G. Šustáčková, L. Stixová, S. Kozubek, S. Legartová et al., 2011 Recruitment of Oct4 Protein to UV-Damaged Chromatin in Embryonic Stem Cells (S. Cotterill, Ed.). PLoS ONE 6: e27281. 10.1371/journal.pone.0027281
- Maška, M., V. Ulman, D. Svoboda, P. Matula, P. Matula et al., 2014 A benchmark for comparison of cell tracking algorithms. Bioinformatics 30: 1609–1617. 10.1093/bioinformatics/btu080
Feedback
Did you use this material as an instructor? Feel free to give us feedback on how it went.
Did you use this material as a learner or student? Click the form below to leave feedback.

Citing this Tutorial
- Riccardo Massei, Parameter tuning and optimization - Evaluating nuclei segmentation with Galaxy (Galaxy Training Materials). https://training.galaxyproject.org/training-material/topics/imaging/tutorials/parameter-tuning/tutorial.html Online; accessed TODAY
- Hiltemann, Saskia, Rasche, Helena et al., 2023 Galaxy Training: A Powerful Framework for Teaching! PLOS Computational Biology 10.1371/journal.pcbi.1010752
- Batut et al., 2018 Community-Driven Data Analysis Training for Biology Cell Systems 10.1016/j.cels.2018.05.012
@misc{imaging-parameter-tuning,
author = "Riccardo Massei",
	title = "Parameter tuning and optimization - Evaluating nuclei segmentation with Galaxy (Galaxy Training Materials)",
	year = "",
	month = "",
	day = "",
	url = "\url{https://training.galaxyproject.org/training-material/topics/imaging/tutorials/parameter-tuning/tutorial.html}",
	note = "[Online; accessed TODAY]"
}
@article{Hiltemann_2023,
	doi = {10.1371/journal.pcbi.1010752},
	url = {https://doi.org/10.1371%2Fjournal.pcbi.1010752},
	year = 2023,
	month = {jan},
	publisher = {Public Library of Science ({PLoS})},
	volume = {19},
	number = {1},
	pages = {e1010752},
	author = {Saskia Hiltemann and Helena Rasche and Simon Gladman and Hans-Rudolf Hotz and Delphine Larivi{\`{e}}re and Daniel Blankenberg and Pratik D. Jagtap and Thomas Wollmann and Anthony Bretaudeau and Nadia Gou{\'{e}} and Timothy J. Griffin and Coline Royaux and Yvan Le Bras and Subina Mehta and Anna Syme and Frederik Coppens and Bert Droesbeke and Nicola Soranzo and Wendi Bacon and Fotis Psomopoulos and Crist{\'{o}}bal Gallardo-Alba and John Davis and Melanie Christine Föll and Matthias Fahrner and Maria A. Doyle and Beatriz Serrano-Solano and Anne Claire Fouilloux and Peter van Heusden and Wolfgang Maier and Dave Clements and Florian Heyl and Björn Grüning and B{\'{e}}r{\'{e}}nice Batut and},
	editor = {Francis Ouellette},
	title = {Galaxy Training: A powerful framework for teaching!},
	journal = {PLoS Comput Biol}
}
Funding
These individuals or organisations provided funding support for the development of this resource


Do you want to extend your knowledge?Follow one of our recommended follow-up trainings:
You can use Ephemeris's
shed-tools installcommand to install the tools used in this tutorial.shed-tools install [-g GALAXY] [-a API_KEY] -t <(curl https://training.galaxyproject.org/training-material/api/topics/imaging/tutorials/parameter-tuning/tutorial.json | jq .admin_install_yaml -r)Alternatively you can copy and paste the following YAML
---
install_tool_dependencies: true
install_repository_dependencies: true
install_resolver_dependencies: true
tools:
- name: split_file_on_column
  owner: bgruening
  revisions: ff2a81aa3f08
  tool_panel_section_label: Text Manipulation
  tool_shed_url: https://toolshed.g2.bx.psu.edu/
- name: 2d_auto_threshold
  owner: imgteam
  revisions: 699a5e9146b3
  tool_panel_section_label: Imaging
  tool_shed_url: https://toolshed.g2.bx.psu.edu/
- name: 2d_histogram_equalization
  owner: imgteam
  revisions: b1c2c210813c
  tool_panel_section_label: Imaging
  tool_shed_url: https://toolshed.g2.bx.psu.edu/
- name: 2d_simple_filter
  owner: imgteam
  revisions: d51310ab328a
  tool_panel_section_label: Imaging
  tool_shed_url: https://toolshed.g2.bx.psu.edu/
- name: segmetrics
  owner: imgteam
  revisions: ac55e2f4d9e3
  tool_panel_section_label: Imaging
  tool_shed_url: https://toolshed.g2.bx.psu.edu/
- name: collapse_collections
  owner: nml
  revisions: 90981f86000f
  tool_panel_section_label: Collection Operations
  tool_shed_url: https://toolshed.g2.bx.psu.edu/