Importing (uploading) data from Onedata
| Author(s) |
|
| Reviewers |
|
OverviewQuestions:
Objectives:
How to import data from Onedata to Galaxy?
How to configure Onedata as a data source in Galaxy?
What are the different ways to configure Onedata in Galaxy?
Requirements:
Learn how to configure Onedata as a data source in Galaxy.
Understand the difference between configuring your own and generic Onedata source.
Learn how to import data from Onedata to Galaxy.
- tutorial Hands-on: Galaxy Basics for genomics
- slides Slides: Getting data into Galaxy
- tutorial Hands-on: Getting started with Onedata distributed storage
Time estimation: 15 minutesLevel: Introductory IntroductorySupporting Materials:Published: Mar 24, 2025Last modification: Apr 8, 2025License: Tutorial Content is licensed under Creative Commons Attribution 4.0 International License. The GTN Framework is licensed under MITpurl PURL: https://gxy.io/GTN:T00493rating Rating: 5.0 (1 recent ratings, 1 all time)version Revision: 2
Agenda
Prerequisites
- This tutorial assumes that you have basic knowledge about Onedata and access to a Onedata ecosystem. If needed, follow this tutorial first!
- To use Onedata as a remote file source for data import, you need the domain of the Onezone service and a suitable access token. Here is the relevant guide on how to get them.
- The Galaxy server must be properly configured by the admins for the Onedata remote and/or Onedata BYOD templates to be available. Here is the corresponding tutorial.
Introduction
You may import the data stored in Onedata into Galaxy (also referred to as data upload). There are two ways how to do that; either use the Bring Your Own Data (BYOD) feature to configure your own Remote File Sources (recommended), or use the ones configured by Galaxy admins (if applicable). Below hands-on tutorials cover both scenarios.
While Onedata can be used for both, a Remote File Source is not the same as a Storage Location. In this tutorial, you will be setting up a Onedata-based Remote File Source, which allows importing (uploading) data to Galaxy and exporting it from Galaxy. If you are looking to use a Storage Location, refer to this tutorial.
Configuration
Configure your own Onedata Remote File Source
To configure a Onedata remote using the Bring Your Own Data (BYOD) approach, follow these steps:
- Log in to your Galaxy account.
- Go to the Manage Your Remote File Sources section of the Preferences menu.
- Click Create in the top right corner to create a new Remote File Source.

- Choose the Onedata Storage template. If there is no such template, the Galaxy server is not configured to support it. Consider contacting its admins.
- Fill in the information. If you wish to perform exports to this remote, check
the Writable? toggle and make sure that your Onedata access token is write-enabled.
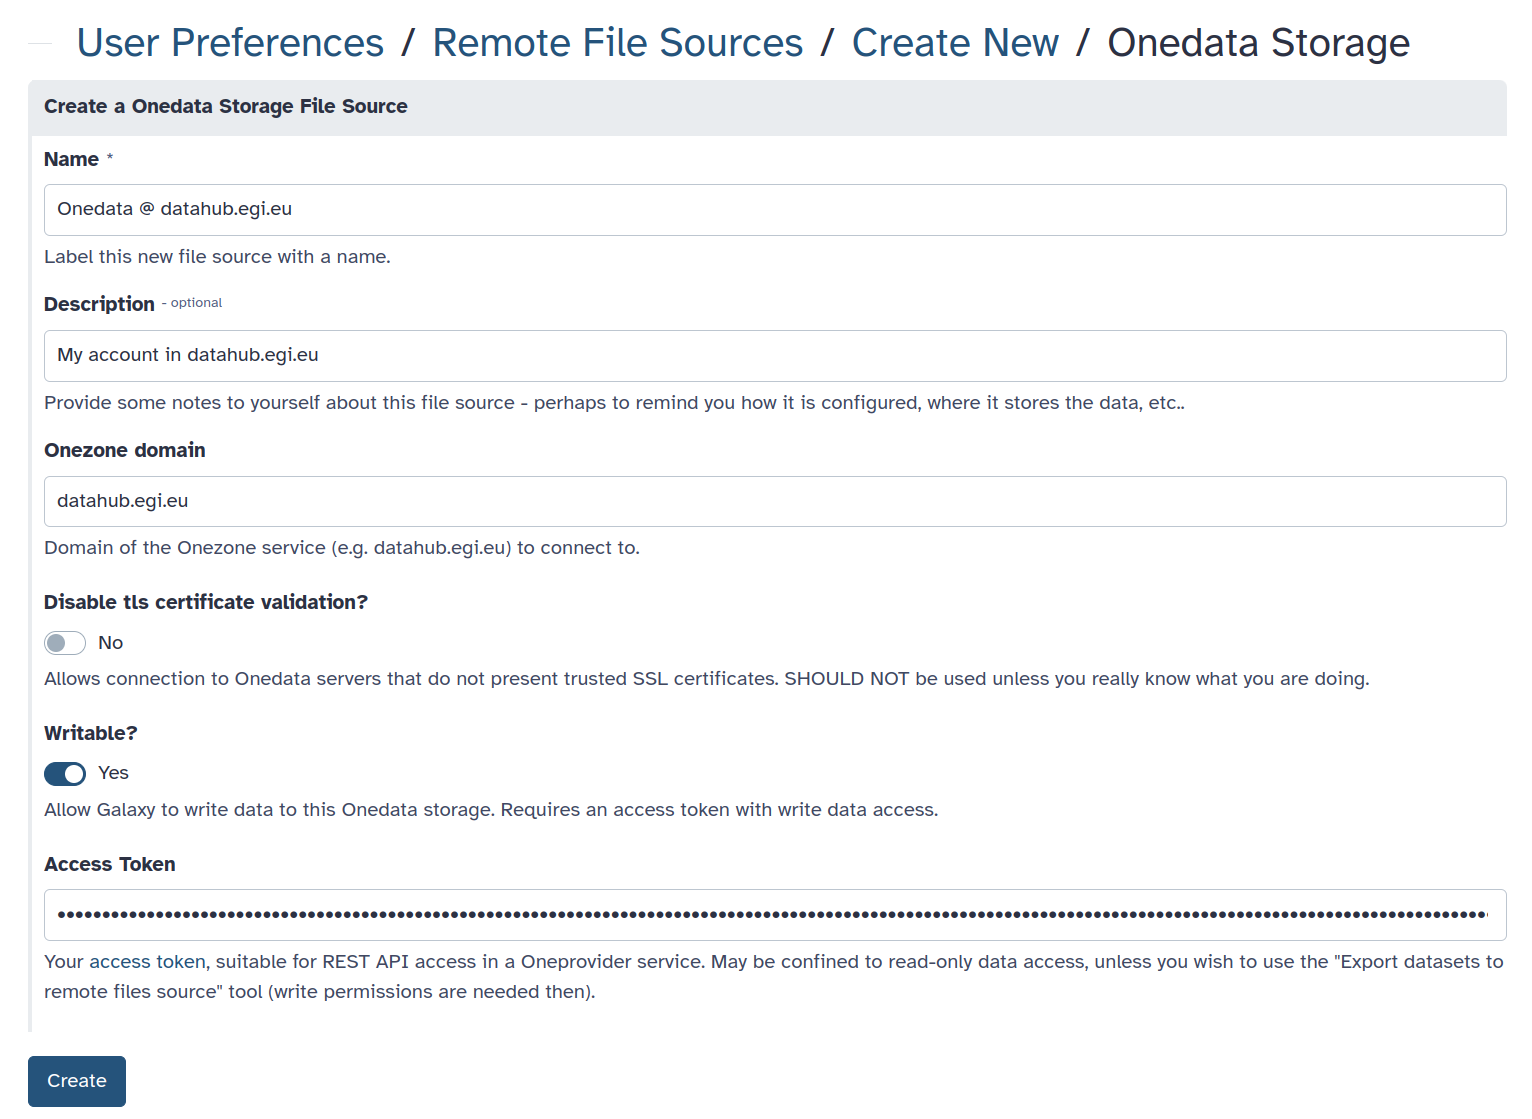
- Click Create and it’s done! You can now use the Onedata remote.
Configure a generic Onedata remote
This option may be viable if it’s not possible to configure your own Onedata Remote File Source, but requires that a generic remote is preconfigured on your Galaxy server.
Follow these steps:
- Log in to your Galaxy account.
- Go to the Manage information section of the Preferences menu.
- Find the section called “Your Onedata account” and fill in the information:
 .
If there is no such section, the Galaxy server is not configured to support it.
Consider contacting its admins.
.
If there is no such section, the Galaxy server is not configured to support it.
Consider contacting its admins. - Done! You can now use the Onedata remote.
Importing (uploading) data
Uploading data to Galaxy from Onedata:
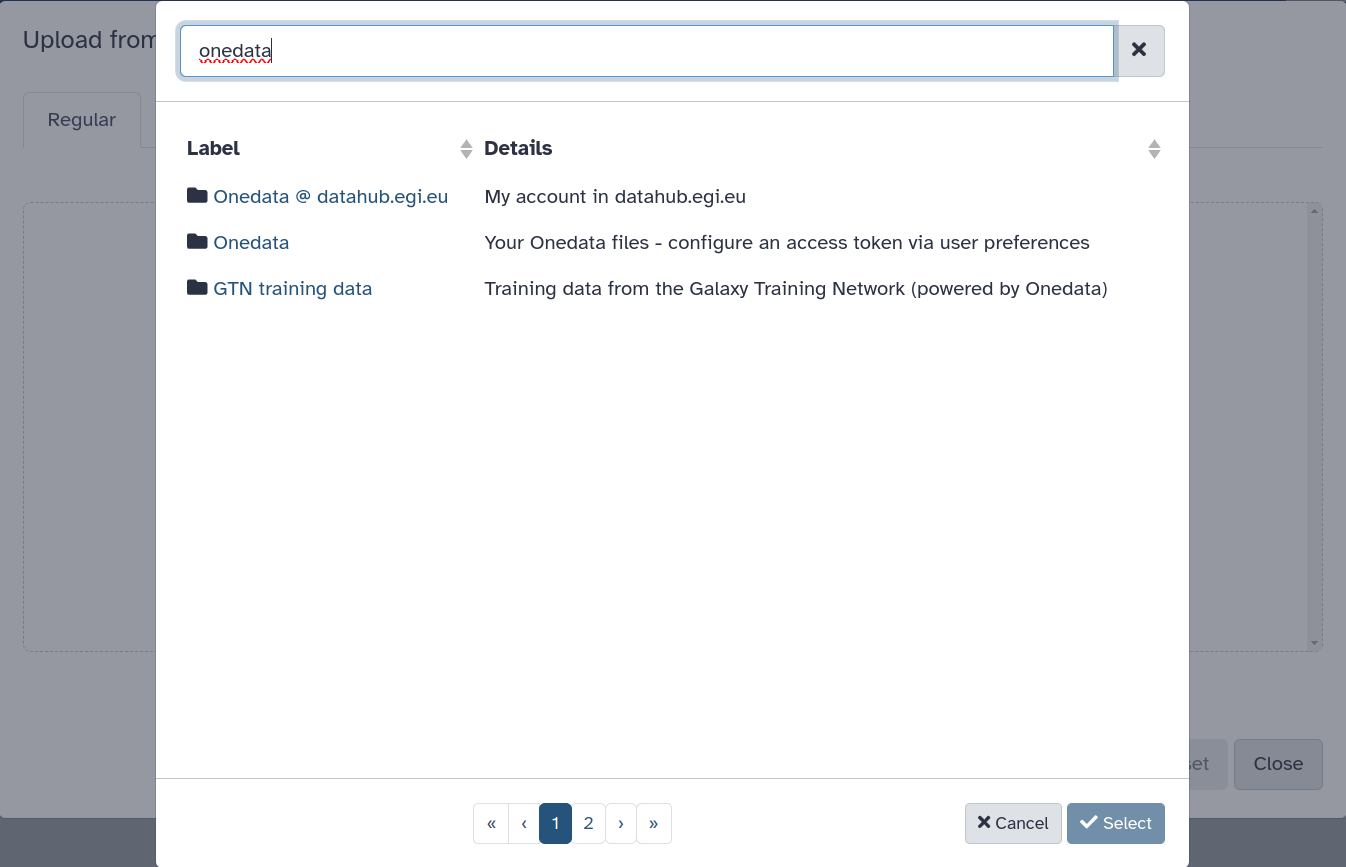
- Navigate to the Upload menu, use the Choose remote files action, and find the
Onedata remote. There may be more than one if you configured it so:
- At the top level of the file browser, you will see all the Onedata Spaces that are
accessible with the access token that was put down in preferences. You can browse
through them and select the files that should be imported to Galaxy.
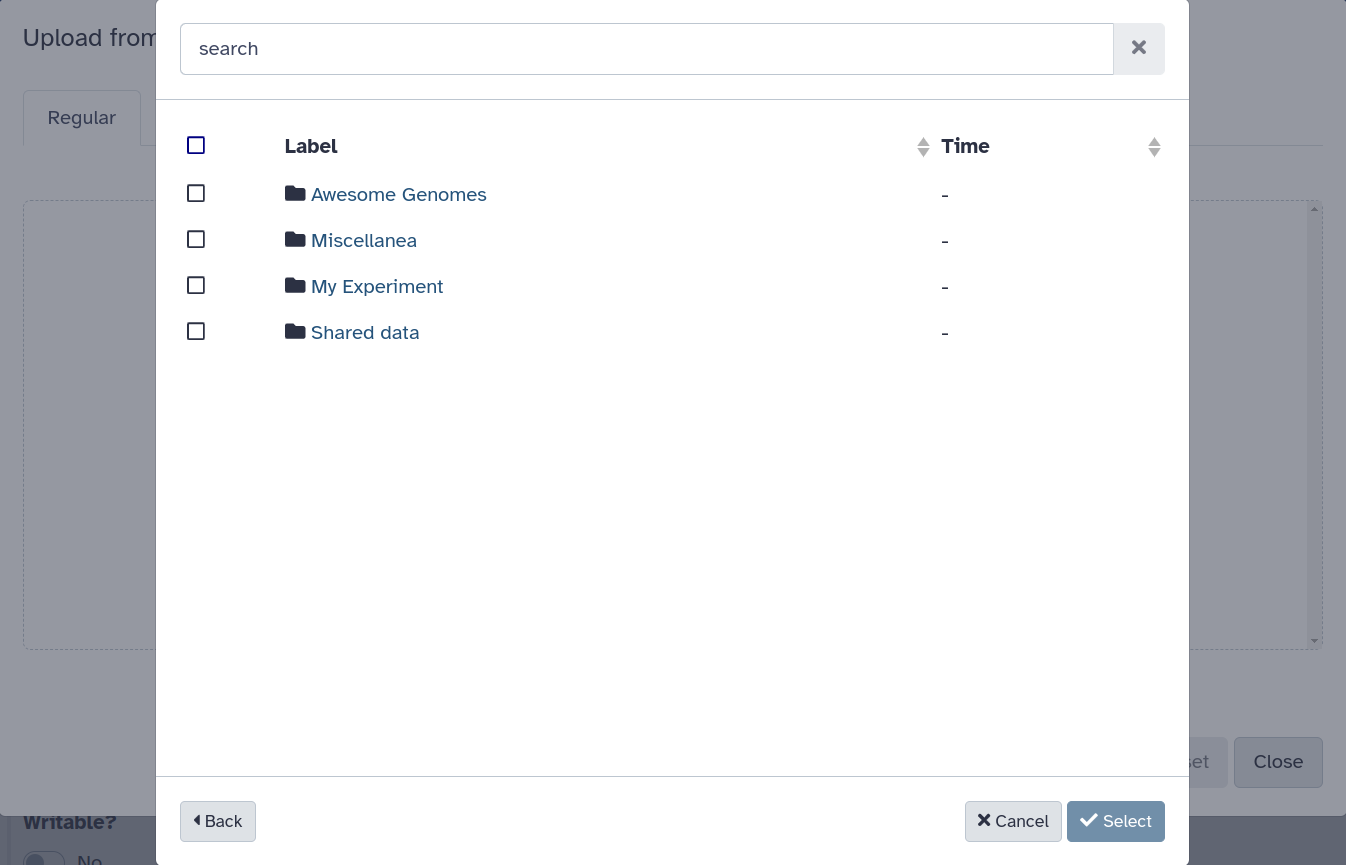
- After selecting the files, confirm with Select.
- In the main upload menu, if you are happy with the queued files, click Start.
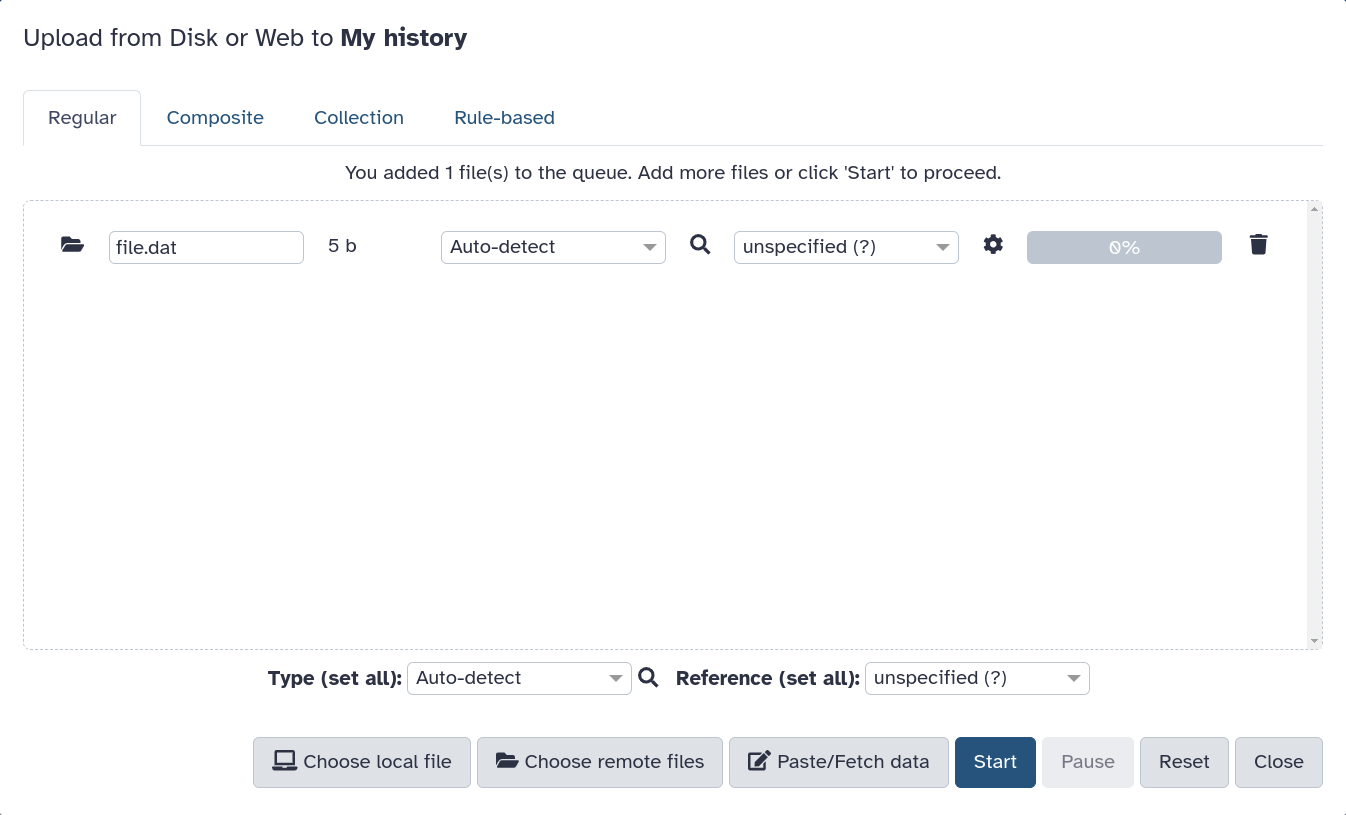
- You may have to wait a bit until your uploads are processed.
Using the preconfigured remotes
You may also use Onedata-based remotes that were predefined by Galaxy admins for public use (if applicable on your Galaxy instance). Note the GTN training data on the screenshot.
Since the GTN training data comes with a public access token, you may also configure it as your own or generic Remote File Source. Use the following credentials:
- Onezone domain:
datahub.egi.eu - Access token:
MDAxY2xvY2F00aW9uIGRhdGFodWIuZWdpLmV1CjAwNmJpZGVudGlmaWVyIDIvbm1kL3Vzci00yNmI4ZTZiMDlkNDdjNGFkN2E3NTU00YzgzOGE3MjgyY2NoNTNhNS9hY3QvMGJiZmY1NWU4NDRiMWJjZGEwNmFlODViM2JmYmRhNjRjaDU00YjYKMDAxNmNpZCBkYXRhLnJlYWRvbmx5CjAwNDljaWQgZGF00YS5wYXRoID00gTHpaa1pUTTROMkl4WmpjMllXVmpOMlU00WWpreU5XWmtNV00ZpT1RKbU1ETXlZMmhoWTJReAowMDJmc2lnbmF00dXJlIIQvnXp01Oey02LnaNwEkFJAyArzhHN8SlXSYFsBbSkqdqCg
This token is read-only, so make sure to mark the remote as not writable.
Troubleshooting
If you experience any problems, take a look at the troubleshooting guide.
Related topics
The Onedata Remote file source can also be used for data export — see the tutorial.
You've Finished the Tutorial
Key points
Onedata can be configured as a data source in two ways - as your own or generic remote source.
Onezone domain and access token are required for Onedata configuration.
Data from Onedata can be easily imported to Galaxy through the remote files selection interface.
Onedata provides access to shared GTN training data.
Frequently Asked Questions
Have questions about this tutorial? Have a look at the available FAQ pages and support channelsFeedback
Did you use this material as an instructor? Feel free to give us feedback on how it went.
Did you use this material as a learner or student? Click the form below to leave feedback.

Citing this Tutorial
- Łukasz Opioła, Bartosz Walkowicz, Importing (uploading) data from Onedata (Galaxy Training Materials). https://training.galaxyproject.org/training-material/topics/galaxy-interface/tutorials/onedata-remote-import/tutorial.html Online; accessed TODAY
- Hiltemann, Saskia, Rasche, Helena et al., 2023 Galaxy Training: A Powerful Framework for Teaching! PLOS Computational Biology 10.1371/journal.pcbi.1010752
- Batut et al., 2018 Community-Driven Data Analysis Training for Biology Cell Systems 10.1016/j.cels.2018.05.012
@misc{galaxy-interface-onedata-remote-import,
author = "Łukasz Opioła and Bartosz Walkowicz",
	title = "Importing (uploading) data from Onedata (Galaxy Training Materials)",
	year = "",
	month = "",
	day = "",
	url = "\url{https://training.galaxyproject.org/training-material/topics/galaxy-interface/tutorials/onedata-remote-import/tutorial.html}",
	note = "[Online; accessed TODAY]"
}
@article{Hiltemann_2023,
	doi = {10.1371/journal.pcbi.1010752},
	url = {https://doi.org/10.1371%2Fjournal.pcbi.1010752},
	year = 2023,
	month = {jan},
	publisher = {Public Library of Science ({PLoS})},
	volume = {19},
	number = {1},
	pages = {e1010752},
	author = {Saskia Hiltemann and Helena Rasche and Simon Gladman and Hans-Rudolf Hotz and Delphine Larivi{\`{e}}re and Daniel Blankenberg and Pratik D. Jagtap and Thomas Wollmann and Anthony Bretaudeau and Nadia Gou{\'{e}} and Timothy J. Griffin and Coline Royaux and Yvan Le Bras and Subina Mehta and Anna Syme and Frederik Coppens and Bert Droesbeke and Nicola Soranzo and Wendi Bacon and Fotis Psomopoulos and Crist{\'{o}}bal Gallardo-Alba and John Davis and Melanie Christine Föll and Matthias Fahrner and Maria A. Doyle and Beatriz Serrano-Solano and Anne Claire Fouilloux and Peter van Heusden and Wolfgang Maier and Dave Clements and Florian Heyl and Björn Grüning and B{\'{e}}r{\'{e}}nice Batut and},
	editor = {Francis Ouellette},
	title = {Galaxy Training: A powerful framework for teaching!},
	journal = {PLoS Comput Biol}
}
Funding
These individuals or organisations provided funding support for the development of this resource
Congratulations on successfully completing this tutorial!