Rule Based Uploader: Advanced
 John Chilton
 Helena Rasche
Overview
question Questionsobjectives Objectives
How to use the rule based uploader to create complex collections
requirements Requirements
Learn even more about the Rule Based Uploader
- Using Galaxy and Managing your Data
- Using dataset collections: tutorial hands-on
- Rule Based Uploader: tutorial hands-on
time Time estimation: 20 minutes
level Level: Advanced level level level
last_modification Last modification: Jun 15, 2020
Introduction
This builds on the previous Rule Based Uploader tutorial to cover even more advanced topics.
comment Audience
This tutorial assumes a basic knowledge of using dataset collections in Galaxy but doesn’t assume any particular knowledge of biology or bioinformatics. If you have not used collections with Galaxy previously, please check out the using dataset collections tutorial.
Agenda
In this tutorial, we will:
Building URLs from Accession Information
In the previous examples the metadata we started with already contained URLs. In some cases such URLs will not be present in the available metadata and may need to be constructed dynamically from identifiers.
For this multiomics example, we will start with a uniprot query and build URLs from accession numbers contained within the supplied tabular data. Consider the uniprot query https://uniprot.org/uniprot/?query=proteome:UP000052092+AND+proteomecomponent:”Genome”, pictured below.
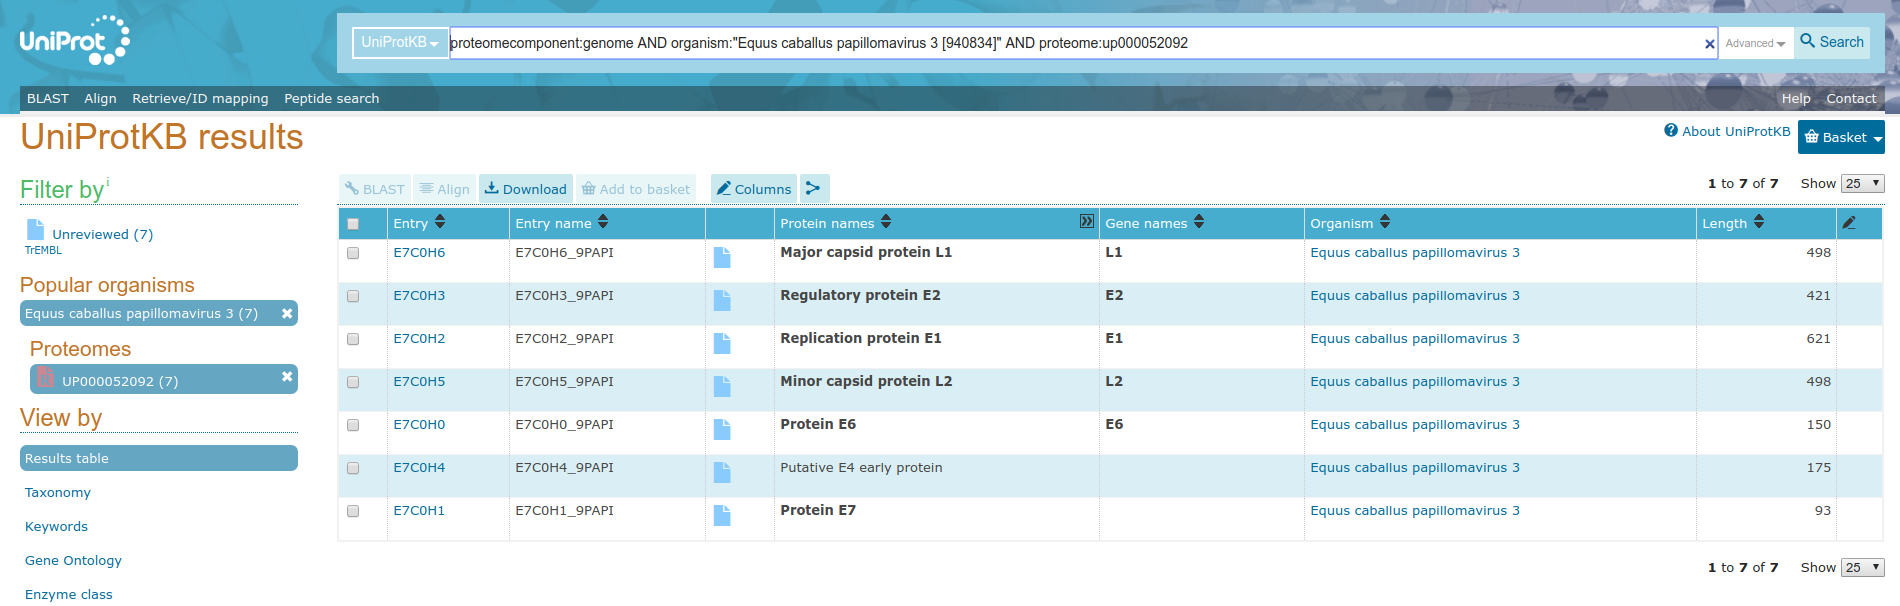
In order to make this data useful for the Rule Builder, we need to turn these accessoin IDs into URLs.
hands_on Hands-on: Turn Uniprot Accession IDs into URLs
- Open Uniprot
- Click on one of the entries in the table (e.g.
E7C0H6)- Select
Formatfrom the top menuClick
FASTA (canonical)
Your browser will redirect to the fasta file
- We can deduce that the FASTA files for the other accession IDs will be available from URLs of the form
https://www.uniprot.org/uniprot/{identifier}.fasta


We will use this information to build a collection of FASTA files from our query.
hands_on Hands-on: Build Collection from Uniprot Accession IDs
- Open the Rule Builder
- “Upload data as”:
Collection(s)- “Load tabular data from”:
Pasted TablePaste the following table:
Entry Entry name Status Protein names Gene names Organism Length E7C0H6 E7C0H6_9PAPI unreviewed Major capsid protein L1 L1 Equus caballus papillomavirus 3 498 E7C0H0 E7C0H0_9PAPI unreviewed Protein E6 E6 Equus caballus papillomavirus 3 150 E7C0H5 E7C0H5_9PAPI unreviewed Minor capsid protein L2 L2 Equus caballus papillomavirus 3 498 E7C0H1 E7C0H1_9PAPI unreviewed Protein E7 Equus caballus papillomavirus 3 93 E7C0H3 E7C0H3_9PAPI unreviewed Regulatory protein E2 E2 Equus caballus papillomavirus 3 421 E7C0H4 E7C0H4_9PAPI unreviewed Putative E4 early protein (Fragment) Equus caballus papillomavirus 3 175 E7C0H2 E7C0H2_9PAPI unreviewed Replication protein E1 (EC 3.6.4.12) (ATP-dependent helicase E1) E1 Equus caballus papillomavirus 3 621- Click
Build- Let’s apply some initial filtering to our data:
- From Filter menu, select
First or Last N Rows
- Filter the first row
- From Rules menu, select
Remove Columns
- Remove columns B, C, E, F, and G.
- From Rules menu, select
Add / Modify Column Definitions
Click
Add Definition,Info, ColumnBThis is a block of text that will appear in the history panel when the dataset is expanded.
These datasets appear in a seemingly random order, it will be easier to manage things in the history panel if we sort this data first.
- From Rules menu, select
Sort
- “From Column”:
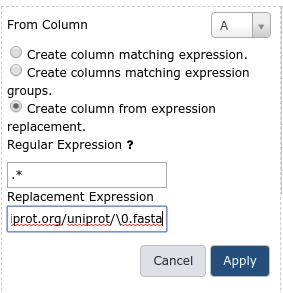
ANext is the key step, we will build a URL from the pattern we described above using the accession ID in column A.
- From Column menu, select
Using a Regular Expression
- “From Column”:
A- Select
Create column from expression replacement- “Regular Expression”:
.*- “Replacement Expression”:
https://www.uniprot.org/uniprot/\0.fastaClick
Apply
comment Regular expression explained
In this regular expression,
.*will capture the entire accession ID.In the replacement expression,
https://www.uniprot.org/uniprot/\0.fasta, the\0will be replaced by the captured regular expression (the accession ID) in the resulting column values.The new column C with the URL we built should appear as shown below.
Finally, let us set our column definitions:
- From Rules menu, select
Add / Modify Column Definitions
Add Definition,List Identifier(s), Select ColumnAAdd Definition,URL, ColumnC- Finalize the collection:
- “Name”: for example
UP000052092- “Type”:
fasta- Click
Uploadcomment JSON Rule Definitions
This example is ready to go, but before clicking “Build” it may be interesting to check out the rules Galaxy is following to clean and import your data. Click the little Wrench icon at the top of the list of rules. The result is a bunch of JavaScript object notation (JSON) text that you should never need to worry about but that you can build or modify by hand if you find it useful. We will use it the next example to quickly restore the list builder back to this state.
This could additionally be copied and pasted if you need to do the same set of operations on multiple metadata inputs that are similarly formatted.
- Click
Buildand wait for your list of FASTA files to appear.


Building Matched Collections
This example will demonstrate creating multiple collections at the same time. We will use the same metadata generated from UniProt as the last example but we will build two collections with matching list identifiers - one collection of FASTA files and one collection of GFF files. This will also demonstrate reading the collection name and the target datatype from the metadata itself - important techniques if generating multiple collections with different names and datatypes.
For this example we will re-use the metadata from the previous example.
hands_on Hands-on: Build a matched collection
- Open the Rule Builder
- “Upload data as”:
Collection(s)- “Load tabular data from”:
Pasted Table- Paste the table from the previous exercise:
Entry Entry name Status Protein names Gene names Organism Length E7C0H6 E7C0H6_9PAPI unreviewed Major capsid protein L1 L1 Equus caballus papillomavirus 3 498 E7C0H0 E7C0H0_9PAPI unreviewed Protein E6 E6 Equus caballus papillomavirus 3 150 E7C0H5 E7C0H5_9PAPI unreviewed Minor capsid protein L2 L2 Equus caballus papillomavirus 3 498 E7C0H1 E7C0H1_9PAPI unreviewed Protein E7 Equus caballus papillomavirus 3 93 E7C0H3 E7C0H3_9PAPI unreviewed Regulatory protein E2 E2 Equus caballus papillomavirus 3 421 E7C0H4 E7C0H4_9PAPI unreviewed Putative E4 early protein (Fragment) Equus caballus papillomavirus 3 175 E7C0H2 E7C0H2_9PAPI unreviewed Replication protein E1 (EC 3.6.4.12) (ATP-dependent helicase E1) E1 Equus caballus papillomavirus 3 621- Click
Buildand proceed to the rule builder.Instead of manually creating the rules this time, we will import an existing set of rules from some JSON. Copy the following text into your clipboard. These are the same rules as used in the Building URLs from Accession Information tutorial.
{"rules":[{"type":"add_filter_count","count":"1","which":"first","invert":false},{"type":"remove_columns","target_columns":[1,2,4,5,6]},{"type":"sort","target_column":0,"numeric":false},{"type":"add_column_regex","target_column":0,"expression":".*","replacement":"http://www.uniprot.org/uniprot/\\0.fasta"}],"mapping":[{"type":"info","columns":[1]},{"type":"list_identifiers","columns":[0],"editing":false},{"type":"url","columns":[2]}],"extension":"csfasta"}- In the ruler builder interface, select the wrench icon next to the word
Rules
- Paste the rules into the textbox
- Click
Apply
You should now see the rules you created in the last example.
This next part may seem a bit silly at first but we are going to add some columns with fixed values into the builder. When we split up the columns at a later step this will make sense.
- From Column menu, select
Fixed Value
- “Value”:
fasta- Click
ApplyThis value will eventually be used for the datatype of the file.- Repeat this process with:
- “Value”:
UP000052092 FASTANext we will repeat the process of adding URL, name, and datatype columns but for GFF files.
- From Column, select
Using a Regular Expression
- “From Column”:
A- Select
Create column from expression replacement- “Regular Expression”:
.*- “Replacement Expression”:
https://www.uniprot.org/uniprot/\0.gff.Next we will add two more columns
- From Column menu, select
Fixed Value
- “Value”:
gff3- Click
ApplyThis value will eventually be used for the datatype of the file.
- Repeat this process with:
- “Value”:
UP000052092 GFF3Your very large list of rules should now look like the following screenshot.
Notice we have two URLs, two collection names, and two datatype extensions for each accession ID we started with. Like in the example where we split the columns, here we will split these up to describe multiple collections.
- From Rules menu, select
Split Columns
- “Odd Number Column(s)”:
C,D, andE(the fasta columns)- “Even Number Column(s)”:
F,G, andH(the gff3 columns)This will take the row consisting of the columns
ABCDEFGHand build two rows, one withABCDEFand the other withABFGHClick
Applyand you should be returned the list of rules.Finally, we need to add some more column definitions for these new columns we just created:
- From Rules menu, select
Add / Modify Column Definitions
Add Definition,List Identifier, ColumnAAdd Definition,Info, ColumnBAdd Definition,URL, ColumnCAdd Definition,Type, ColumnDAdd Definition,Collection Name, ColumnENotice when these values are being generated from the metadata the option to specify them manually from the type and collection name boxes from the bottom of the form disappear.
Click
UploadGalaxy should make two collections - one containing FASTA files and one containing GFF3 files.


Building Nested Lists
In this example, we will be building a nested list using data from SRA. This is a more sophisticated structure for organizing datasets in Galaxy. In the above examples we organized datasets into simple lists with a single “list identifier” describing the files in the collection. Galaxy allows lists to be organized into nested lists - where each level of the list has an identifier.
If two such identifiers are present, this is a list of lists (called list:list in the workflow editor). In such a structure the outer identifiers (or first level of identifiers) may describe sample names and the inner identifiers (or second level) may describe replicates. Alternative the outer identifiers may describe conditions and the inner identifiers may describe individual samples. The structure of such collections should ideally be dictated by the study design.
If certain parts of your analysis require benefit from datasets being nested this way while other parts require feeding you data to a Galaxy tool all together without such a structure, then it is probably best to go ahead and build nested lists at the start of your analysis and then use the “Flatten Collection” tool on the resulting collection or a derivative collection to get the flat structure needed by certain tools in certain parts of your analysis.
For this example, we will describe analyzing the metadata of the SRA project PRJNA355367. Unlike the other examples, these SRA files are relatively large and not ideal for training purposes. So we’ve pre-downloaded the project metadata and replaced all the links with simple text files that should download really quickly - the result is here.
So use either the SRA exporter tool or download the CSV file with fake URLs. If you download the data from the SRA exporter tool, select only the first 12 columns from the data (up to the column labeled “Library Name”) and copy the resulting data to your clipboard.
hands_on Hands-on: Building Nested Lists
- Open the Rule Builder
- “Upload data as”:
Collection(s)- “Load tabular data from”:
Pasted Table- Paste the table
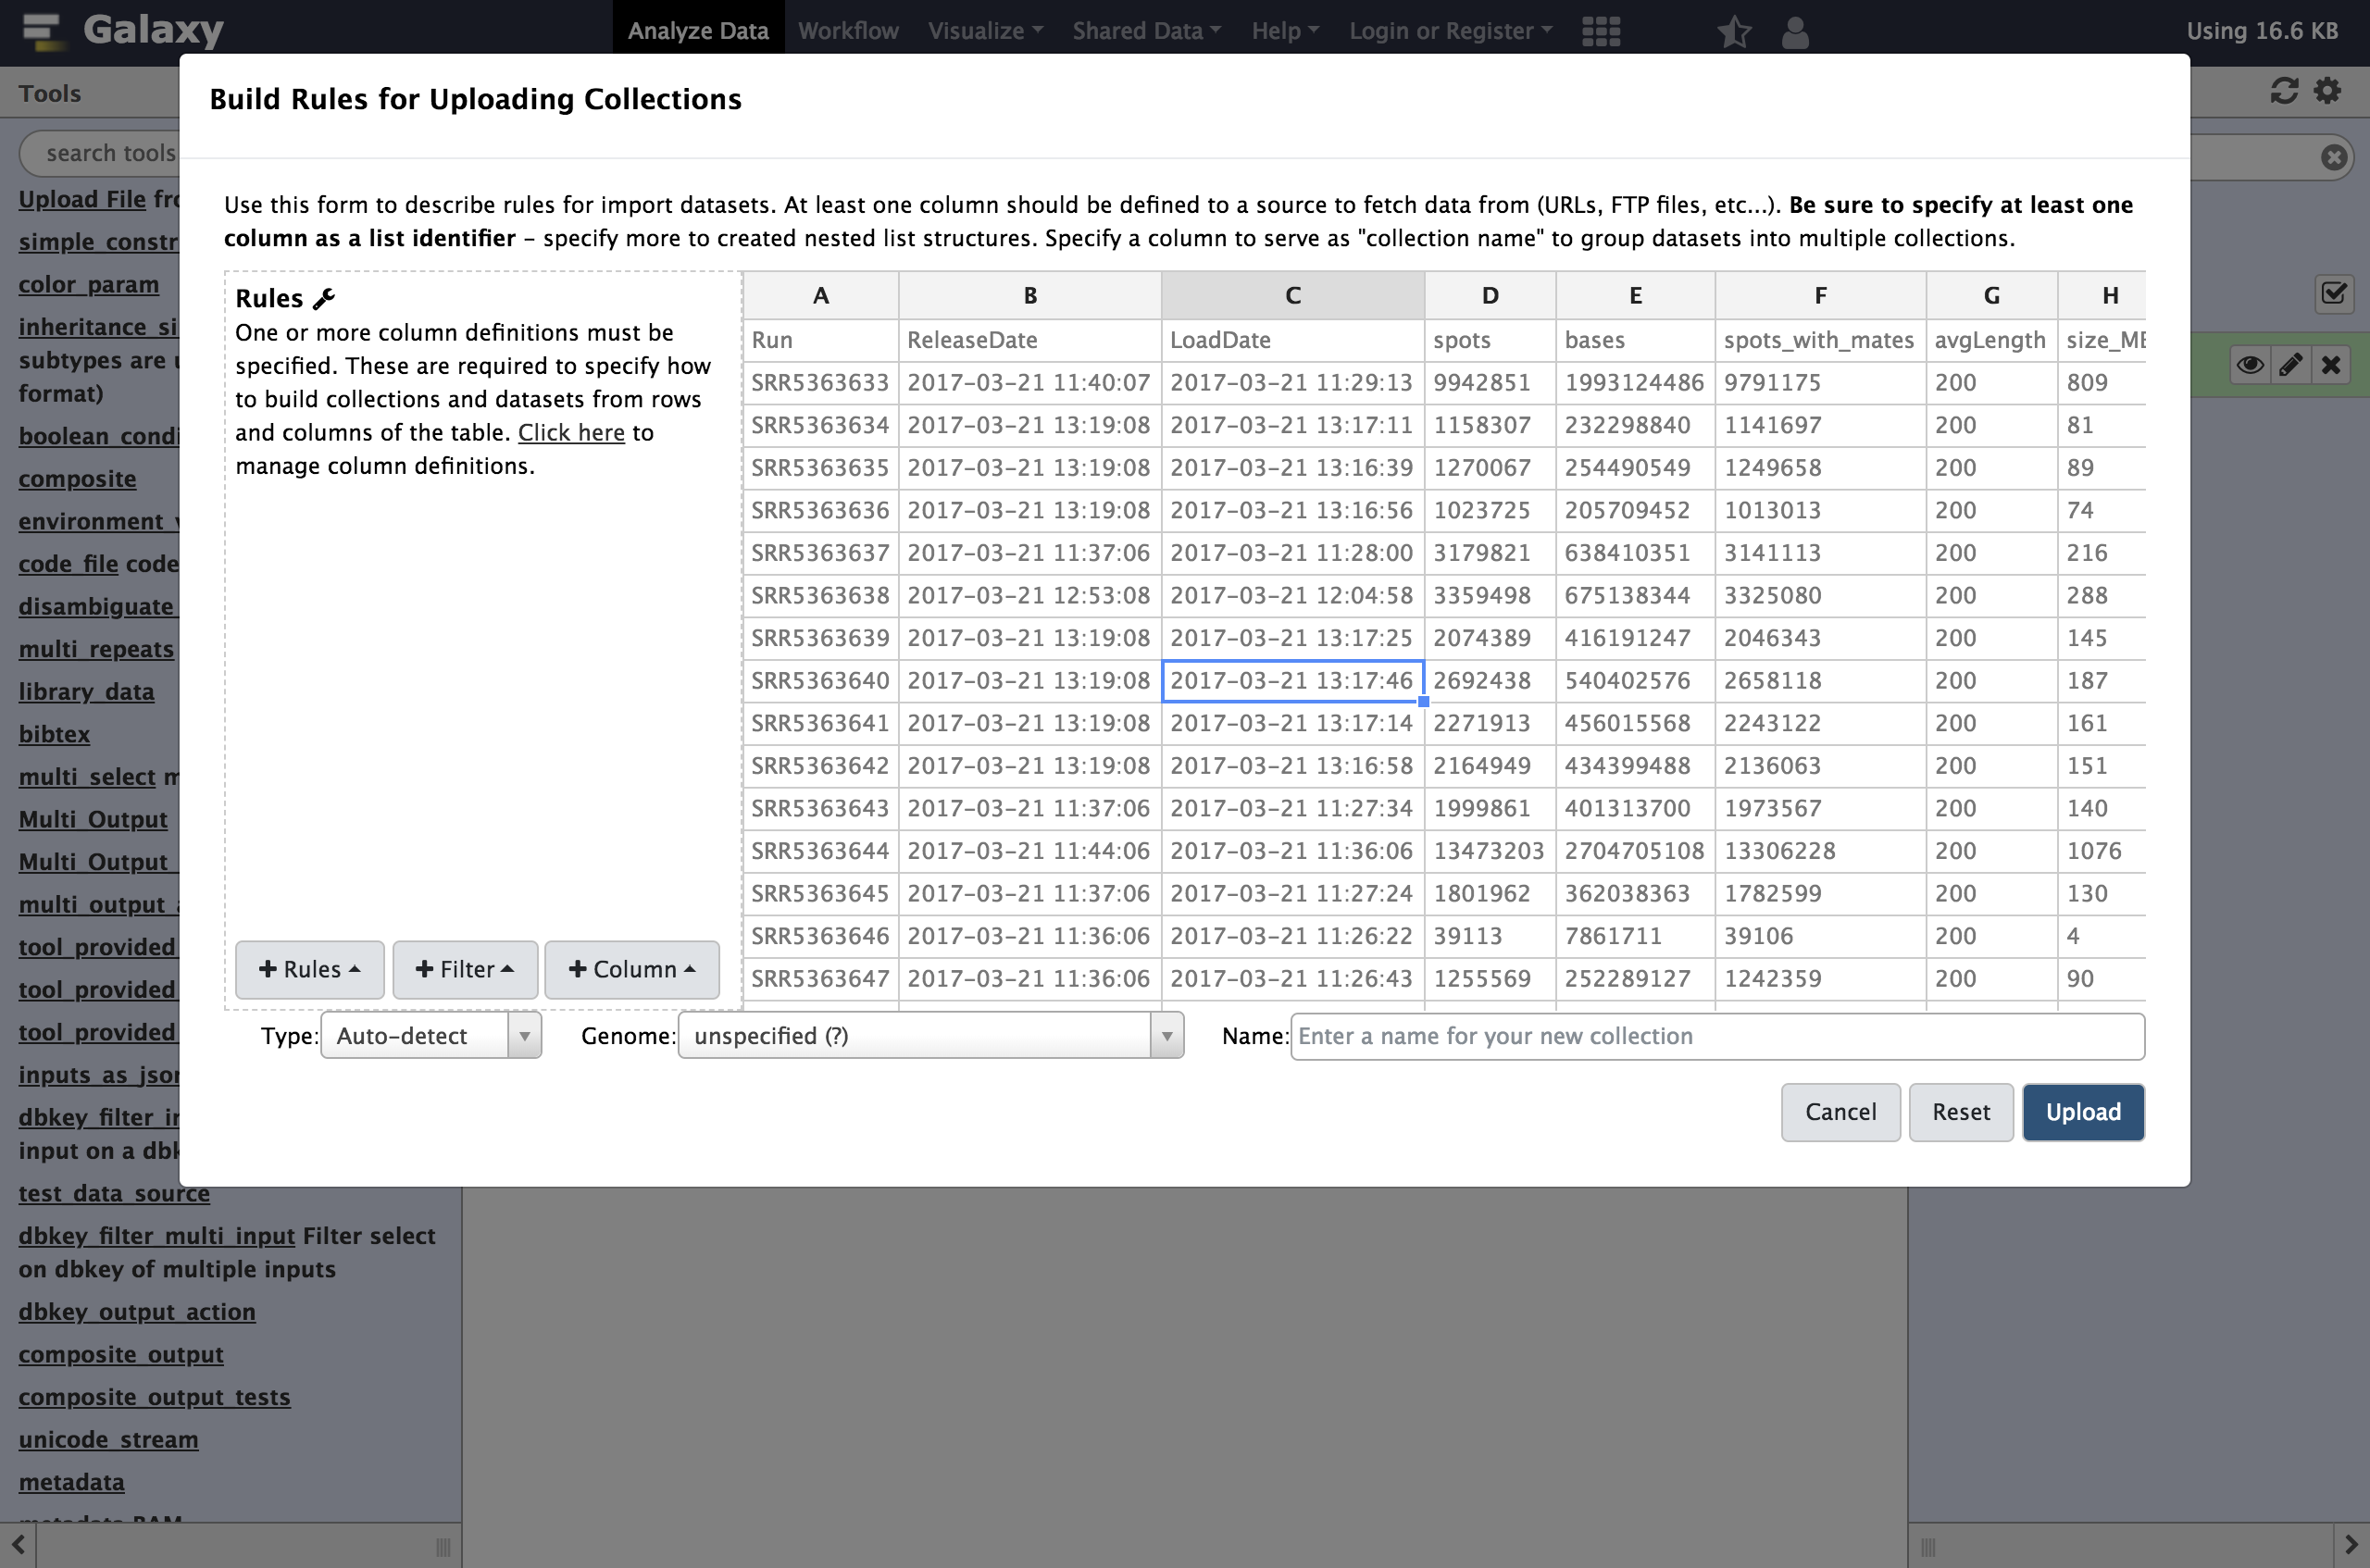
solution Show Table
The resulting table should look something like the following:
Navigate to the end of the table and notice that column J is the URL target we are hoping to download for each file.
- As in the previous exercises, please:
- Set this
Column definitionfor the URL targetStrip the header row
solution Solution
For the analysis we wish to do, we want to group these files based on the type indicated in column
L(LibraryName) shown below. The source data though adds numbers to the library type to to generate theLibraryName, we need to strip those out to use the type as an identifier for grouping the datasets. To do this, use the regex column adder rule again.- From Column menu, select
Using a Regular Expression
- “From Column”:
L- Select
Create column from regular expression groups- “Regular Expression”:
([^\d]+)\d+.- “Number of Groups”:
1The result looks like:
comment Regular expression explained
In this regular expression,
\dmeans any digit, so[^...]means match anything that is not inside the brackets. So together[^\d]+means match one or more, non digits at the start of the column and the()around that means capture them into a group. We’ve add\d+at the end of the expression but it isn’t grouped so we are effectively ignoring the digits at the end as we had hoped.Now we have two columns we need to assign list identifiers for, the new column
Mfor the first, outer identifier and the first columnAfor the inner, second identifier.- From Rules menu, select
Add / Modify Column Definitions
Add Definition,List Identifier(s), ColumnM- Click on
... Assign Another ColumnSelect column
Acomment Re-ordering columns
If you make a mistake in the order you select columns in you can simple use the up and down arrows to re-arrange the list
The result should look something like this:
Click
Applyto return to the rule preview screen and notice there are two column listed for the list identifier definition- Finalize your collection:
- “Type”:
txt- Name your Collection
- Click
UploadNote: set “Type” to
sraif you used real data from SRA instead of the table from exercise.


Apply Rules to Existing Collections
To start this example, we will first upload a simple, flat collection of data. The data files we will use will be the same as those used by the DESeq2 Vignette from the Pasilla Bioconductor Package.
hands_on Hands-on: Applying Rules to Existing Collections
- Open the Rule Builder
- “Upload data as”:
Collection(s)- “Load tabular data from”:
Pasted Table- Paste the following table:
https://raw.githubusercontent.com/jmchilton/galaxy/apply_rules_tutorials/test-data/rules/treated1fb.txt treated_single_1
https://raw.githubusercontent.com/jmchilton/galaxy/apply_rules_tutorials/test-data/rules/treated2fb.txt treated_paired_2
https://raw.githubusercontent.com/jmchilton/galaxy/apply_rules_tutorials/test-data/rules/treated3fb.txt treated_paired_3
https://raw.githubusercontent.com/jmchilton/galaxy/apply_rules_tutorials/test-data/rules/untreated1fb.txt untreated_single_4
https://raw.githubusercontent.com/jmchilton/galaxy/apply_rules_tutorials/test-data/rules/untreated2fb.txt untreated_single_5
https://raw.githubusercontent.com/jmchilton/galaxy/apply_rules_tutorials/test-data/rules/untreated3fb.txt untreated_paired_6
https://raw.githubusercontent.com/jmchilton/galaxy/apply_rules_tutorials/test-data/rules/untreated4fb.txt untreated_paired_7
Next, we set up the column types:
- From Rules menu, select
Add / Modify Column Definitions
Add Definition,URL, columnAAdd Definition,List Identifier(s), columnB- Finalize the collection:
- “Type”:
txt- Give the collection a name.
- Click
BuildThe first thing we will do to this new collection is add some levels or depth to its structure. Lets assume we want to group it into “treated” and “untreated” lists and “paired” and “single” sublists below that. We can do this with the
Apply Rulescollection operation tool, which will likely be under theCollection Operationstool menu in your Galaxy interface.Open the Apply Rule to Collection tool
The very simple interface should look something like this:
This interface simply lets one pick a collection to operate on and then launch the rule builder window to work to describe and preview manipulating the metadata of that collection.
- Apply Rule to Collection tool with the following parameters:
- “Input Collection”: the collection we just uploaded
- Click the
EditbuttonWhen a flat collection is used with this tool, the rule builder will initialize a default rule to pull the list identifier out for each item of the collection as shown above. Next we will use regular expressions to build two new columns, these columns will group the datasets into “treated” and “untreated” sublists and then “single” and “paired” sublists of that. This rule is found under the
Columnmenu.We’ll transform column A into some more useful columns
- From Column, select
Using a Regular Expression
- “Column”:
A- Select
Create columns matching expression groups- “Regular Expression”:
(.*)_(.*)_.*- “Number of Groups”:
2comment Regular expression explained
Here
.*means match any number of any character - so basically match anything. The parentheses around.*means form a “group” from whatever is matched. The_describes the literal_values in the identifier we are matching. The result is that everything before the first_will be matched as the first group and everything between the_characters will be matched as the second group. Click to apply this rule and two new columns should be created.We have defined two matching groups (the
(.*)in the regex), so the number of groups is set to2- From Rules, select
Add / Modify Column Definitions
Add Definition,List Identifier(s), ColumnBAssign another column, columnCAssign another column, columnA- Click
Save
The resulting collection should have two new levels of depth for “untreated” vs “treated” and “paired” vs “single” as shown below:
Placing the “single” and “paired” sublists inside the “treated” and “untreated” lists was a bit arbitrary and depending on the workflow these may need to be inverted at different parts of an analysis. The Apply Rules tool can be used to invert these levels if that is needed.
- Apply Rule to Collection tool with the following parameters:
- “Input Collection”: the new nested list we created in the previous step
- Click “Edit”.
Notice when loading a nested collection into the rule builder, there is a column for each layer of the list for each element. One can pretty easily invert the outer two layers of the list by simply assigning the list identifiers in a new order. So select to assign “List Identifiers” and this time assign them to columns “B”, “A”, and “C” - in that order.
- From Rules, select
Add / Modify Column Definitions
Add Definition,List Identifier(s), ColumnBAssign another column, ColumnAAssign another column, ColumnC- Click
Save
The resulting collection should be inverted.
In addition to structural re-organizations of a collection, the Apply Rules tool can be used to filter elements out of the collection.
- Apply Rule to Collection tool with the following parameters:
- “Input Collection”: the original flat list created
- Click
Edit- From Filter menu, select
From a regular expression
- “From Column”:
A- “Regular Expression”:
.*_single_.*- From Rules menu, select
Add / Modify Column Definitions
Add Definition,List Identifier(s), ColumnA
The resulting collection should be a filtered version of the original list.
Structural re-organizations of collections can also be combined with filtering. To demonstrate this, reopen the original flat list created for this example again in the rule builder of the Apply Rules tool. Use the same regular expression as last time to filter the result but also add a column for “treated” and “untreated” list identifiers.
- Apply Rule to Collection tool with the following parameters:
- From Filter menu, select
Using a Regular Expression
- “From Column”:
A- “Regular Expression”:
.*_single_.*- From Column menu, select
Using a Regular Expression
- “From Column”:
A- Select
Create column from regular expression groups- “Regular Expression”:
(.*)_single_.*- “Number of Groups”:
1- From Rules menu, select
Add / Modify Column Definitions
Add Definition,List Identifier(s). ColumnBAssign another column, ColumnA
The resulting collection should be a filtered to only include the “single” data and broken into “treated” and “untreated” sublists.


Feedback
Did you use this material as an instructor? Feel free to give us feedback on how it went.

Citing this Tutorial
- John Chilton, Helena Rasche, 2020 Rule Based Uploader: Advanced (Galaxy Training Materials). /archive/2021-02-01/topics/galaxy-interface/tutorials/upload-rules-advanced/tutorial.html Online; accessed Wed Mar 26 2025
- Batut et al., 2018 Community-Driven Data Analysis Training for Biology Cell Systems 10.1016/j.cels.2018.05.012
details BibTeX